3D Xperience
A 3D Xperience is an object-based interaction, exploring a 3D object. In the 3D Xperience you can access media content, and learning activities used for self-evaluation.
Start Xperience
You can start a 3D Xperience to explore in Play mode from the Xperience page:
Select Start Xperience to view and explore the EON-XR Xperience
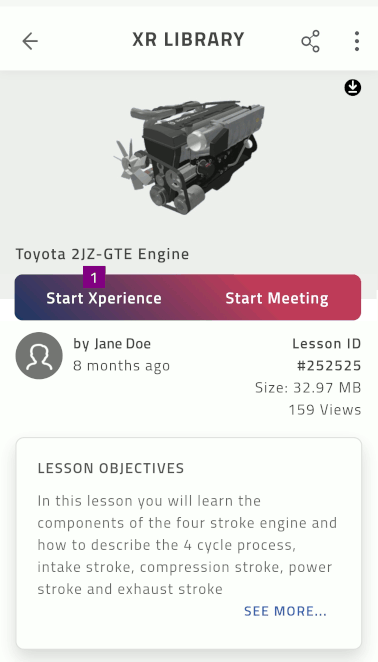
The selected 3D Xperience starts in play mode
Select X to exit the Xperience

Play mode
In play mode you can access different tools and menus to explore the Xperience:
Select the exploration tools to interact with the object(s) and view annotations
Current hierarchy location indicated by object name and part name
Select
 to navigate to the start position of the current hierarchy
Select
 to access additional options in the experience menu
Select the AR tools to view in 1:1 scale, change object position, or use the interact tool
Select
 to access learning activities and self-evaluation in the activity menu
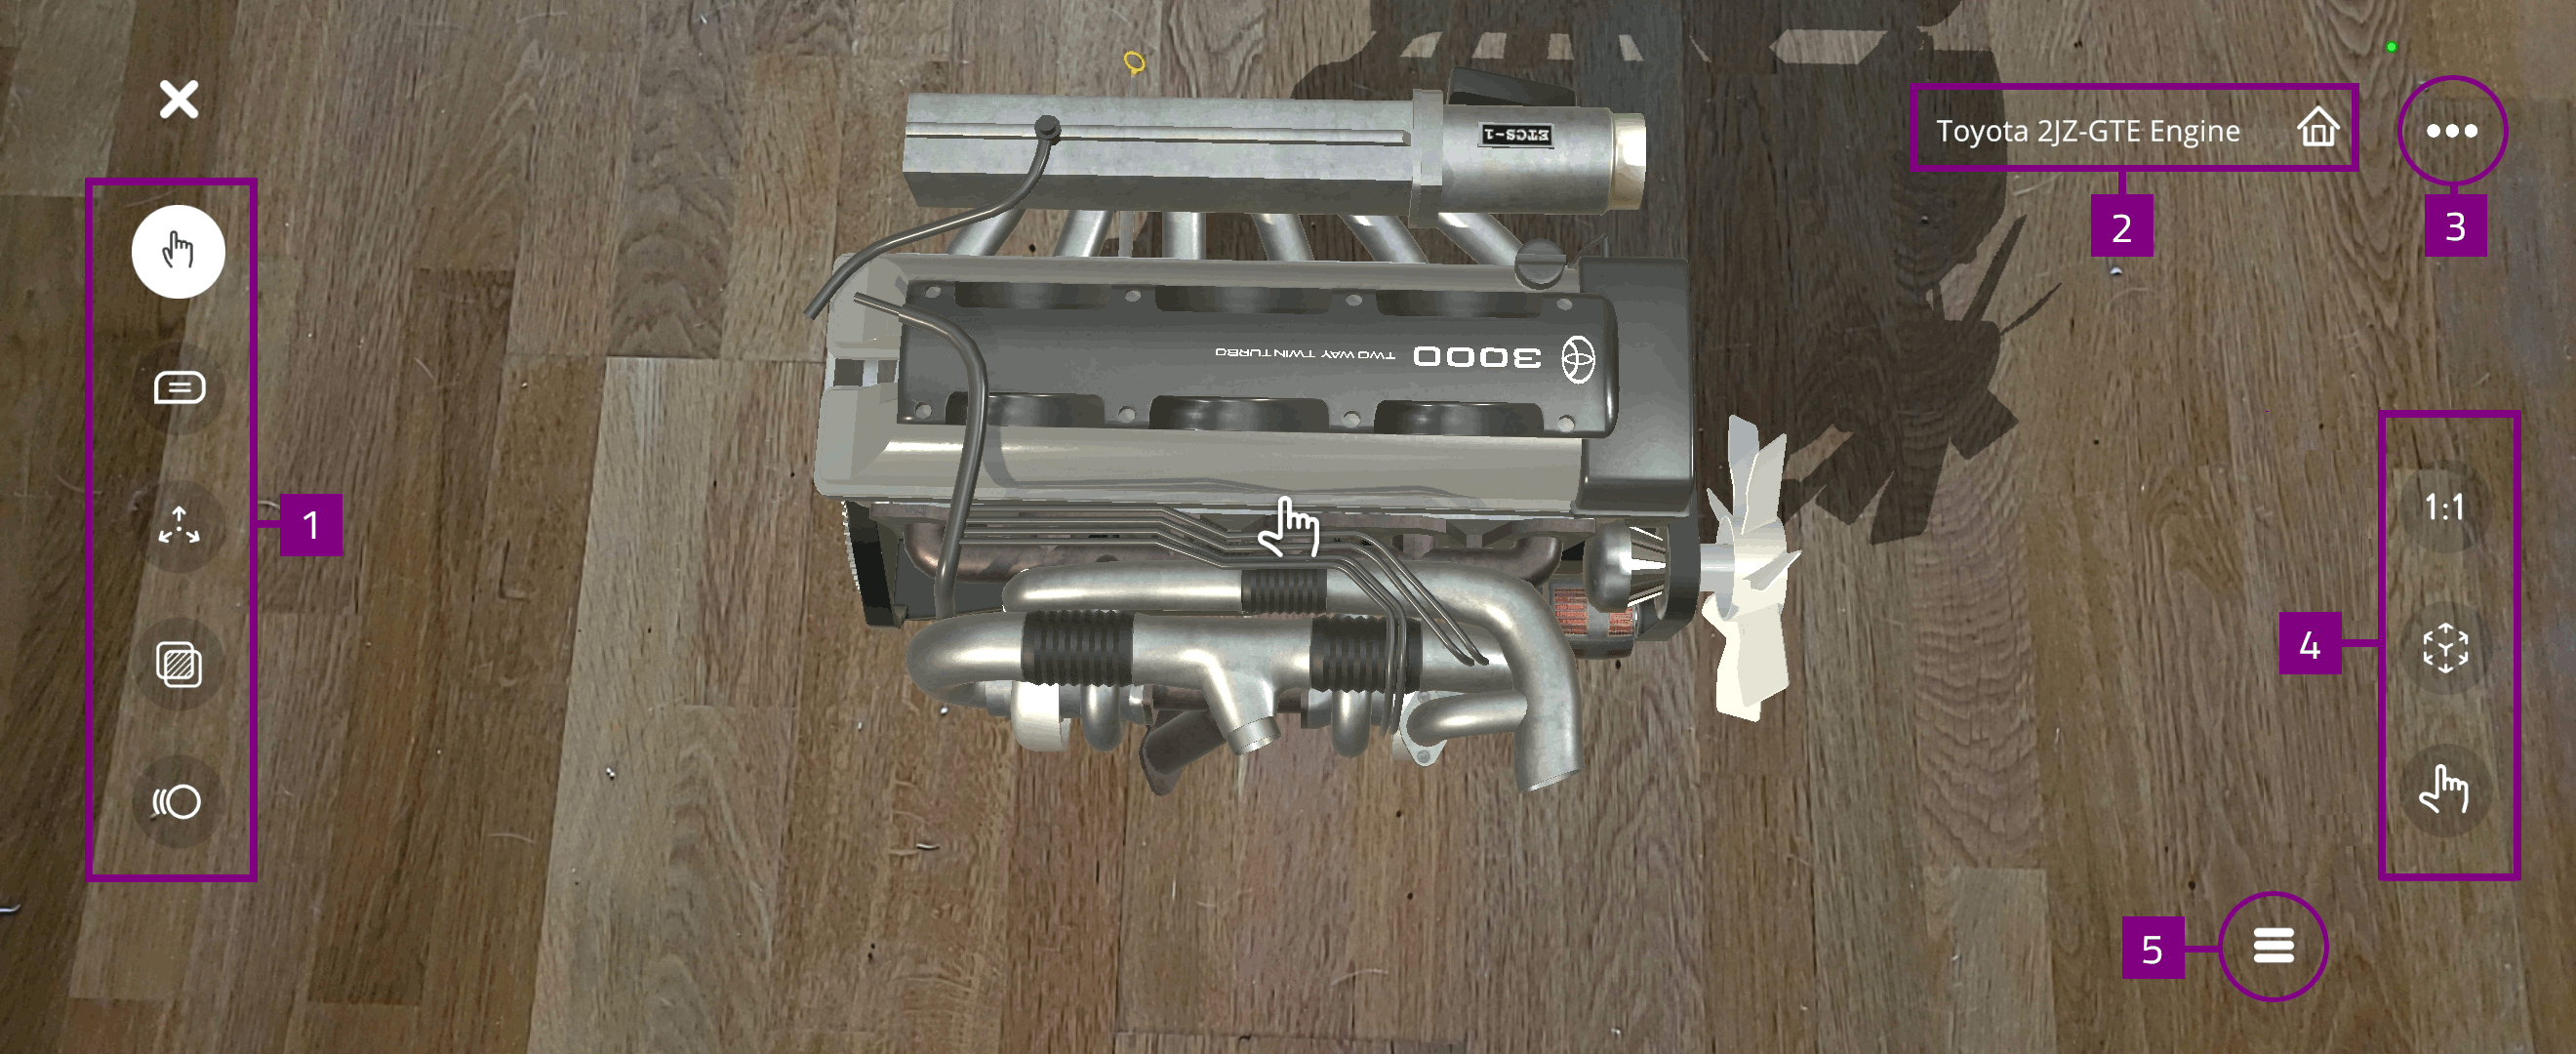
Use multitouch gestures to interact with the 3D object

Introduction video
You can view this video for an introduction to EON-XR 3D Xperiences:
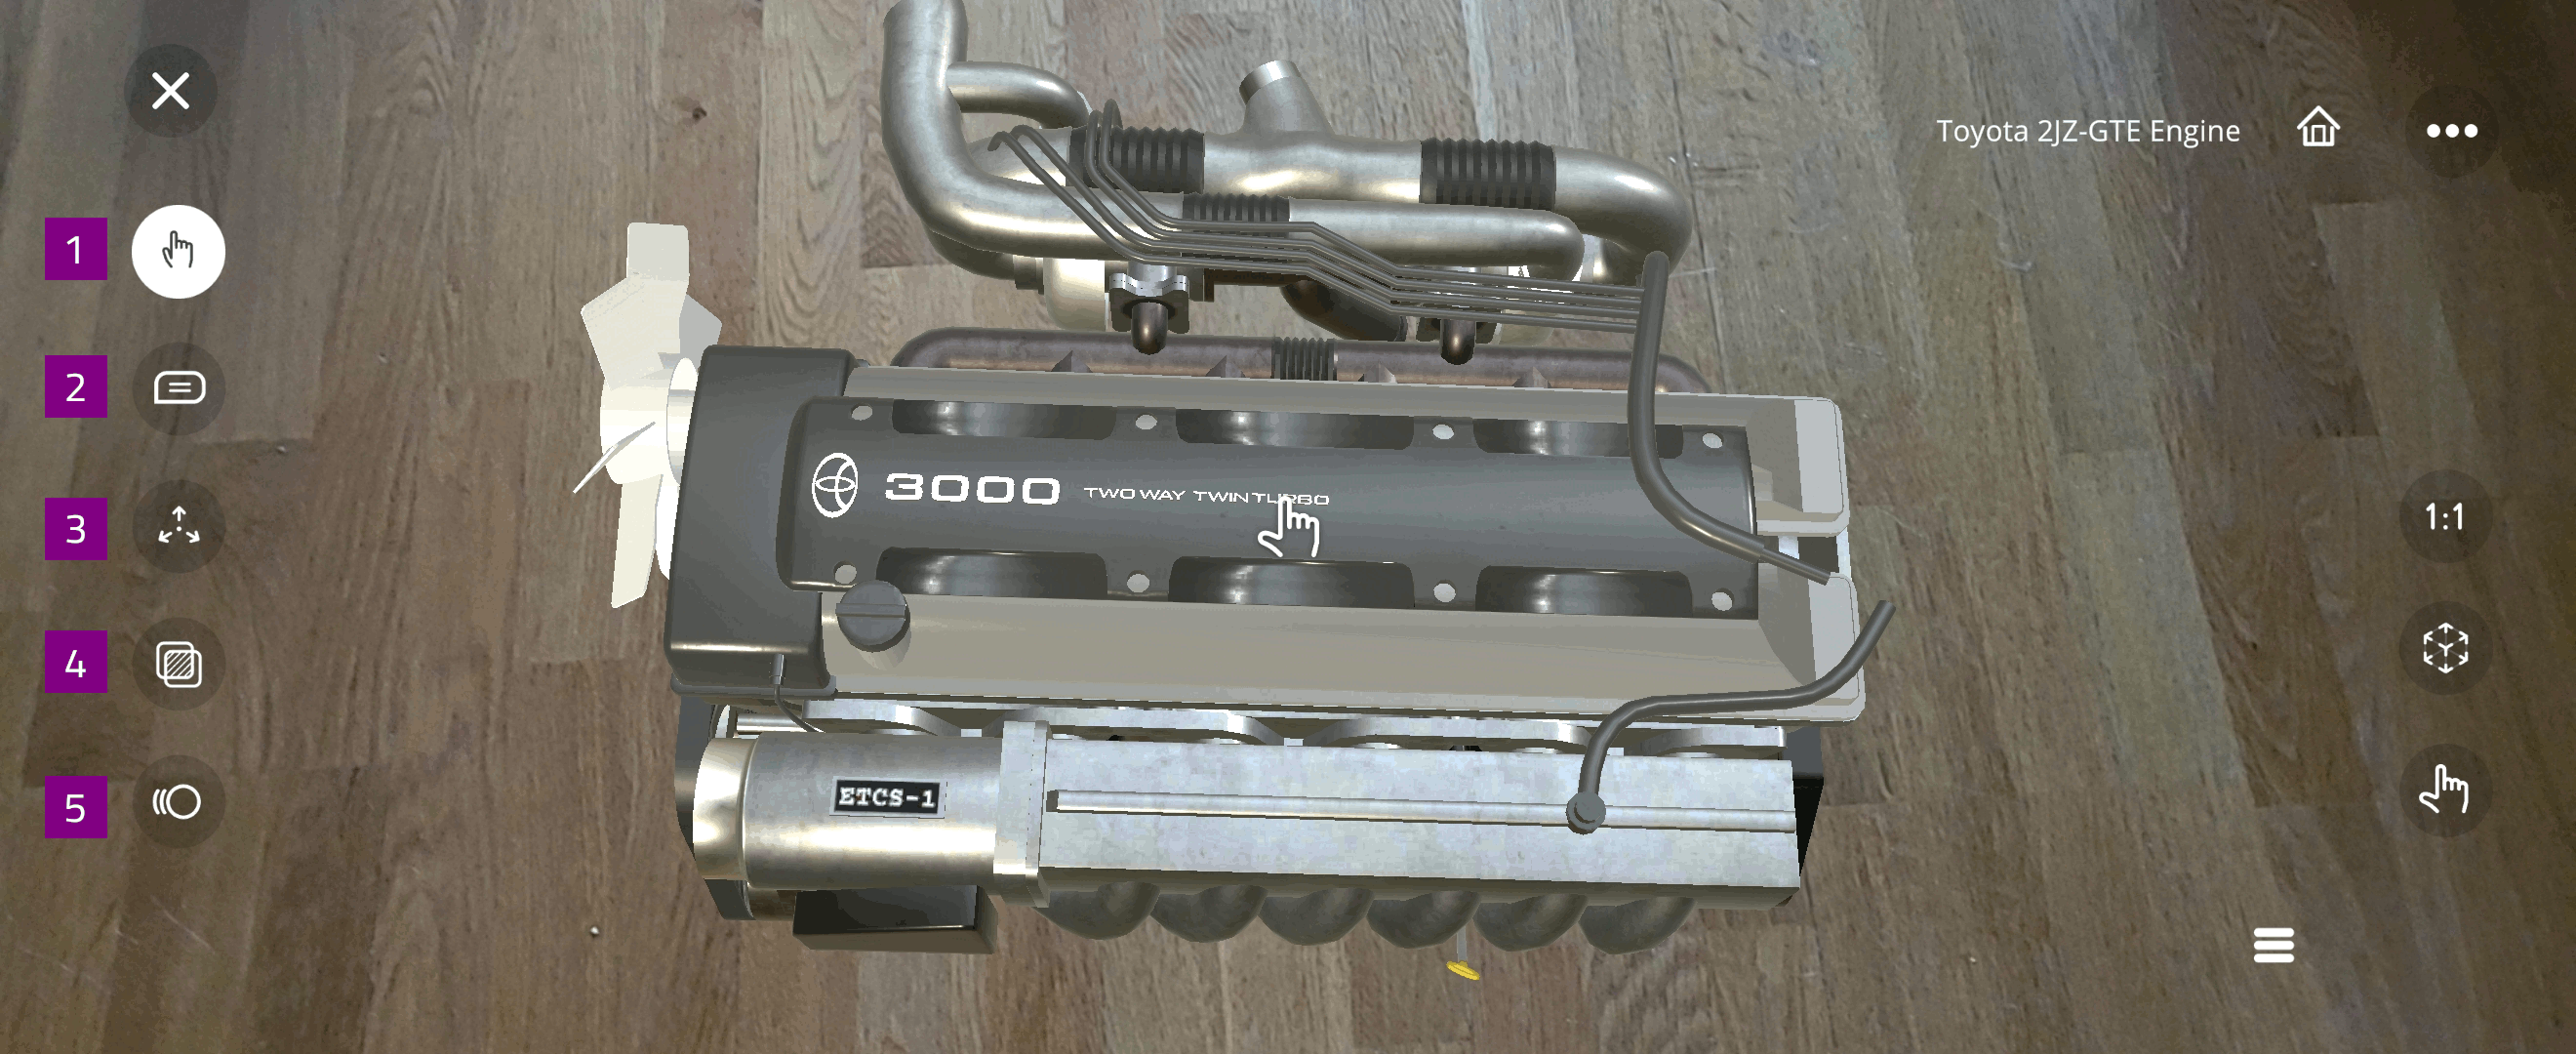
Exploration tools
The exploration tools include:
Select AR
 or Touch
  to switch between viewing modes:
AR mode: view 3D object in Augmented Reality and use AR tools
Touch mode: view and interact with the 3D object on screen and use Touch mode options
Select Annotations
 to view descriptions, images, and videos attached to object parts
Select Explode
 to break apart the 3D object
Select X-Ray
 to view the inner details of the 3D object
Select Animation
 to view animation associated with the 3D object
Note
This option is only available for 3D objects with animation
AR tools
AR specific tools are available while using AR mode . You can select the AR tools to:
View the 3D object in actual size
Adjust placement the 3D object(s) on a surface
Select and grab parts of the object(s)
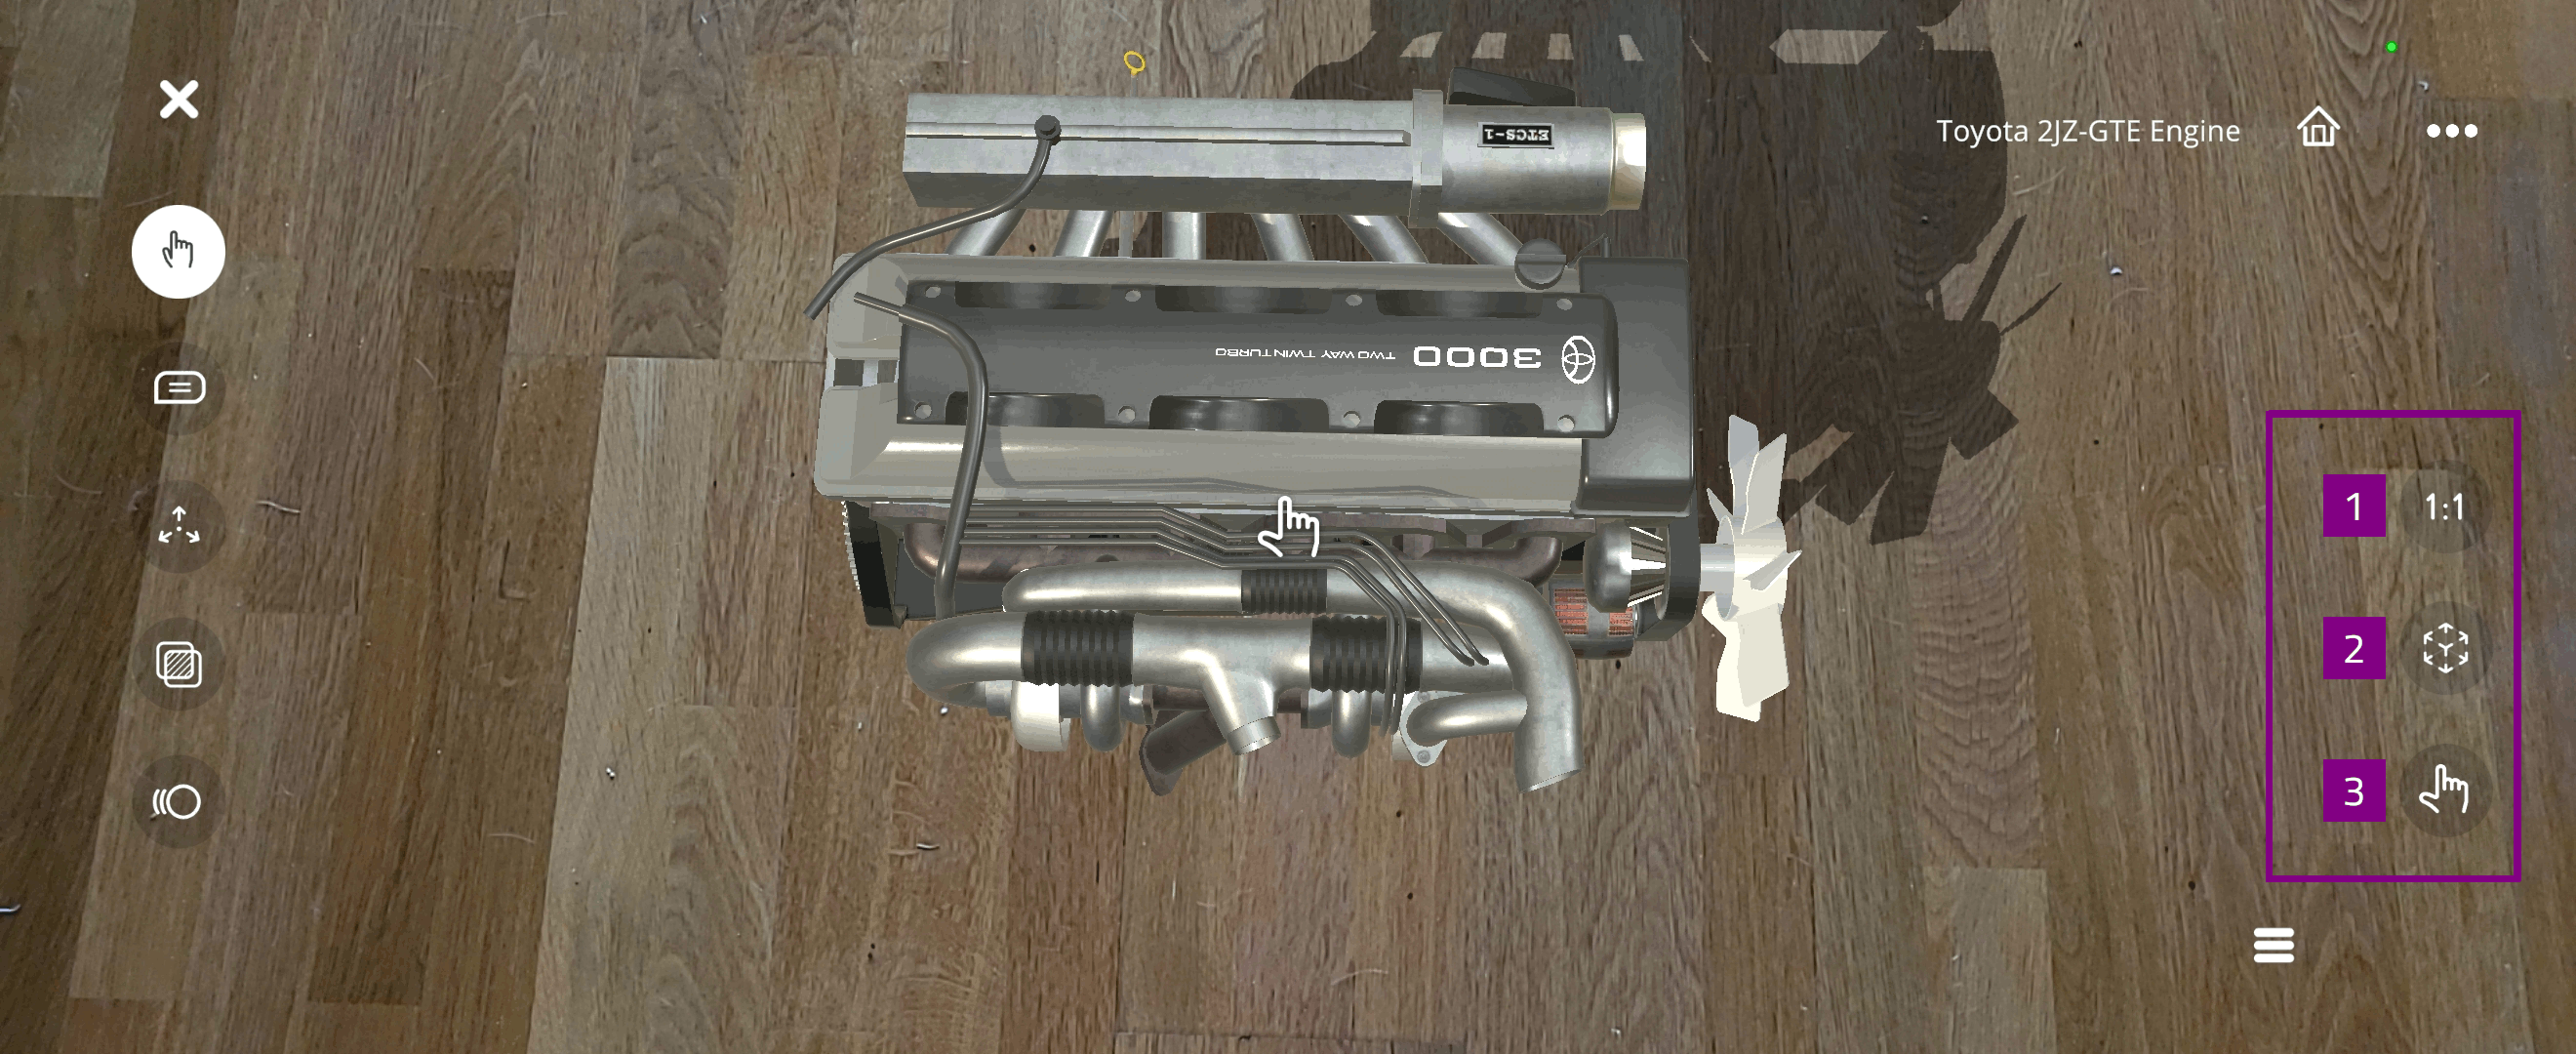
Note
AR tools are only available for users with the EON Merged XR license.
AR input options
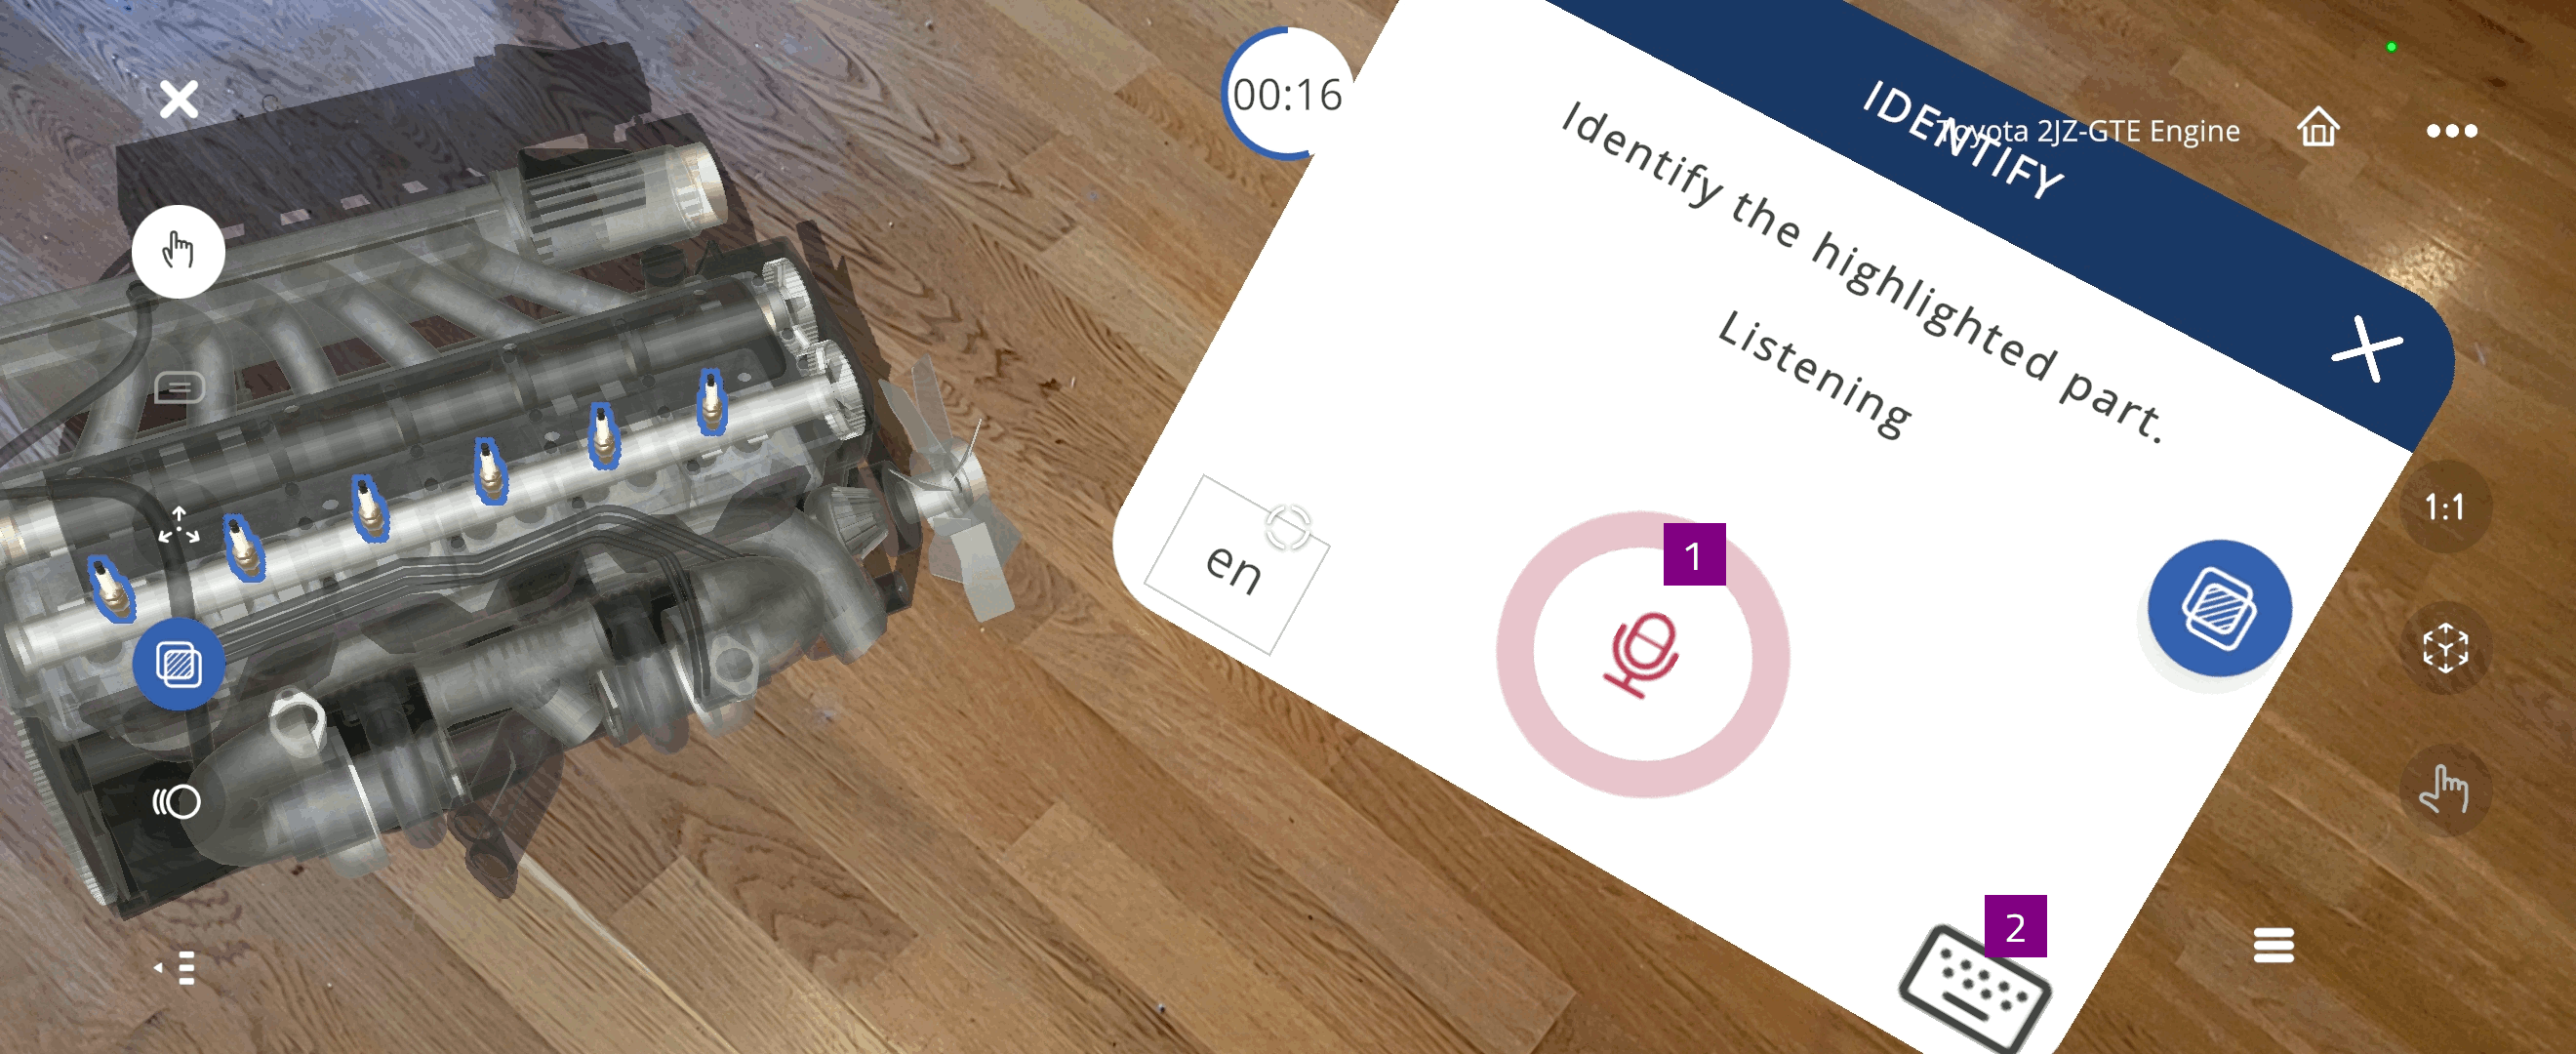
In AR mode you can submit answers for certain activities using either voice recording or keyboard.
Voice recording:
 - record your answer using voice recording
 - stop recording
 - redo the recording
Keyboard:
Select
 to type your answer using the keyboard
Touch mode options
In touch mode , you can select either orbit or walk navigation.
Walk navigation:
Select
 to enable walk navigation
Use walk navigation gestures to navigate around the virtual surface
Pan up / down with one finger: Move forward and backward
Pan left / right with one finger: Walk left and right
Pan around with two fingers: Look around
Pan up / down with three fingers: Elevate up and down
Orbit navigation:
Select
 to enable orbit navigation
Use the multitouch gestures to interact with the 3D object
Note
When you switch between orbit and walk navigation, the object position and view is maintained.
Note
When you switch from walk to orbit navigation, the orbit point is set to a point straight in front of you, at the same distance you had in walk navigation.
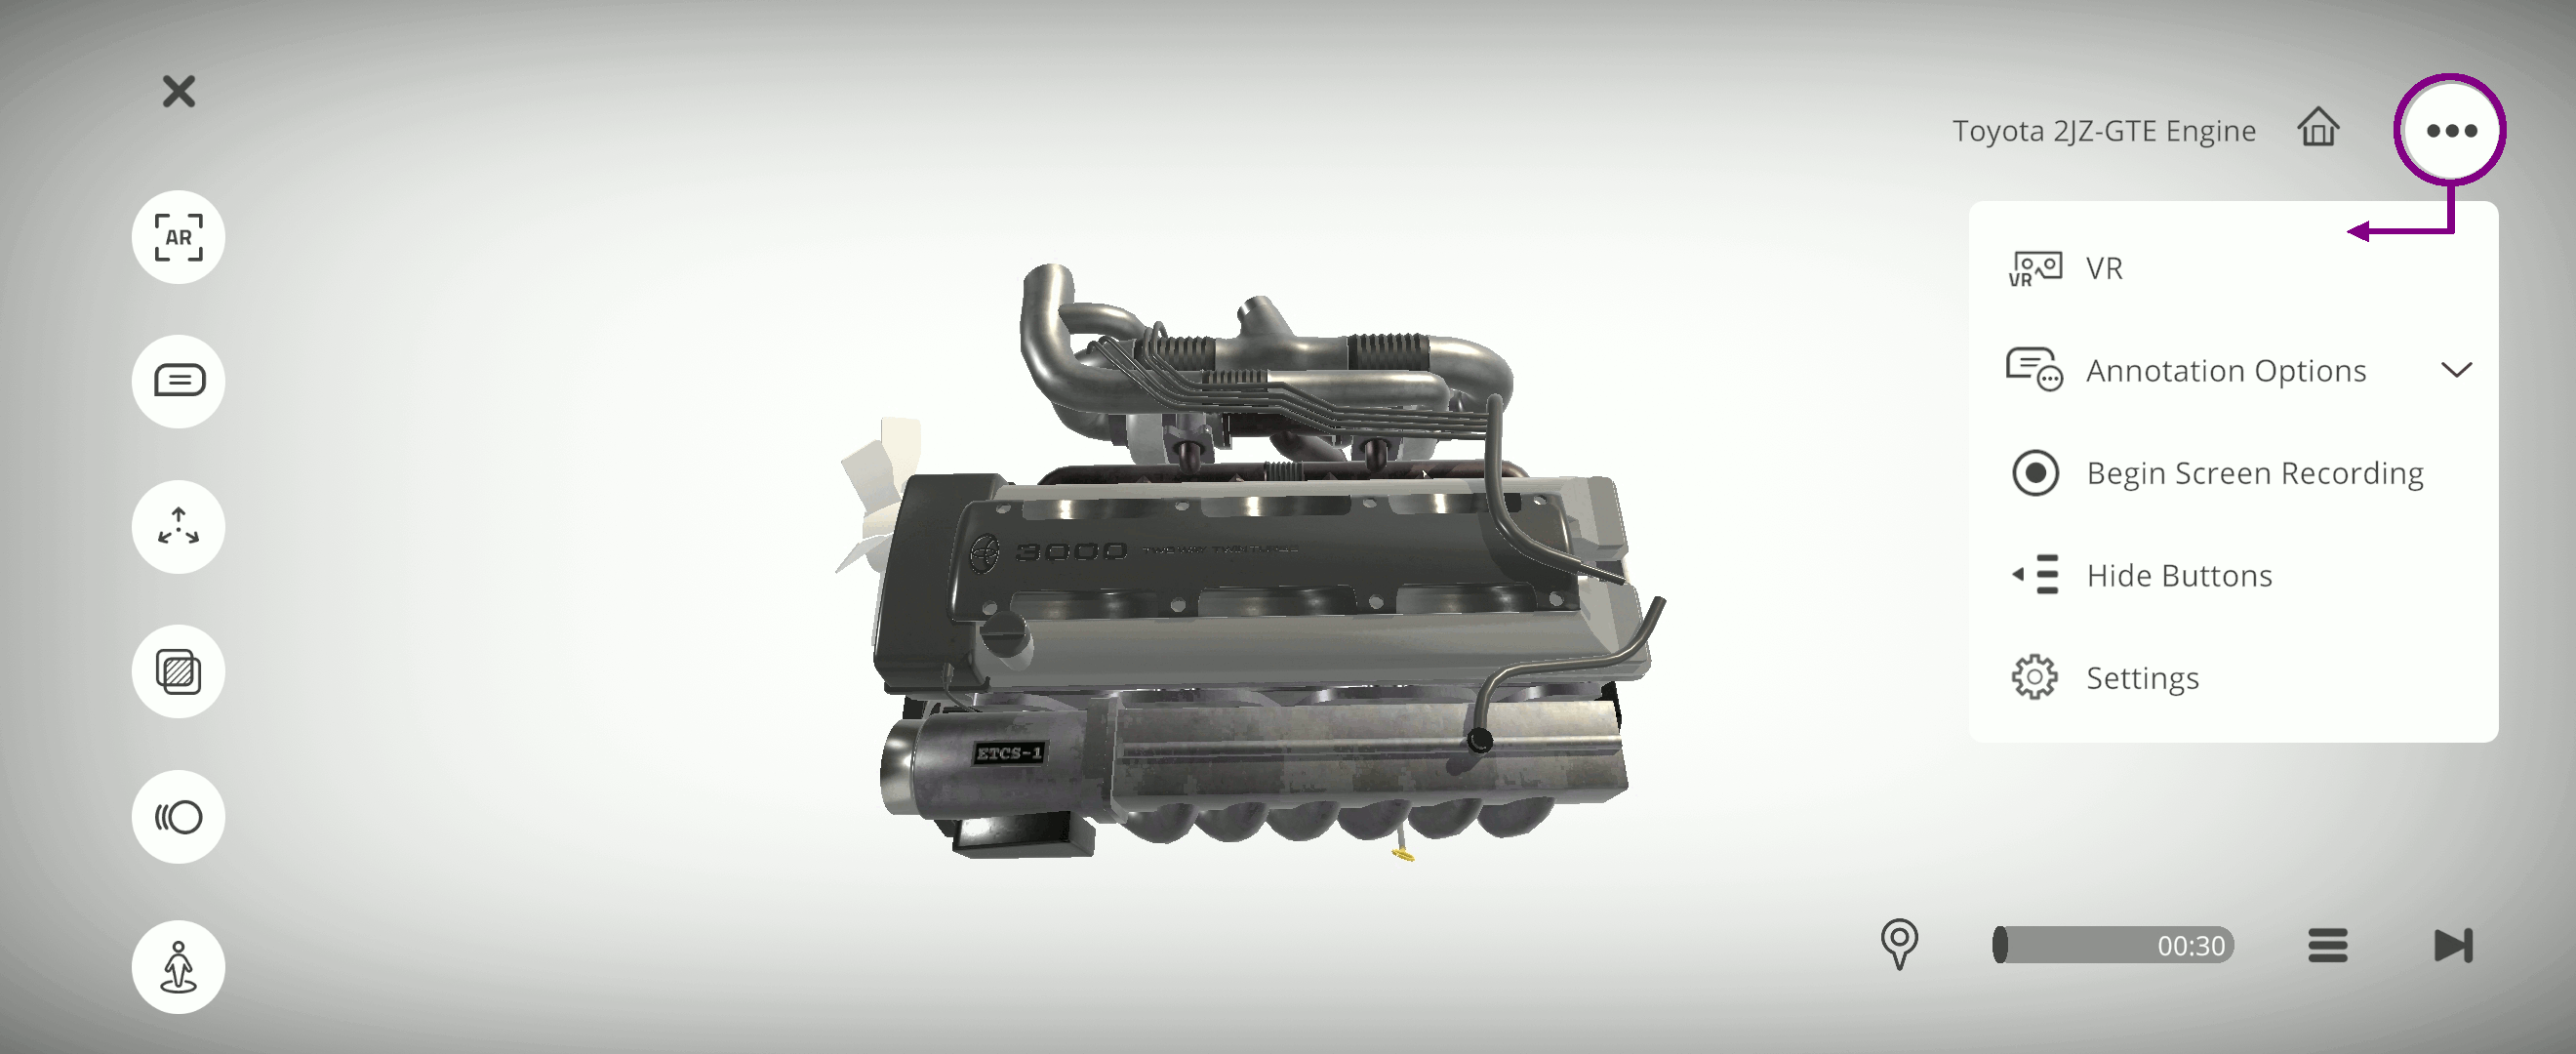
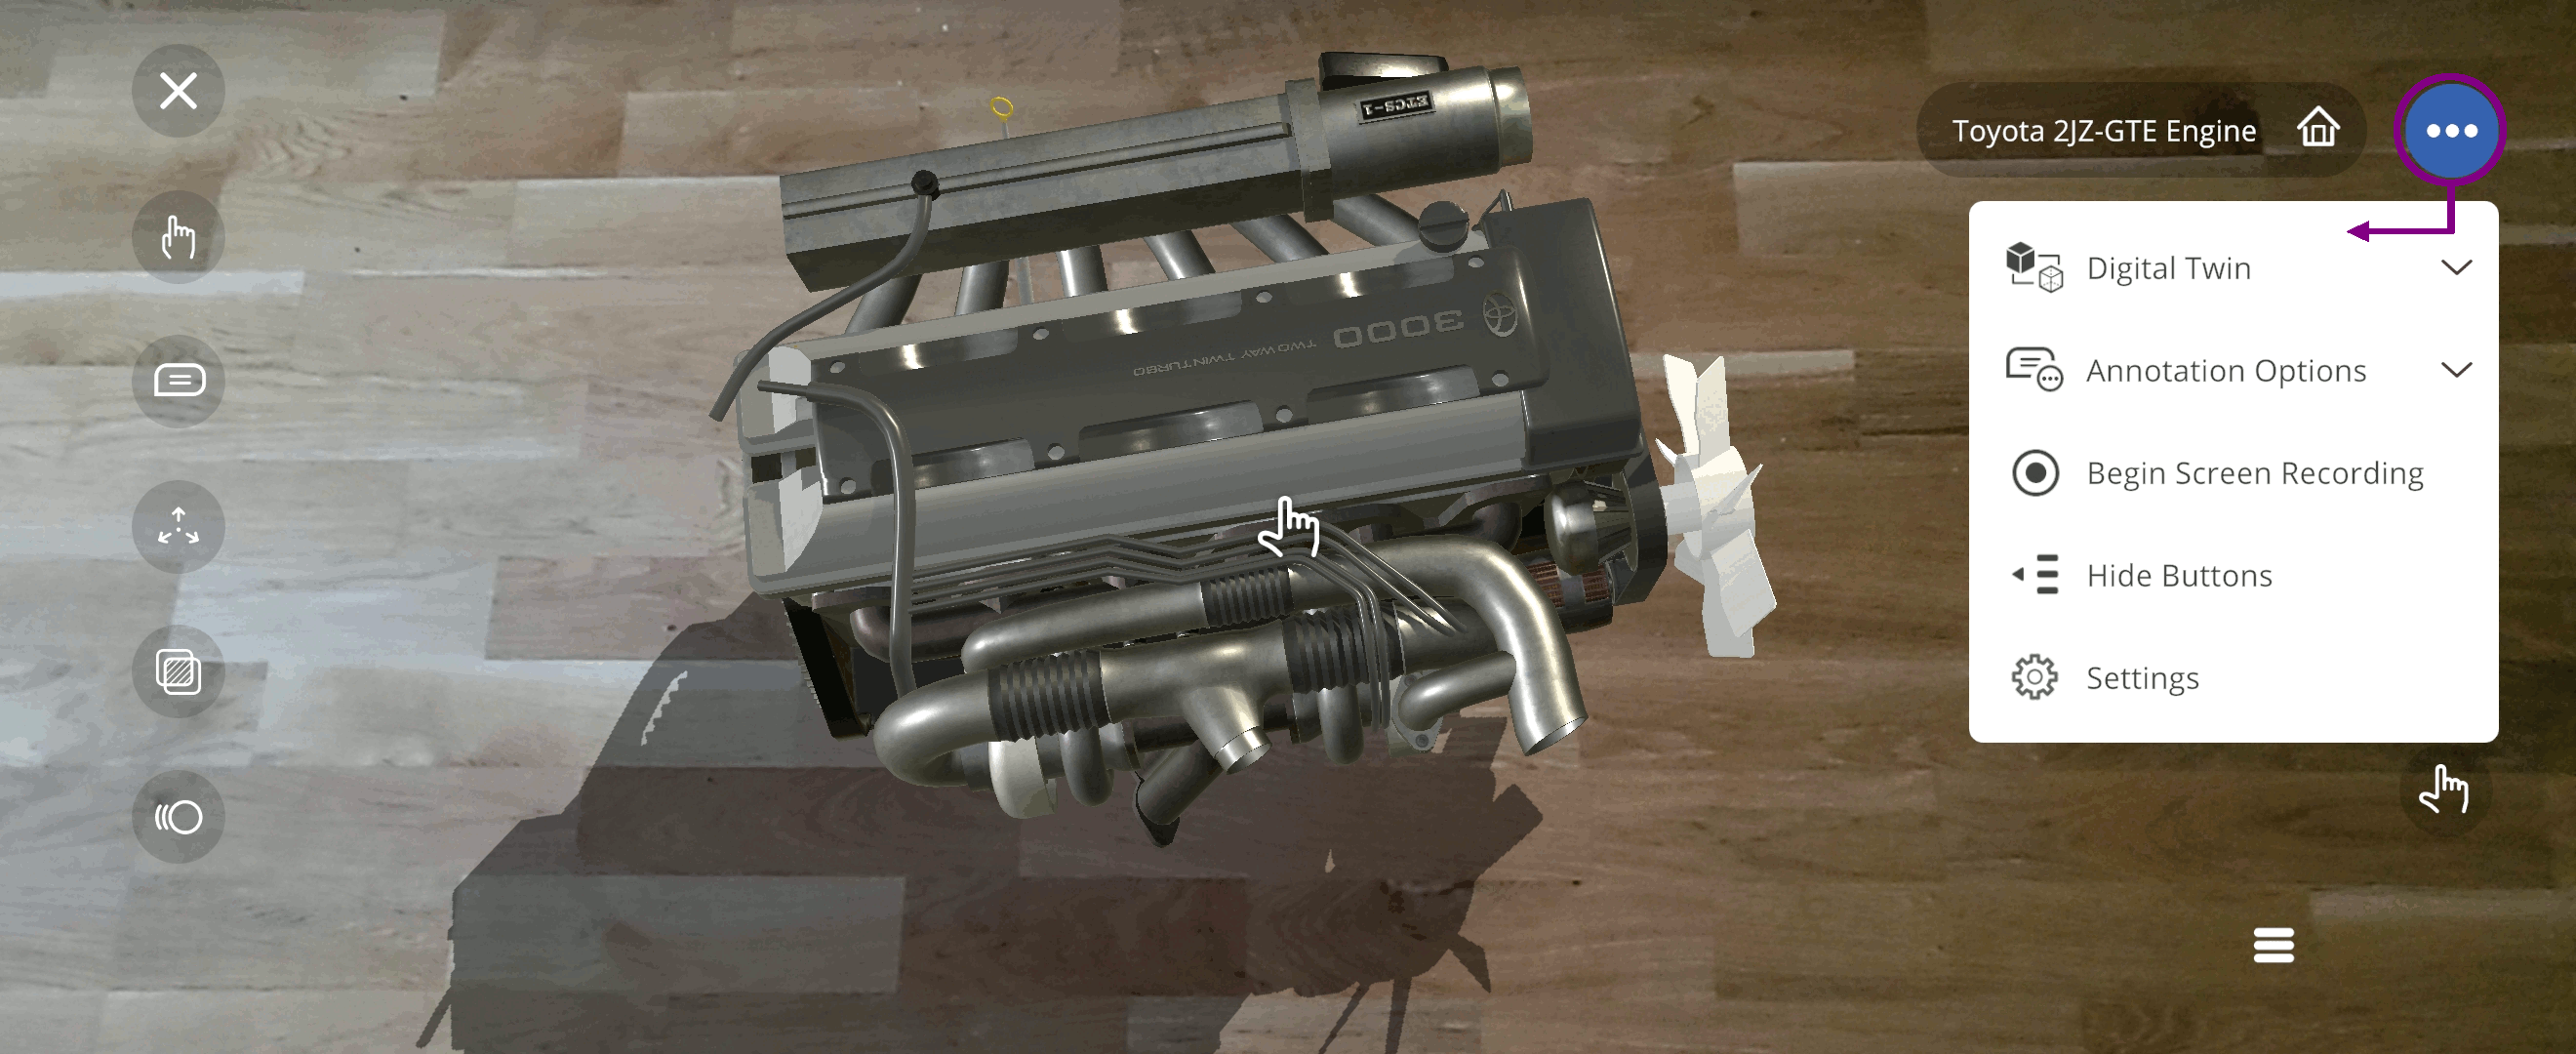
Experience menu
You can select options in the Experience menu to:
Option |
Remark |
|---|---|
VR |
Use head-mounted device paired with your mobile device. Only in Touch mode |
Digital twin: |
The digital twin options are only available in AR mode |
Start alignment |
Create a digital twin of the object, placed in relation to real-world objects. Annotations are linked with the digital twin |
Hide model |
Hide the 3D object from view |
Annotation options: |
|
Reverse annotations |
Reverse direction of annotation anchors |
Begin screen recording |
Capture exploration of the 3D object |
Hide / Show buttons |
Either hide or show tools and menus |
Settings |
Open Settings menu to configure background, sound, and lightning effects |
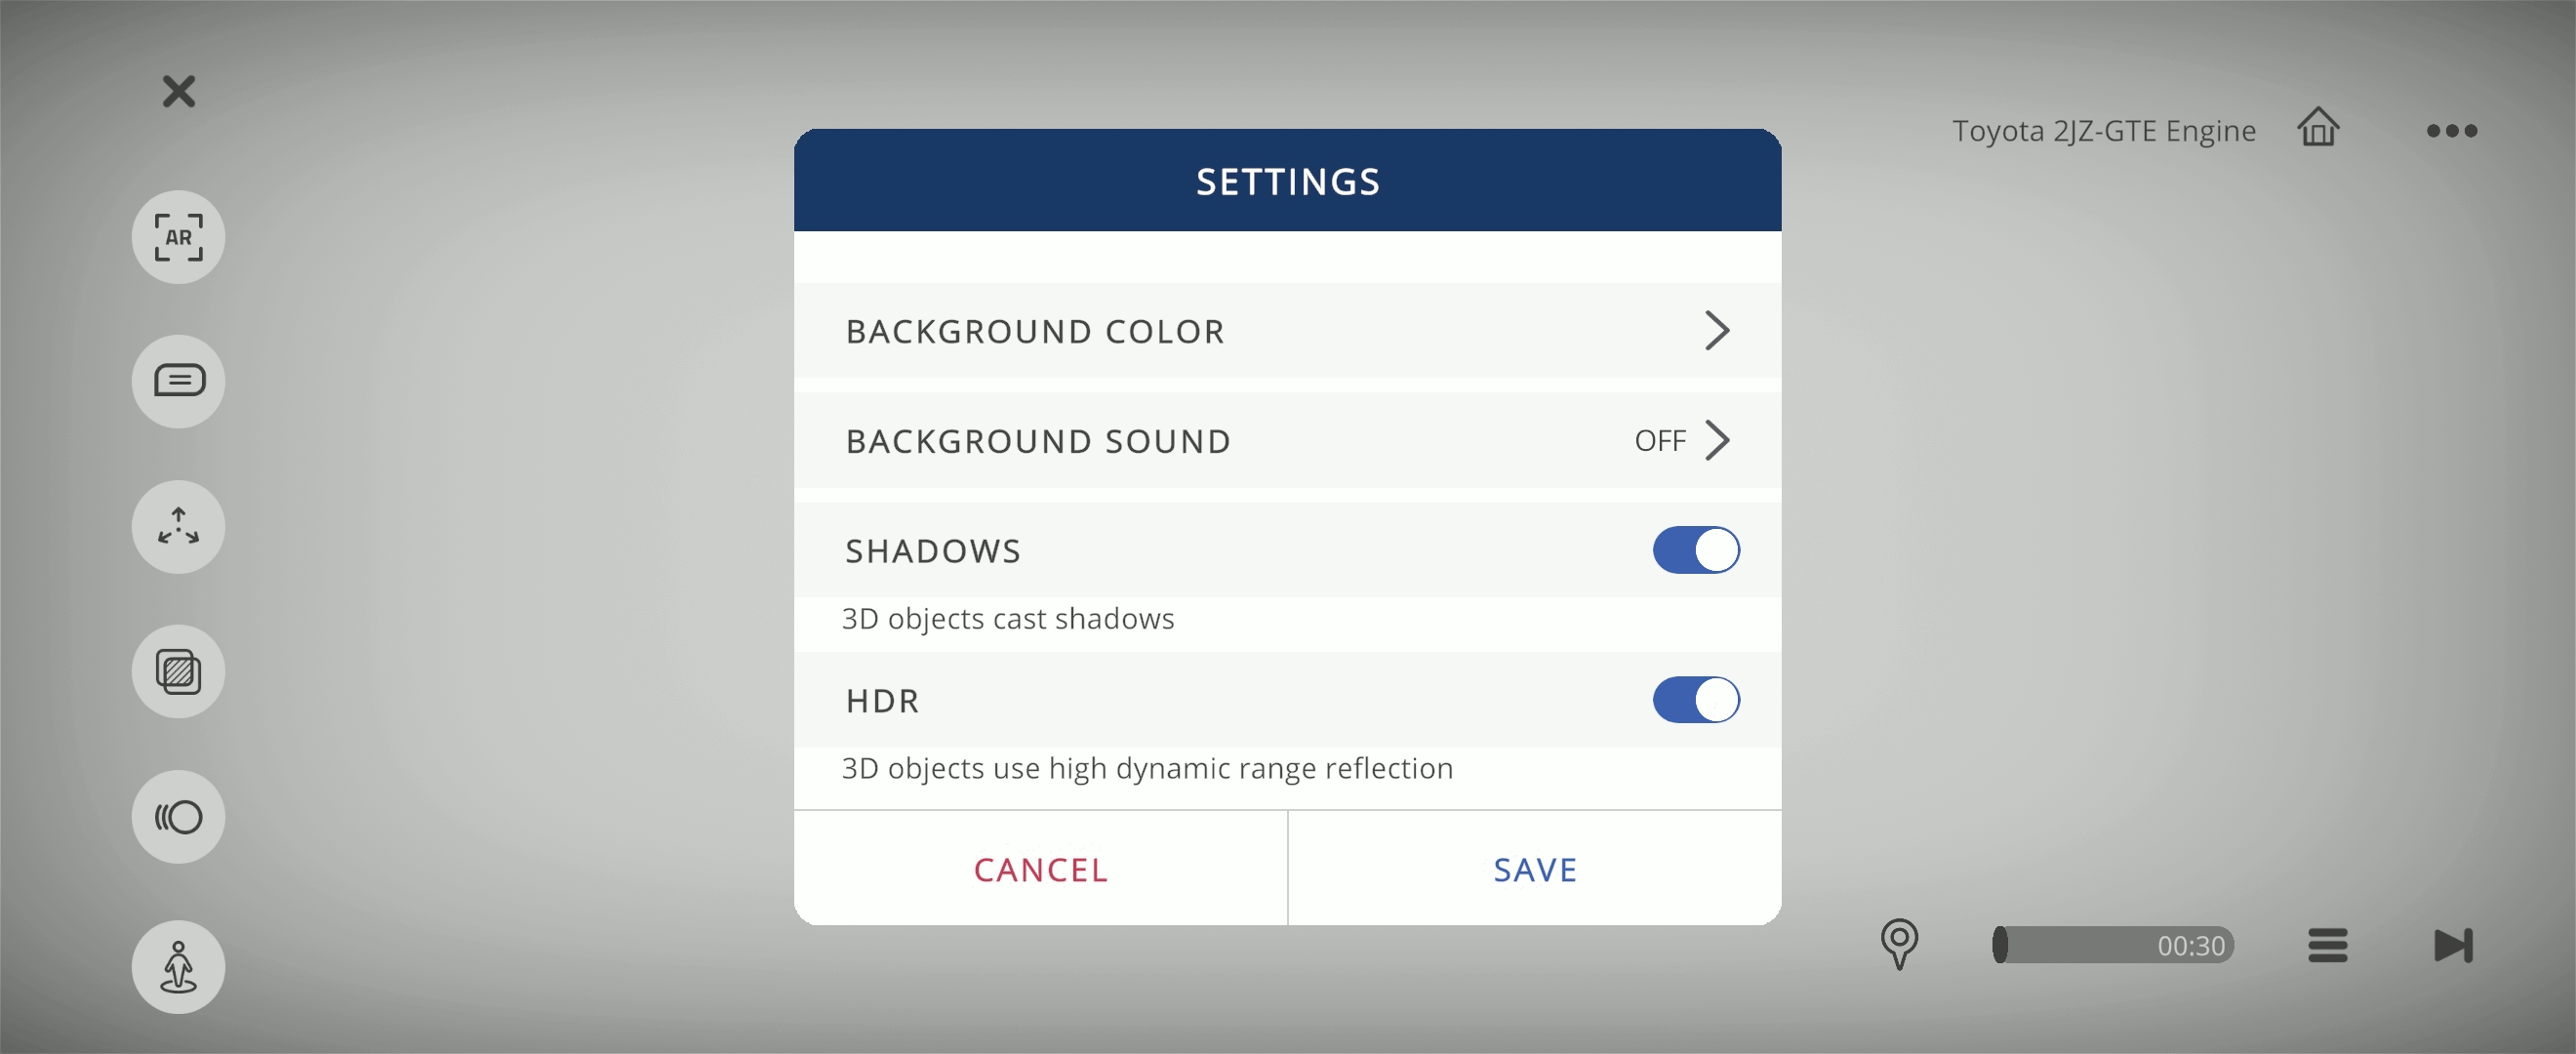
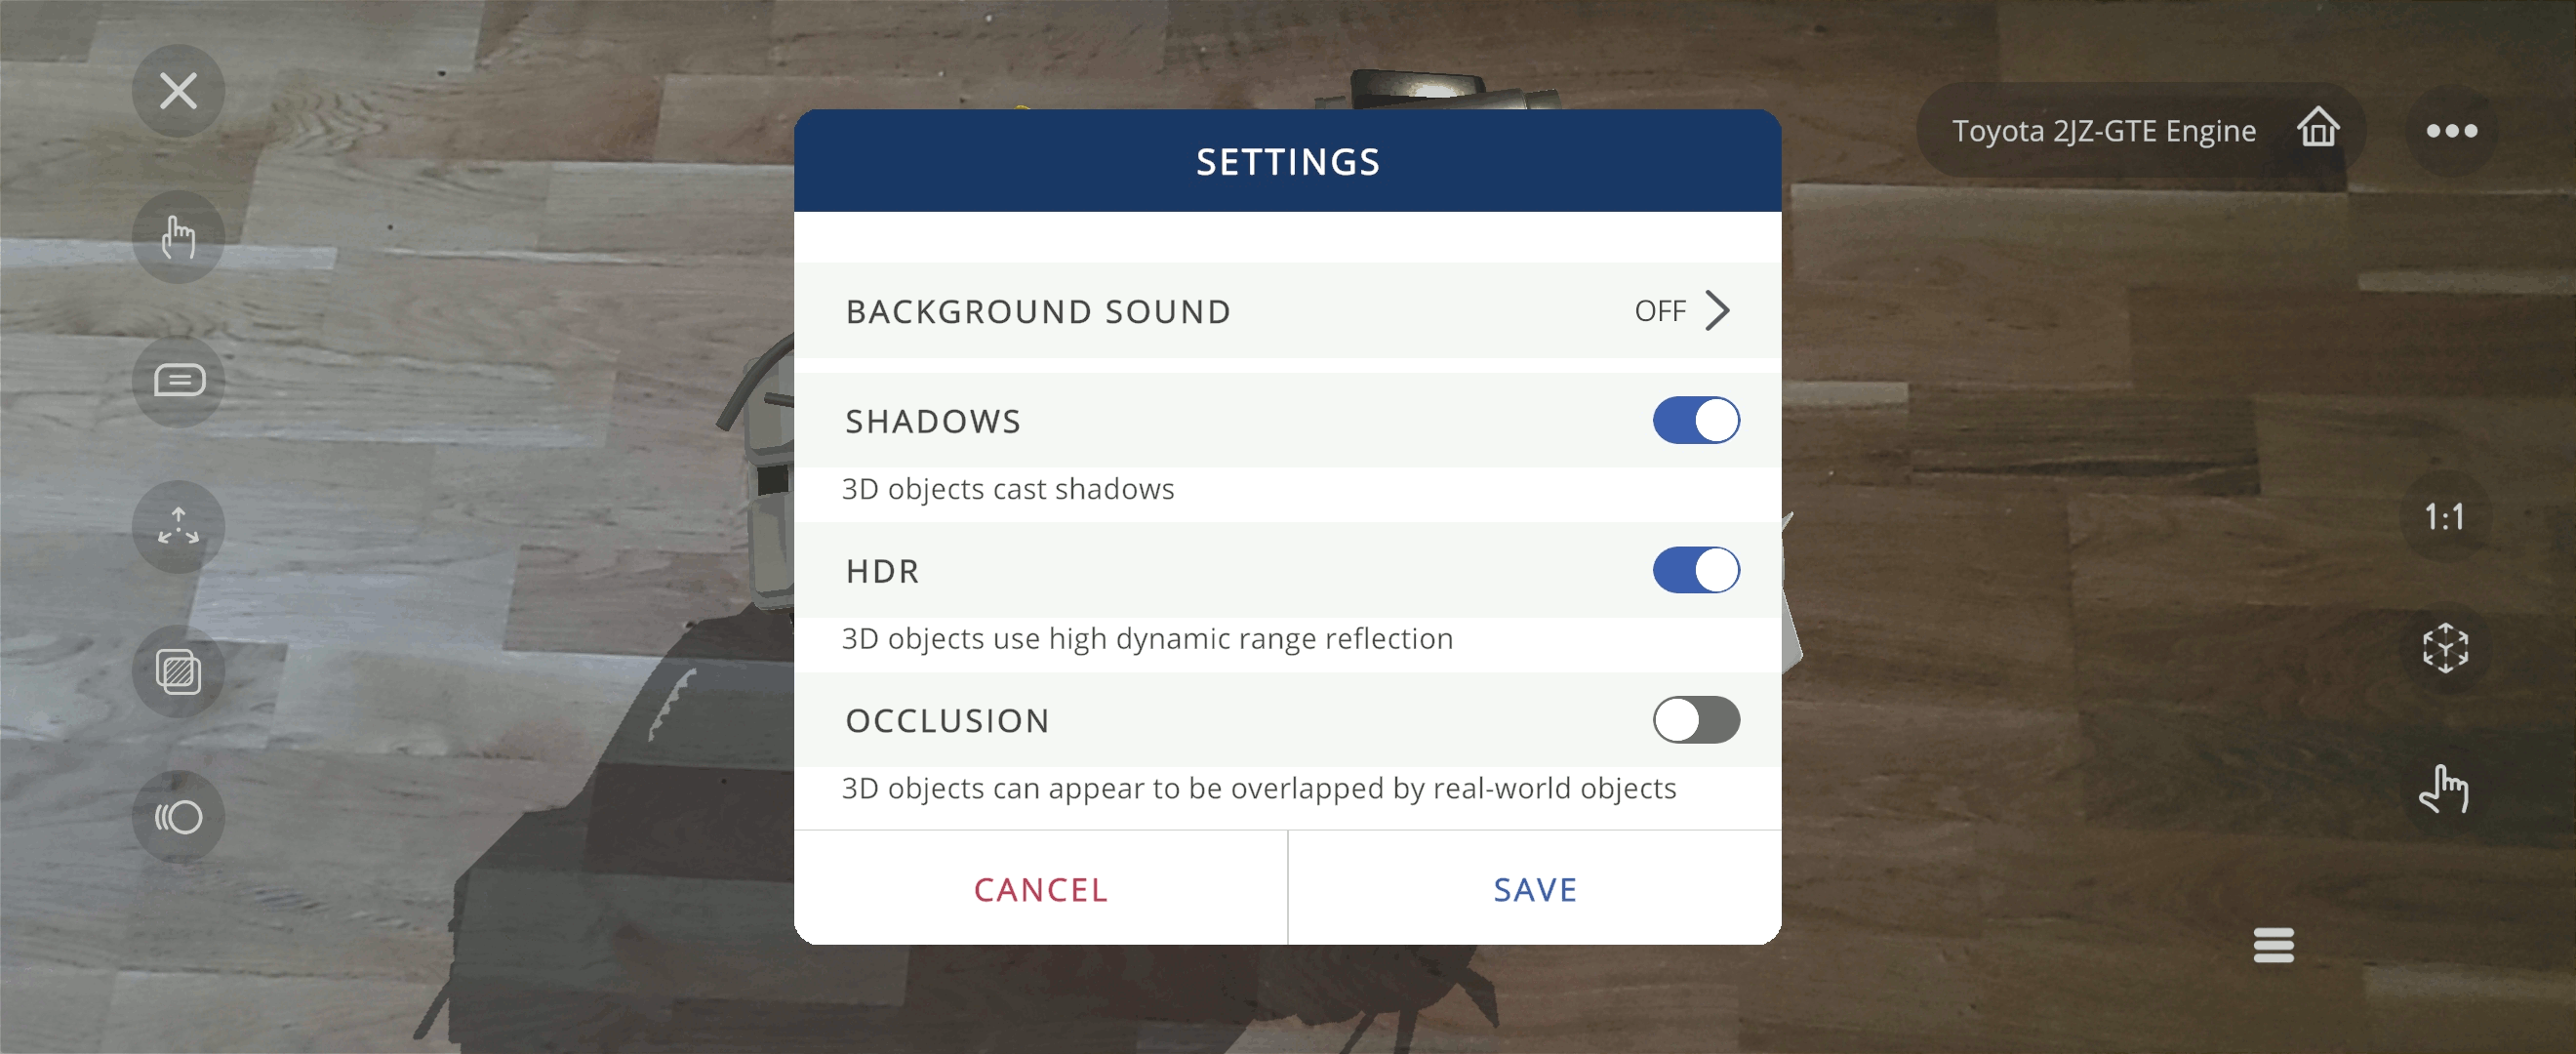
Settings
Number |
Remark |
|---|---|
Background color |
Change background color. Only in Touch mode |
Background sound |
Enable or disable background audio |
Shadows |
Enable the 3D objects to cast shadows |
HDR |
Enable high dynamic range reflection on the 3D object |
Enable segmentation of physical objects. Improves illusion that 3D objects exist in real-world. Only in AR mode |
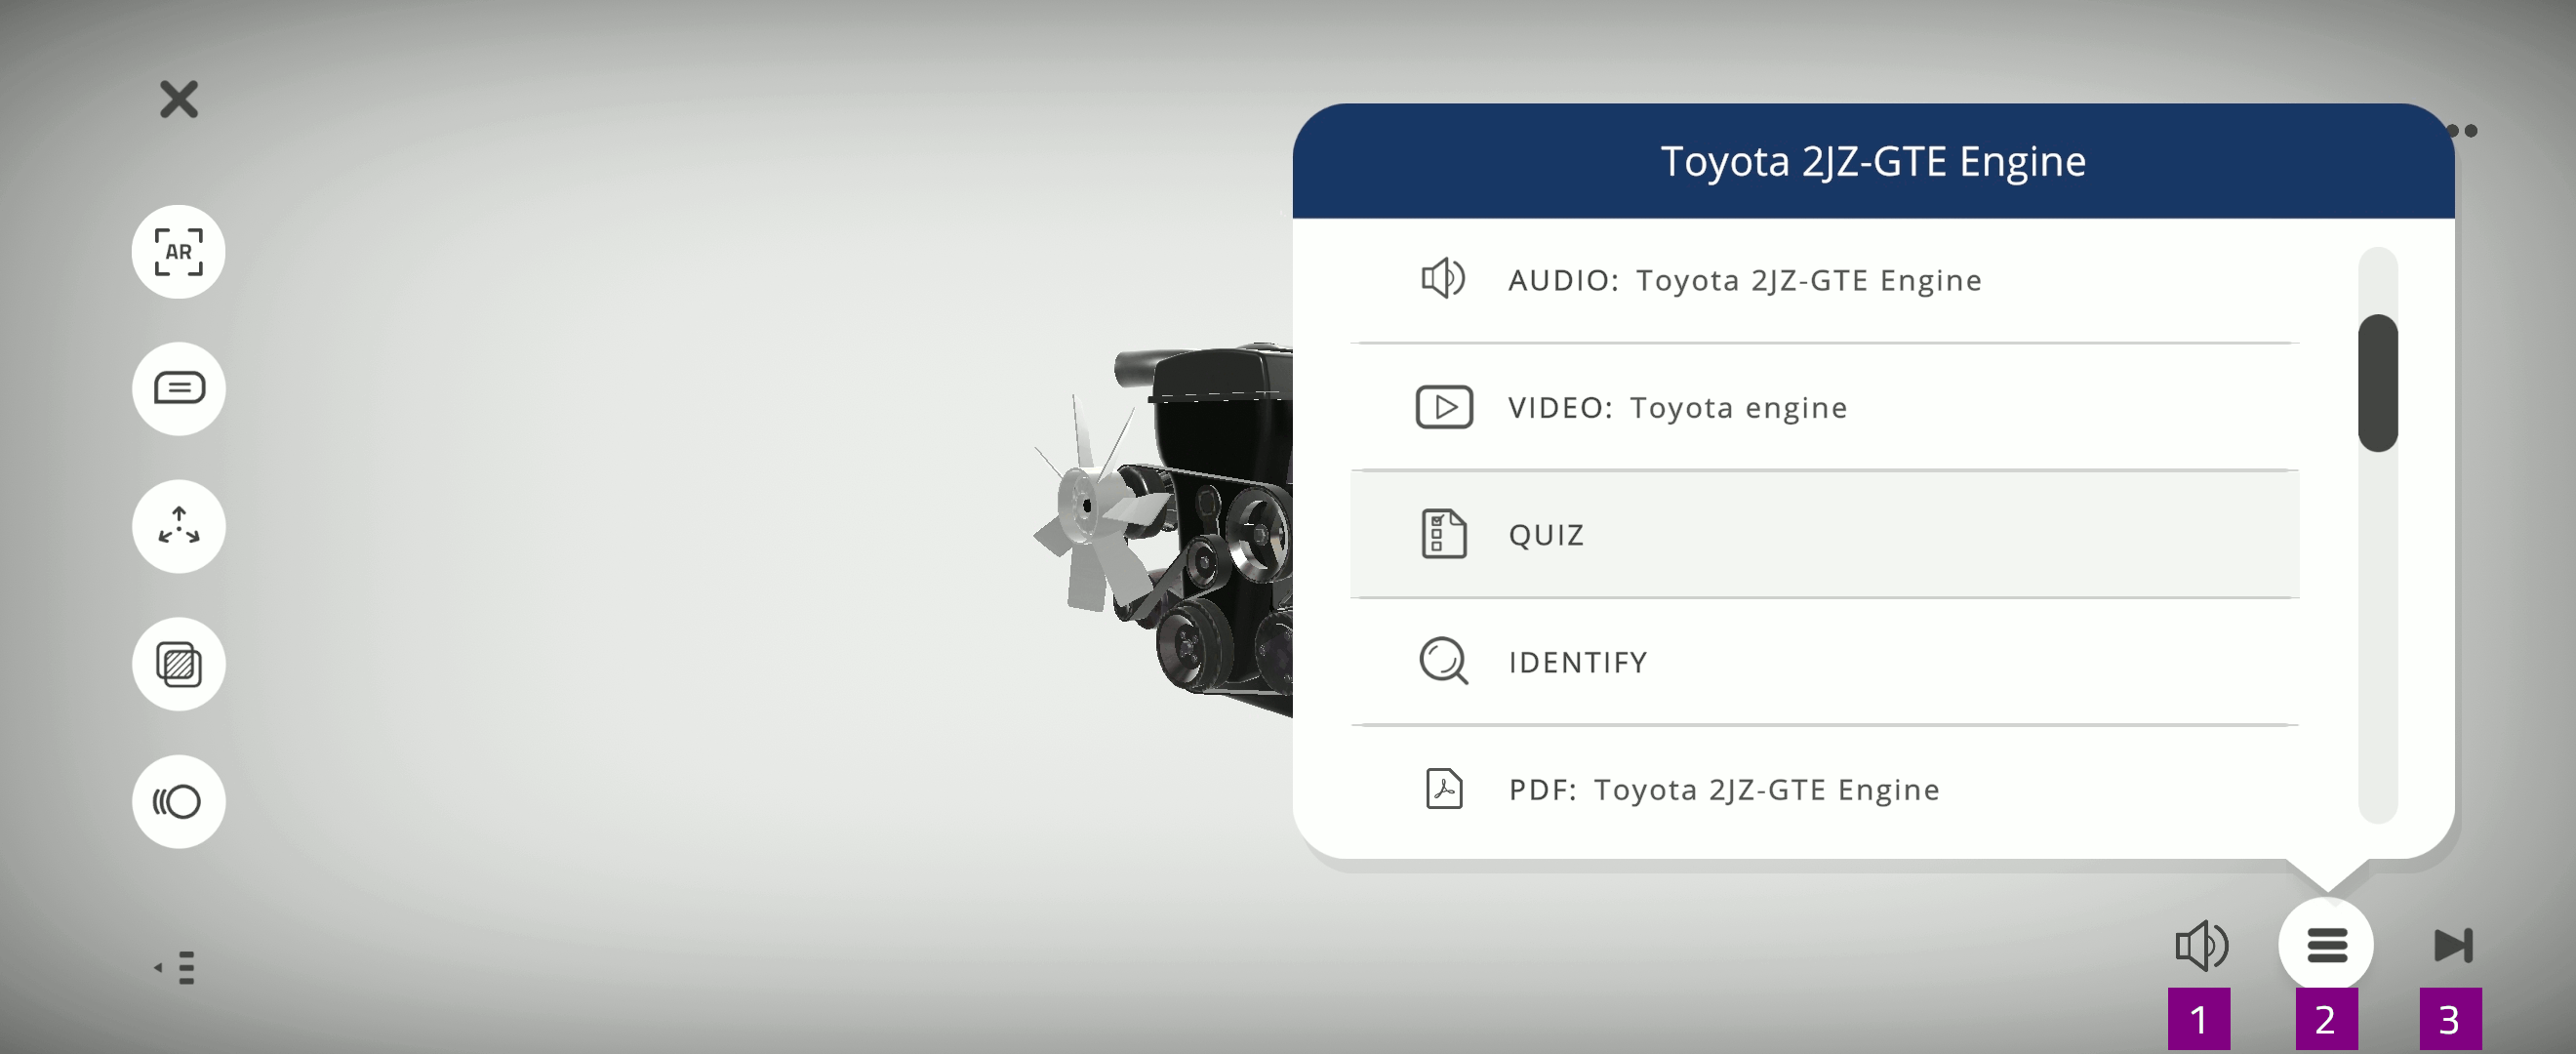
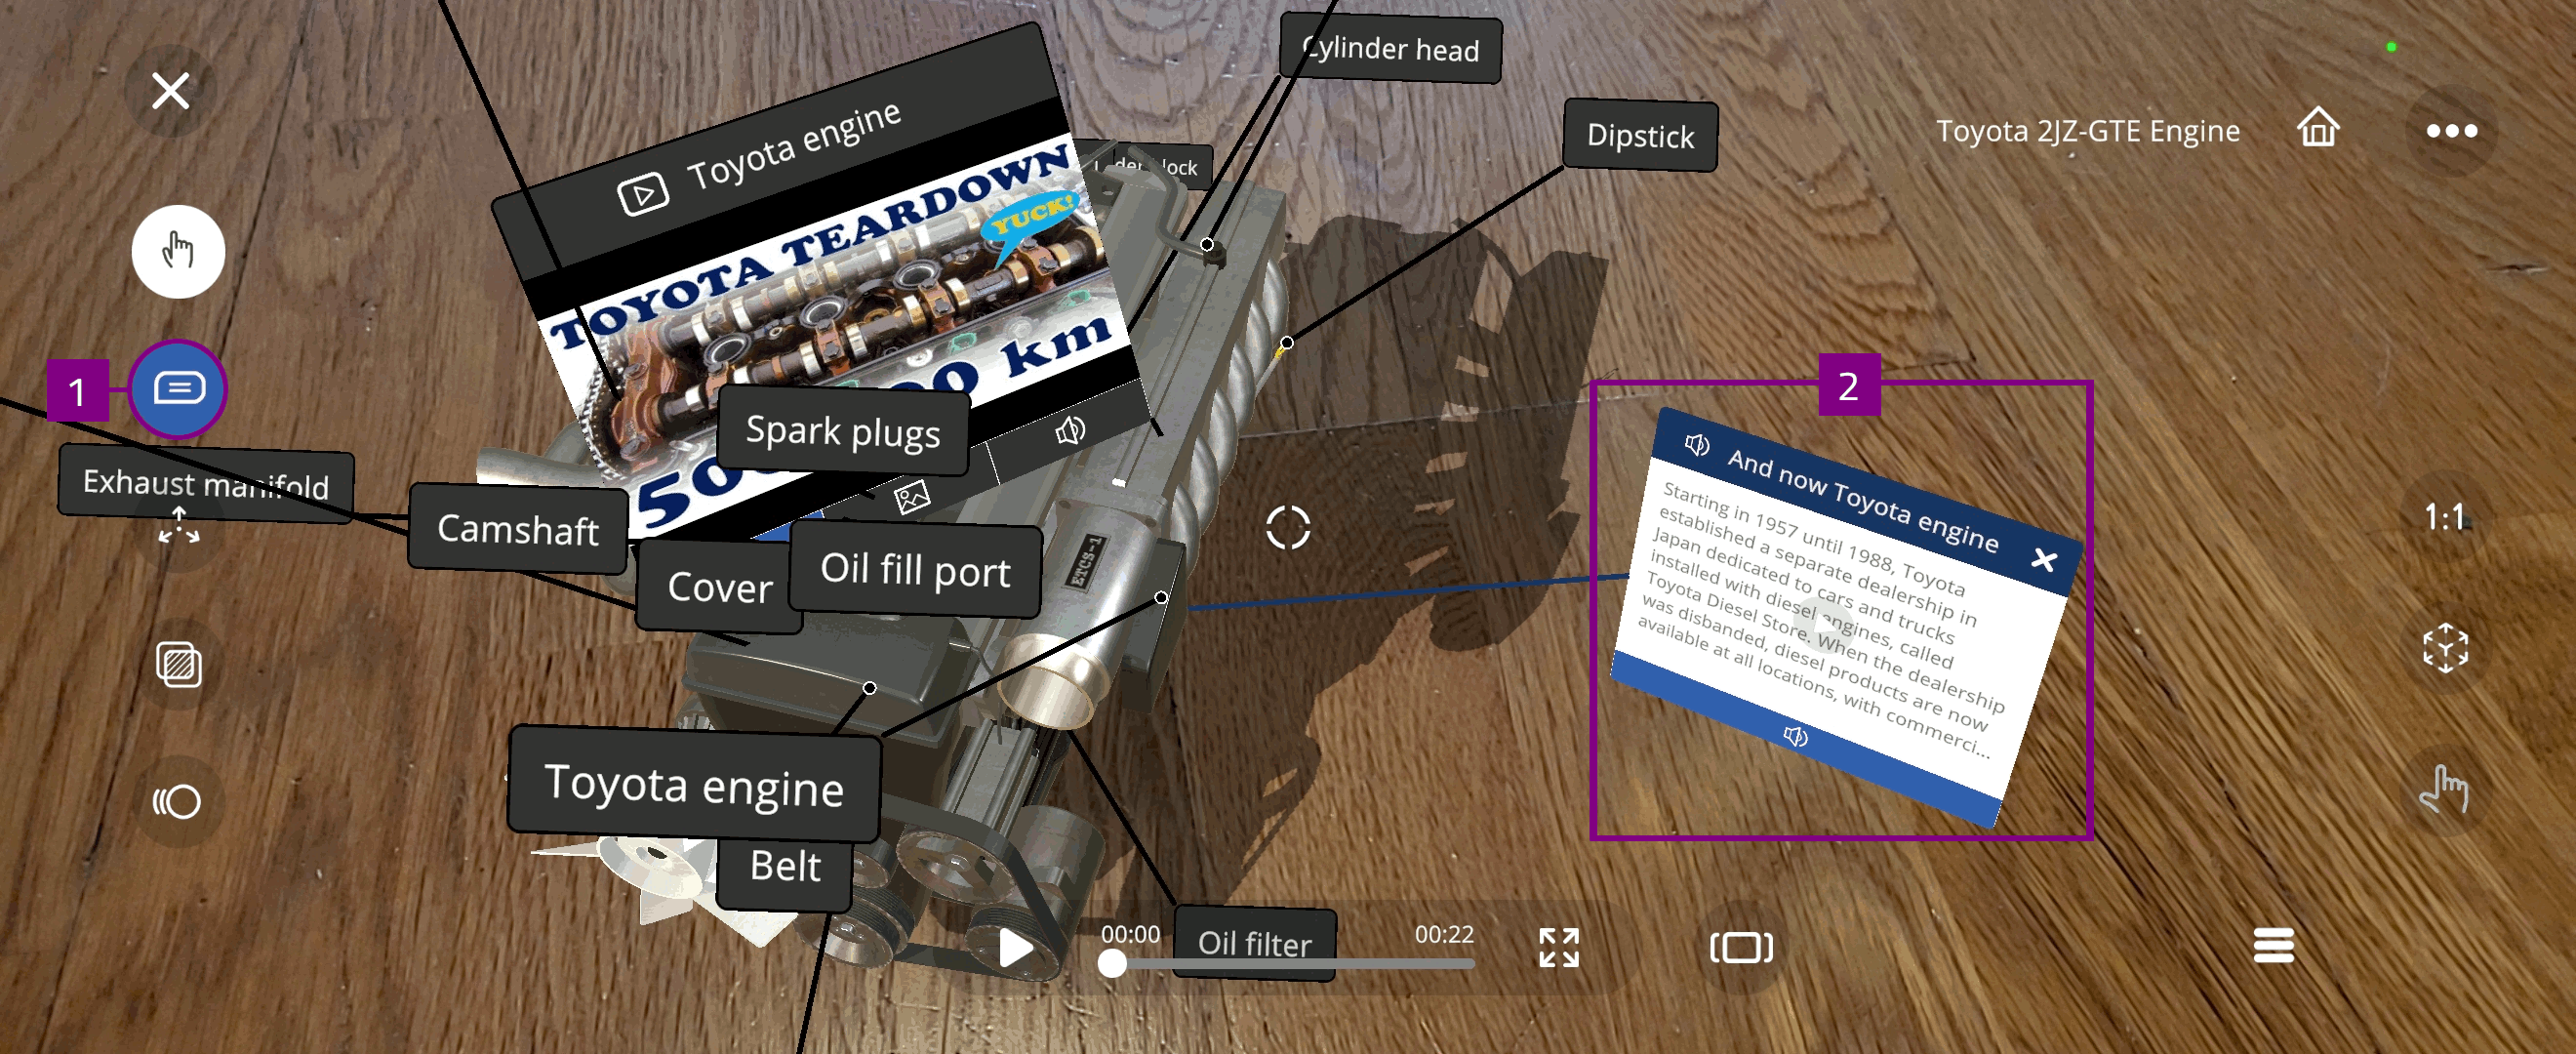
Activity menu
Use the Activity menu to experience the learning assignments and tasks created for the 3D Xperience.
The activity icon indicates the current activity, for example

Select the activity icon to hide or show the activity window
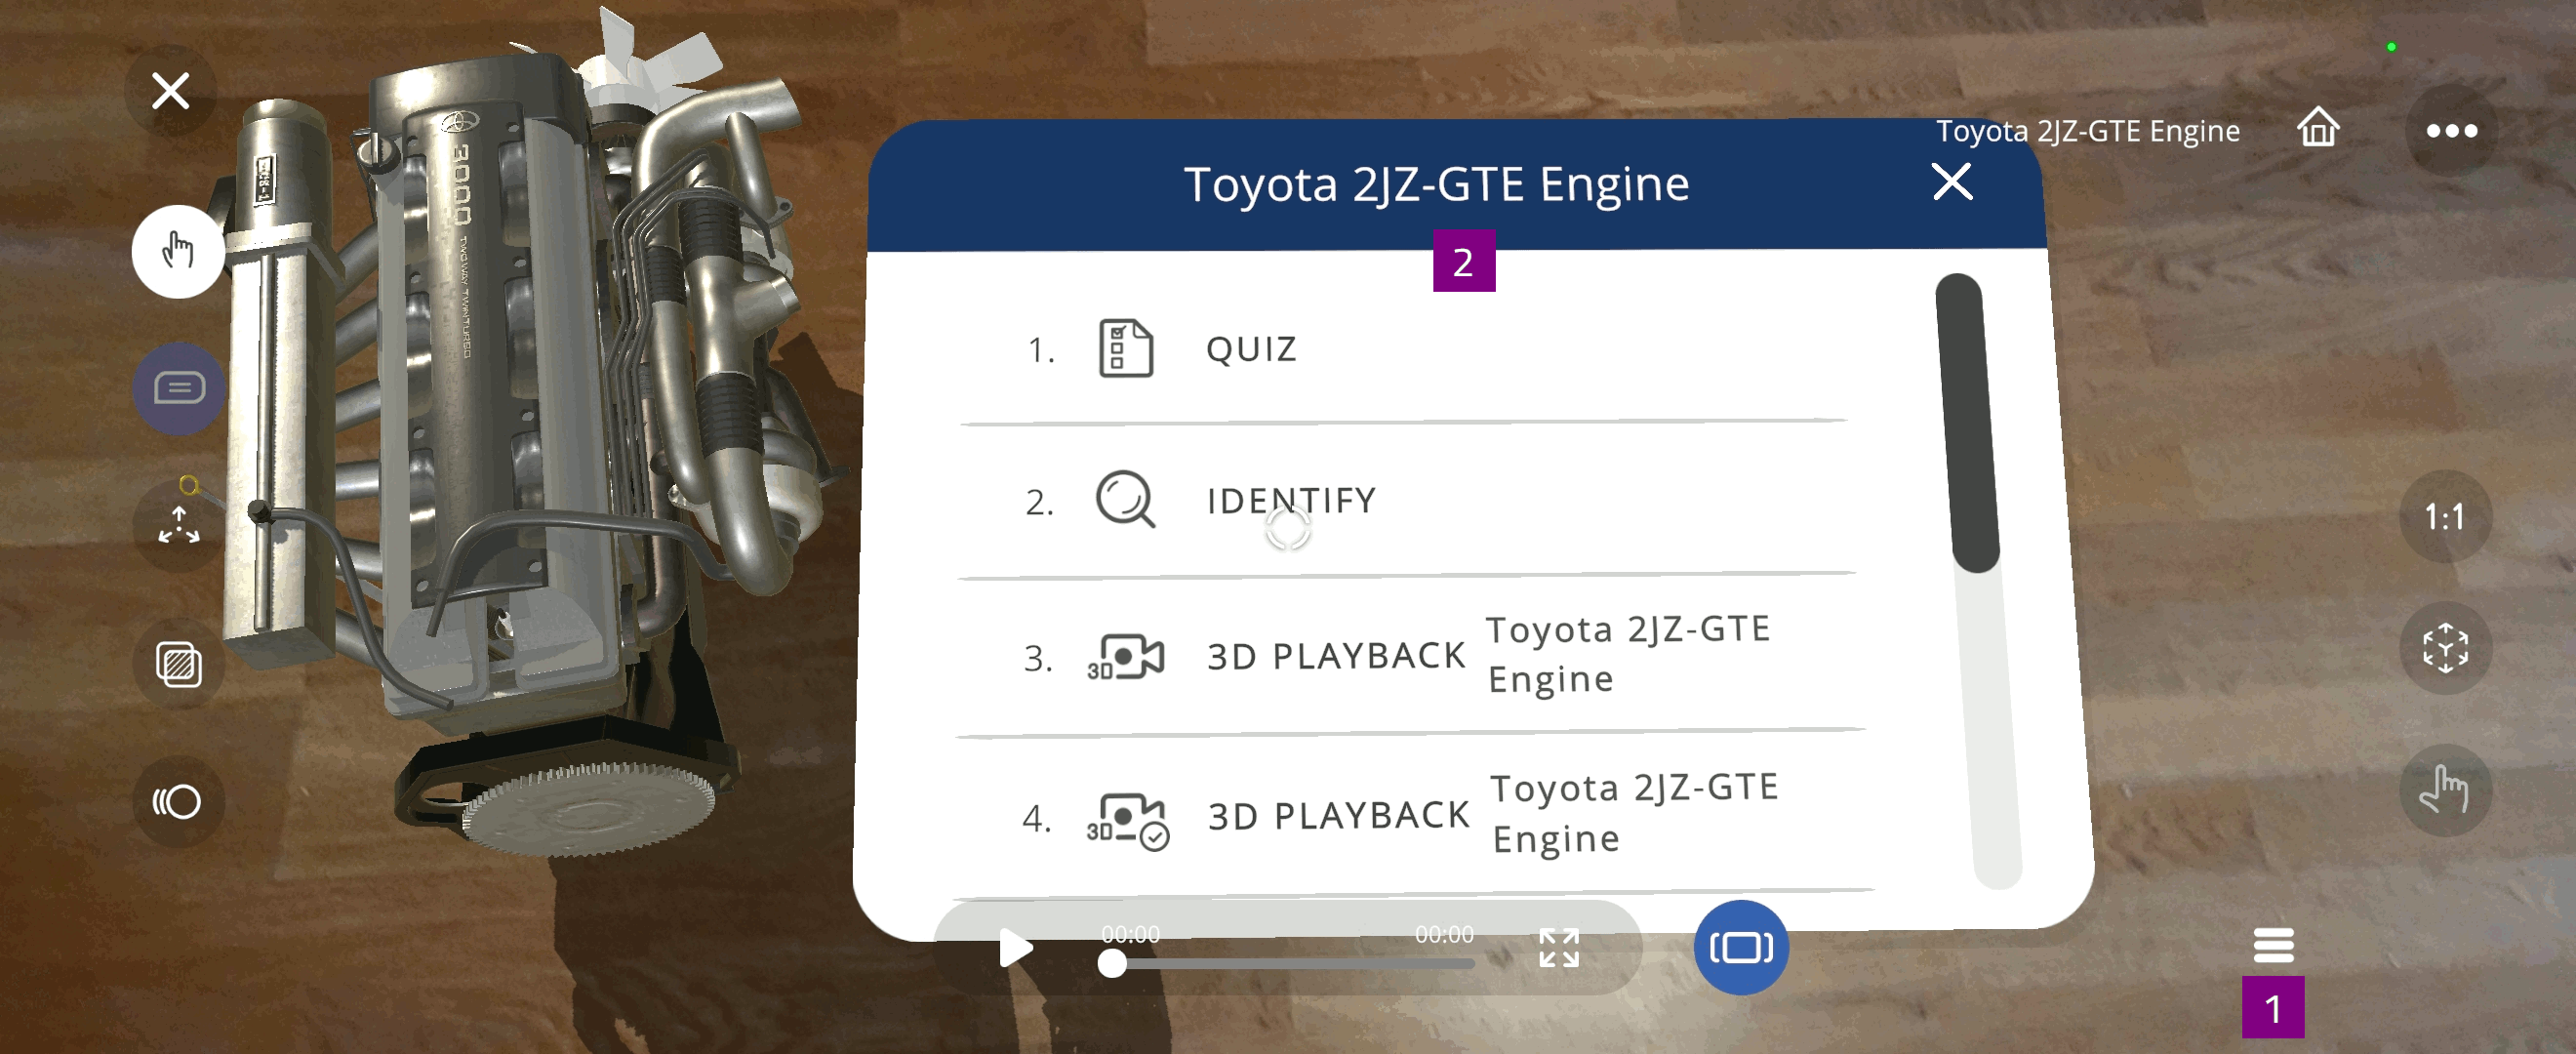
Select Activity menu
 to open the activity menu and select an activity
Only activities created for the Xperience are displayed
Video, PDF, and Image can be viewed in full screen
Closed captions (CC) can be enabled for video content
Select Forward
 to go to the next activity
Quiz
In the Quiz activity you test your knowledge related to the 3D Xperience with multiple-choice questions.
Select a Quiz activity in the activity menu
Select
 to start the activity, this starts the timer
Select your answer(s):
For single answer questions, select one option to choose your answer
For multiple-answers questions, select SUBMIT after choosing your answers
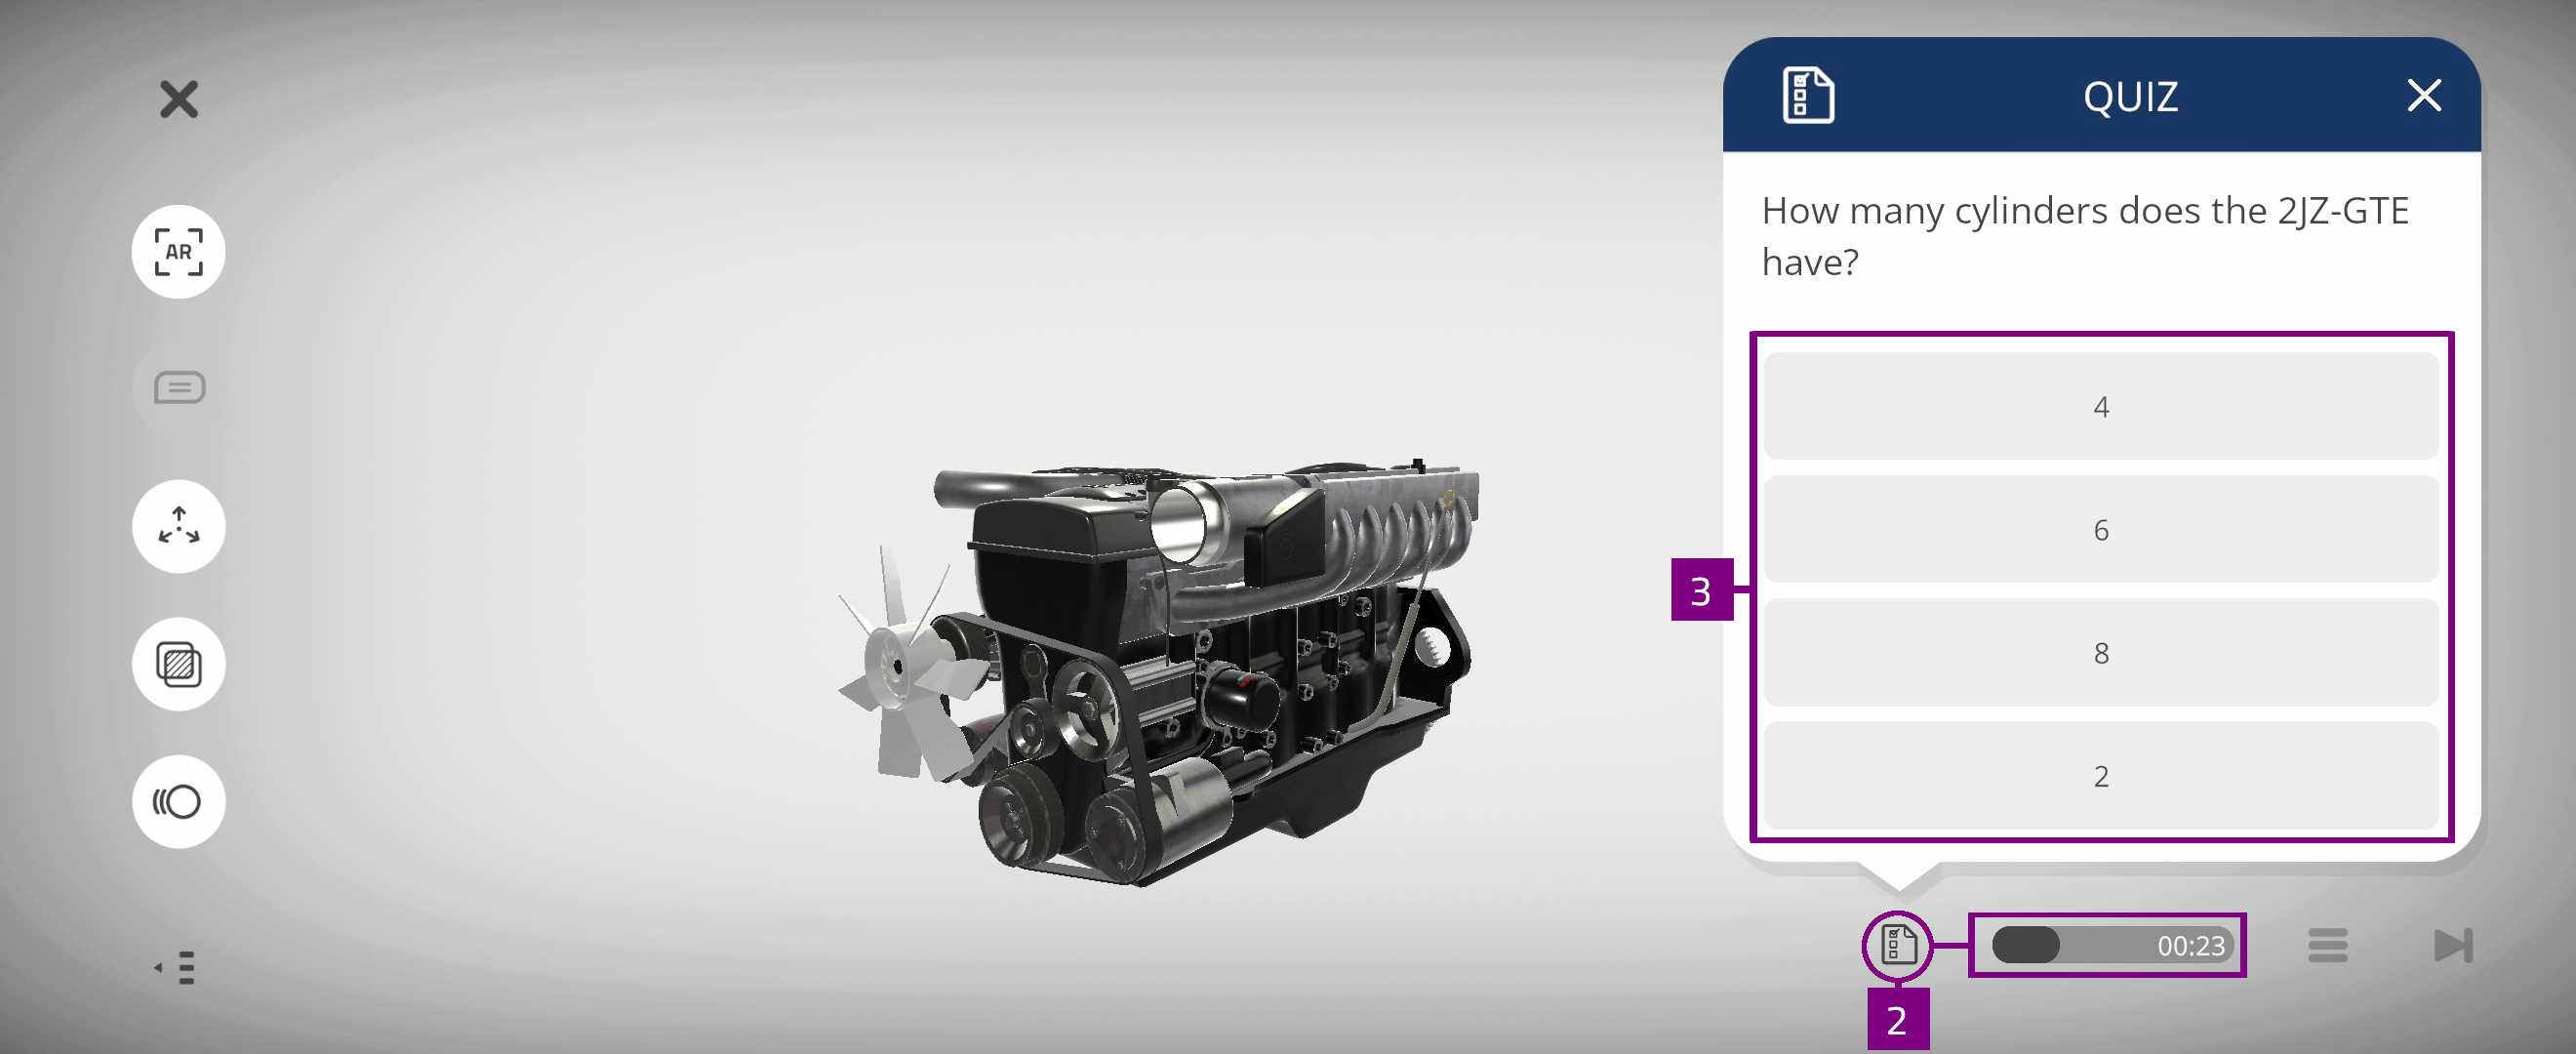
Feedback on your attempt is presented. You can retry incorrect attempts until the time is up
Locate
In the Locate activity, you find and select specific parts from the 3D object.
Select a Locate activity in the activity menu
Select
 to start the activity, this starts the timer
Select the parts:
For objects consisting of multiple parts: select and hold for two seconds
For single mesh model objects: select the sphere connected to the object parts
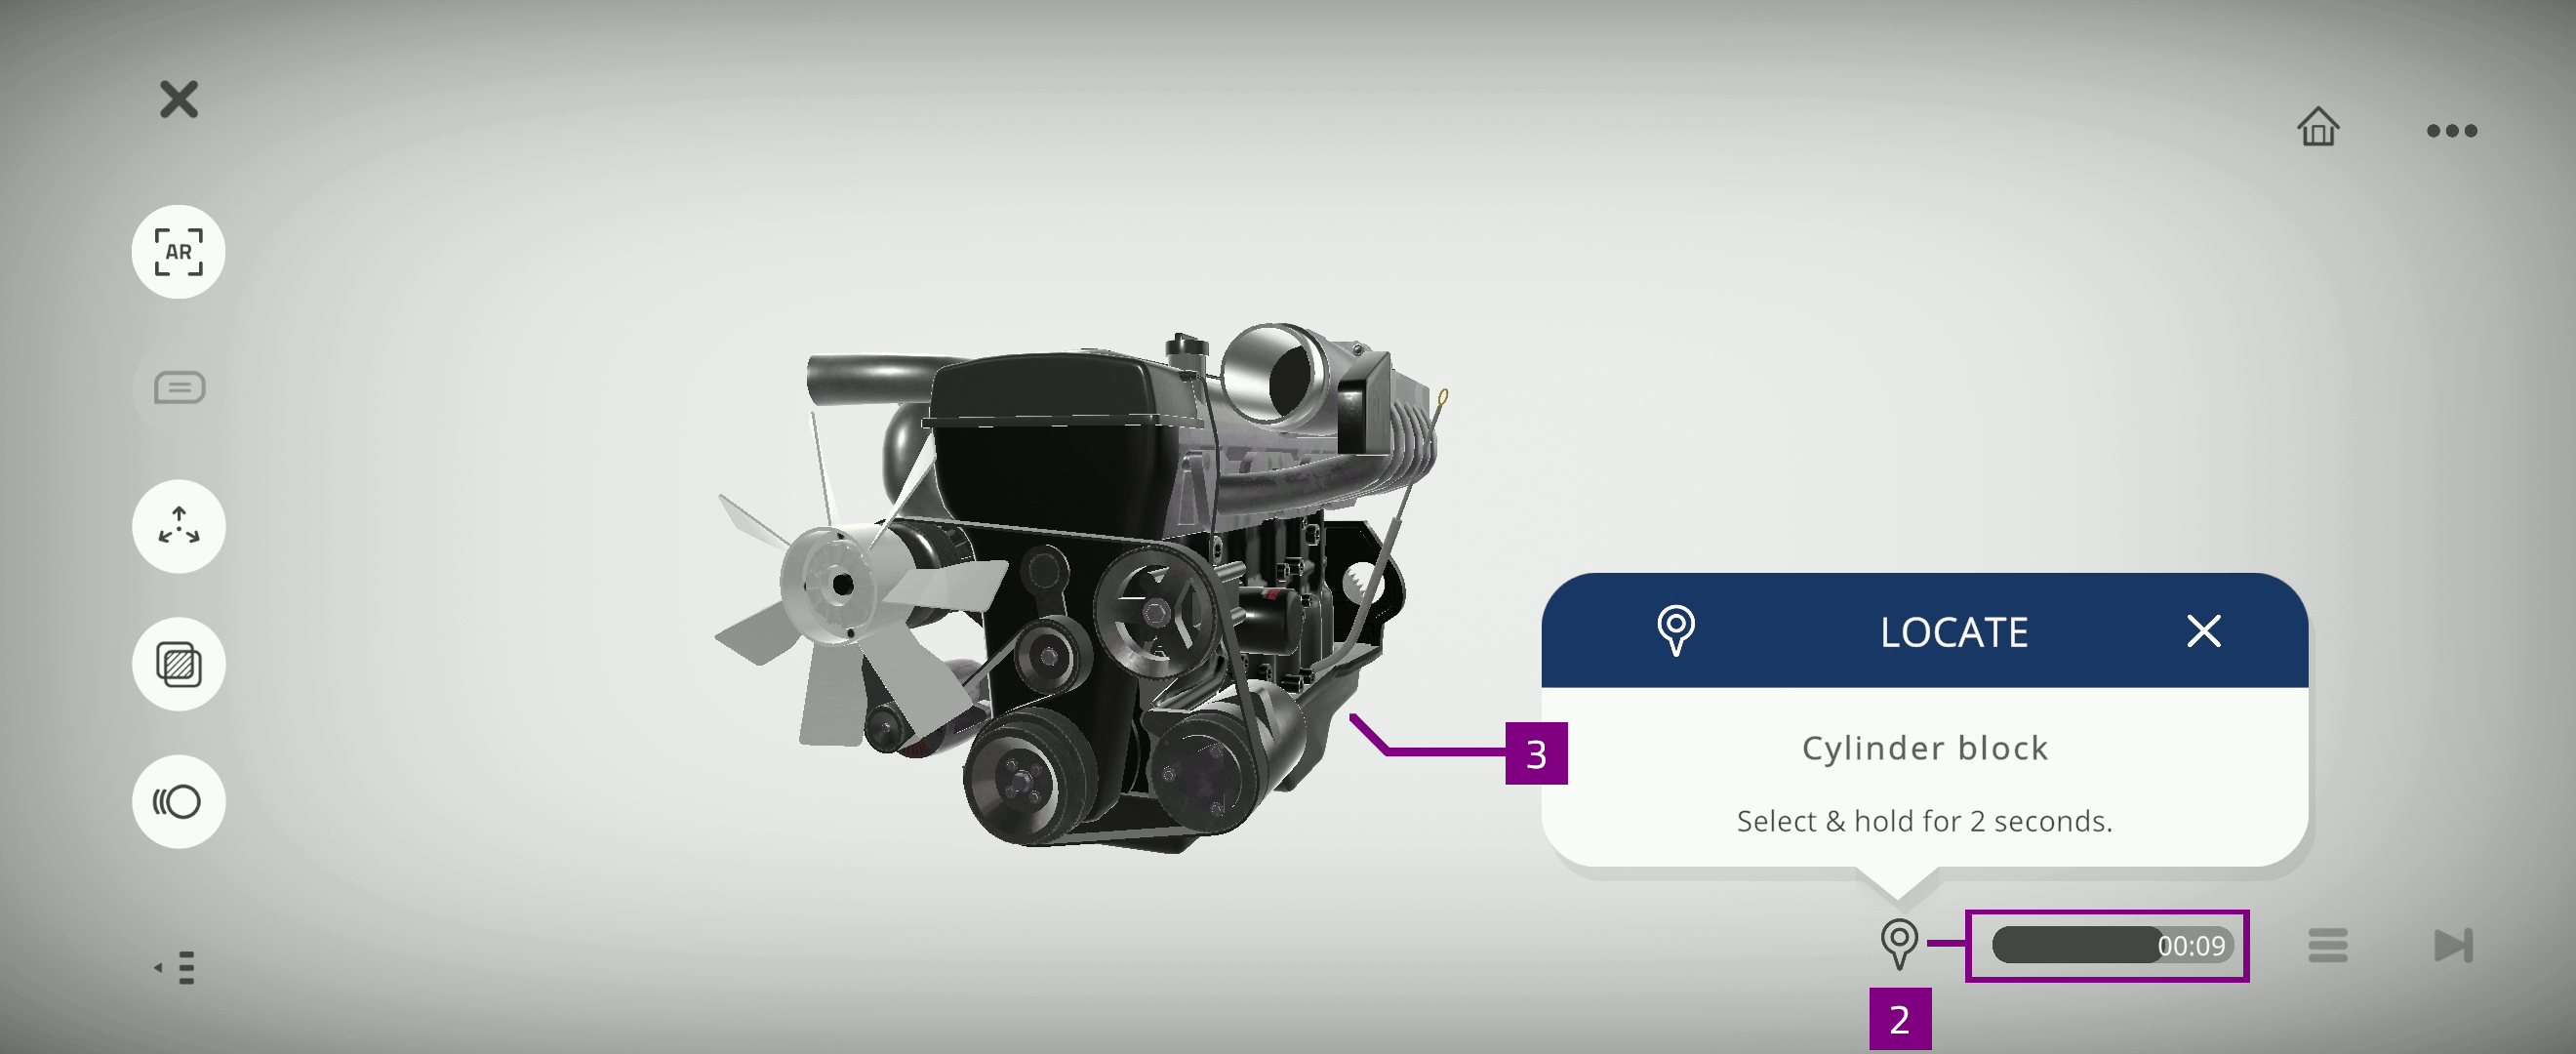
Feedback on your attempt is presented. You can retry incorrect attempts until the time is up
Identify
In the Identify activity, you name the displayed 3D object parts.
Select an Identify activity in the activity menu
Select
 to start the activity, this starts the timer
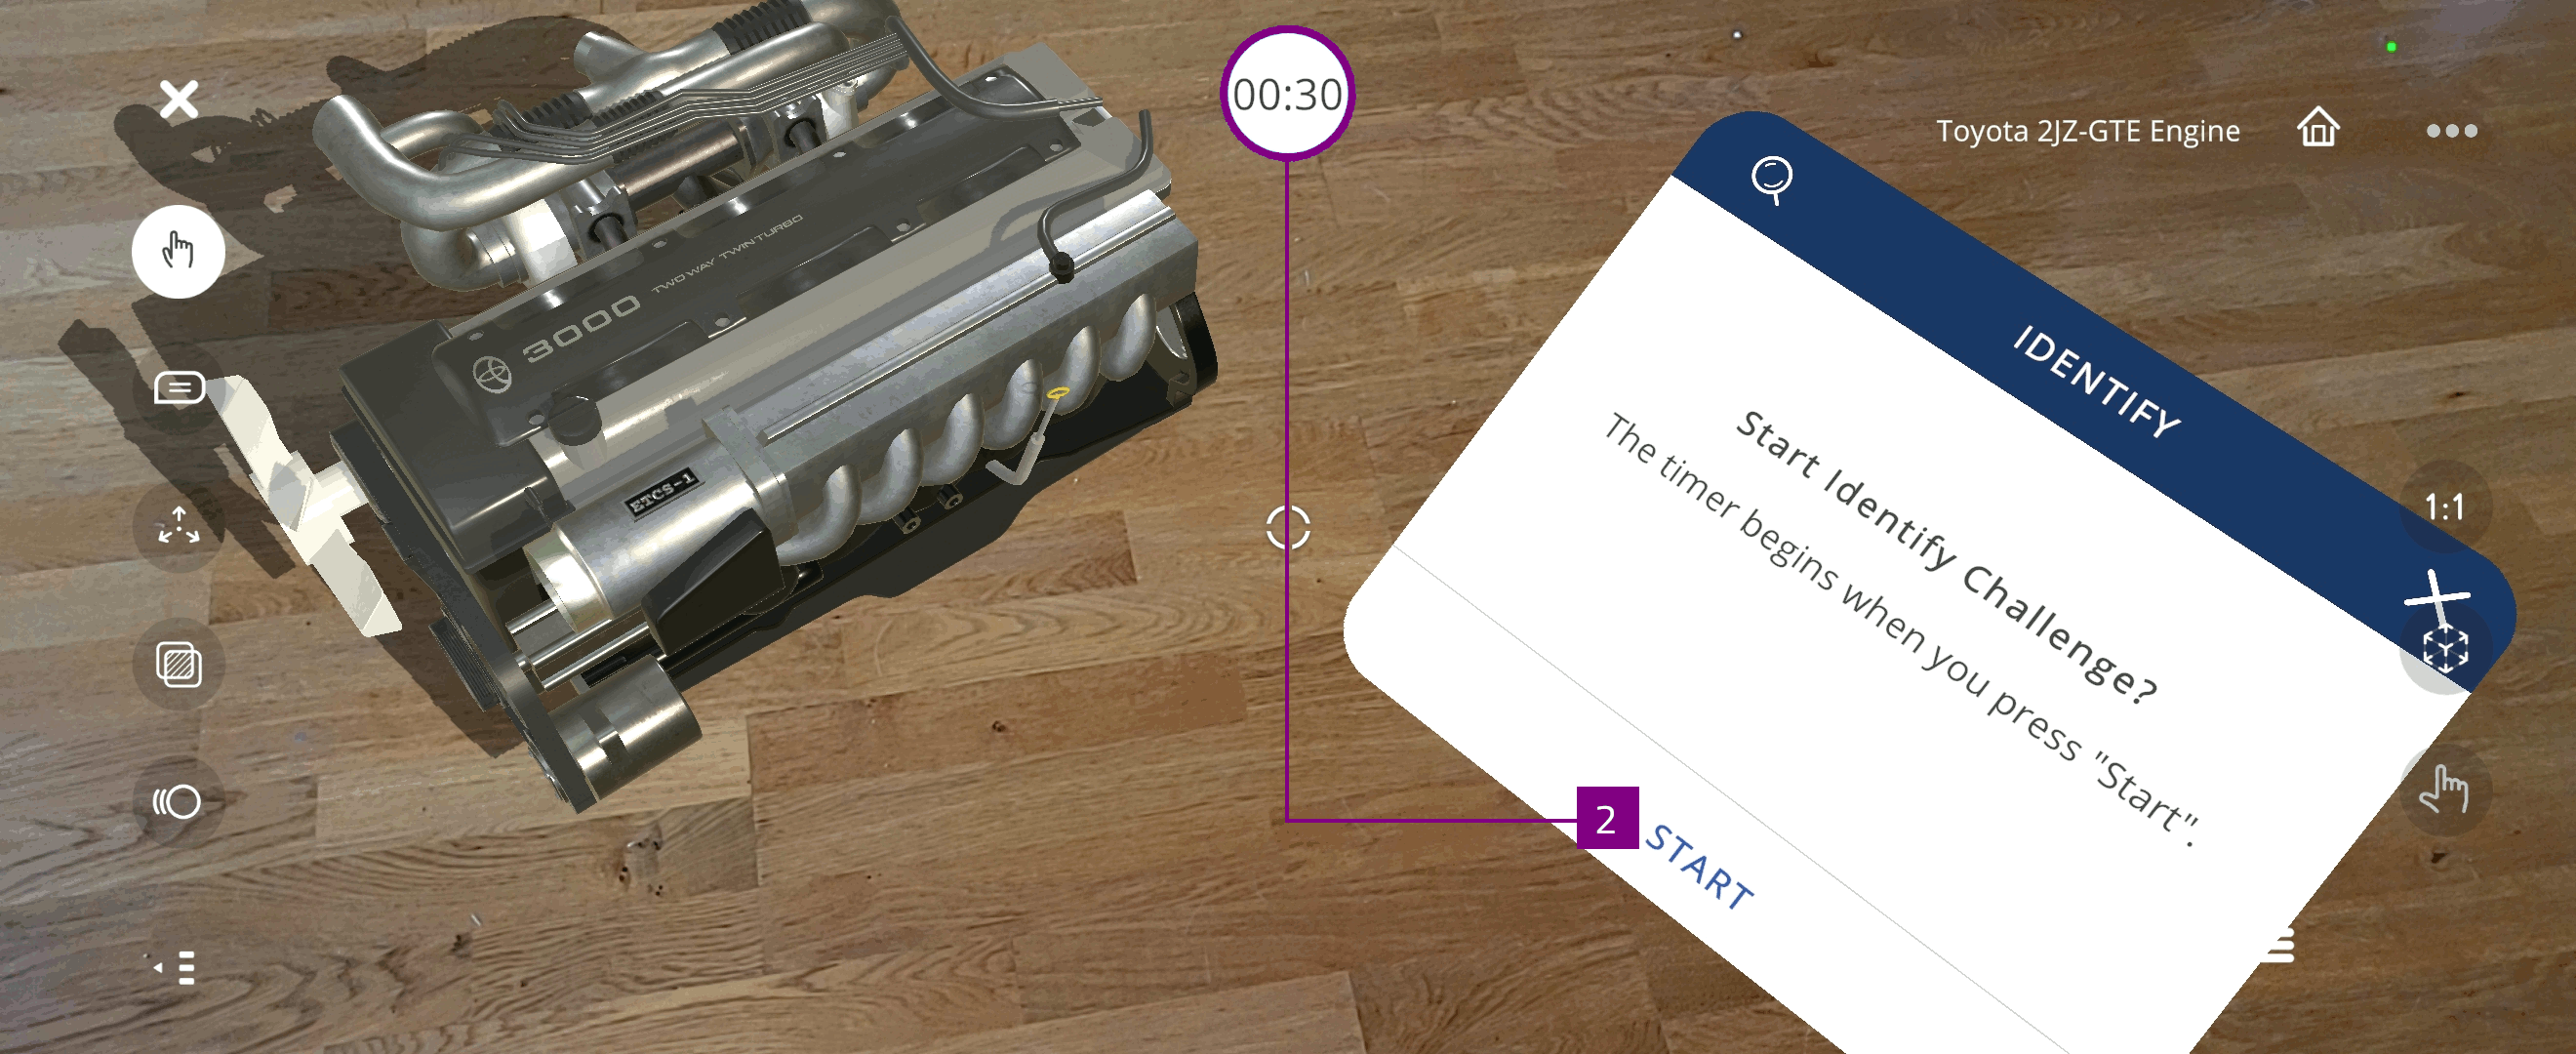
Enter the part name
Feedback on your attempt is presented. You can retry incorrect attempts until the time is up
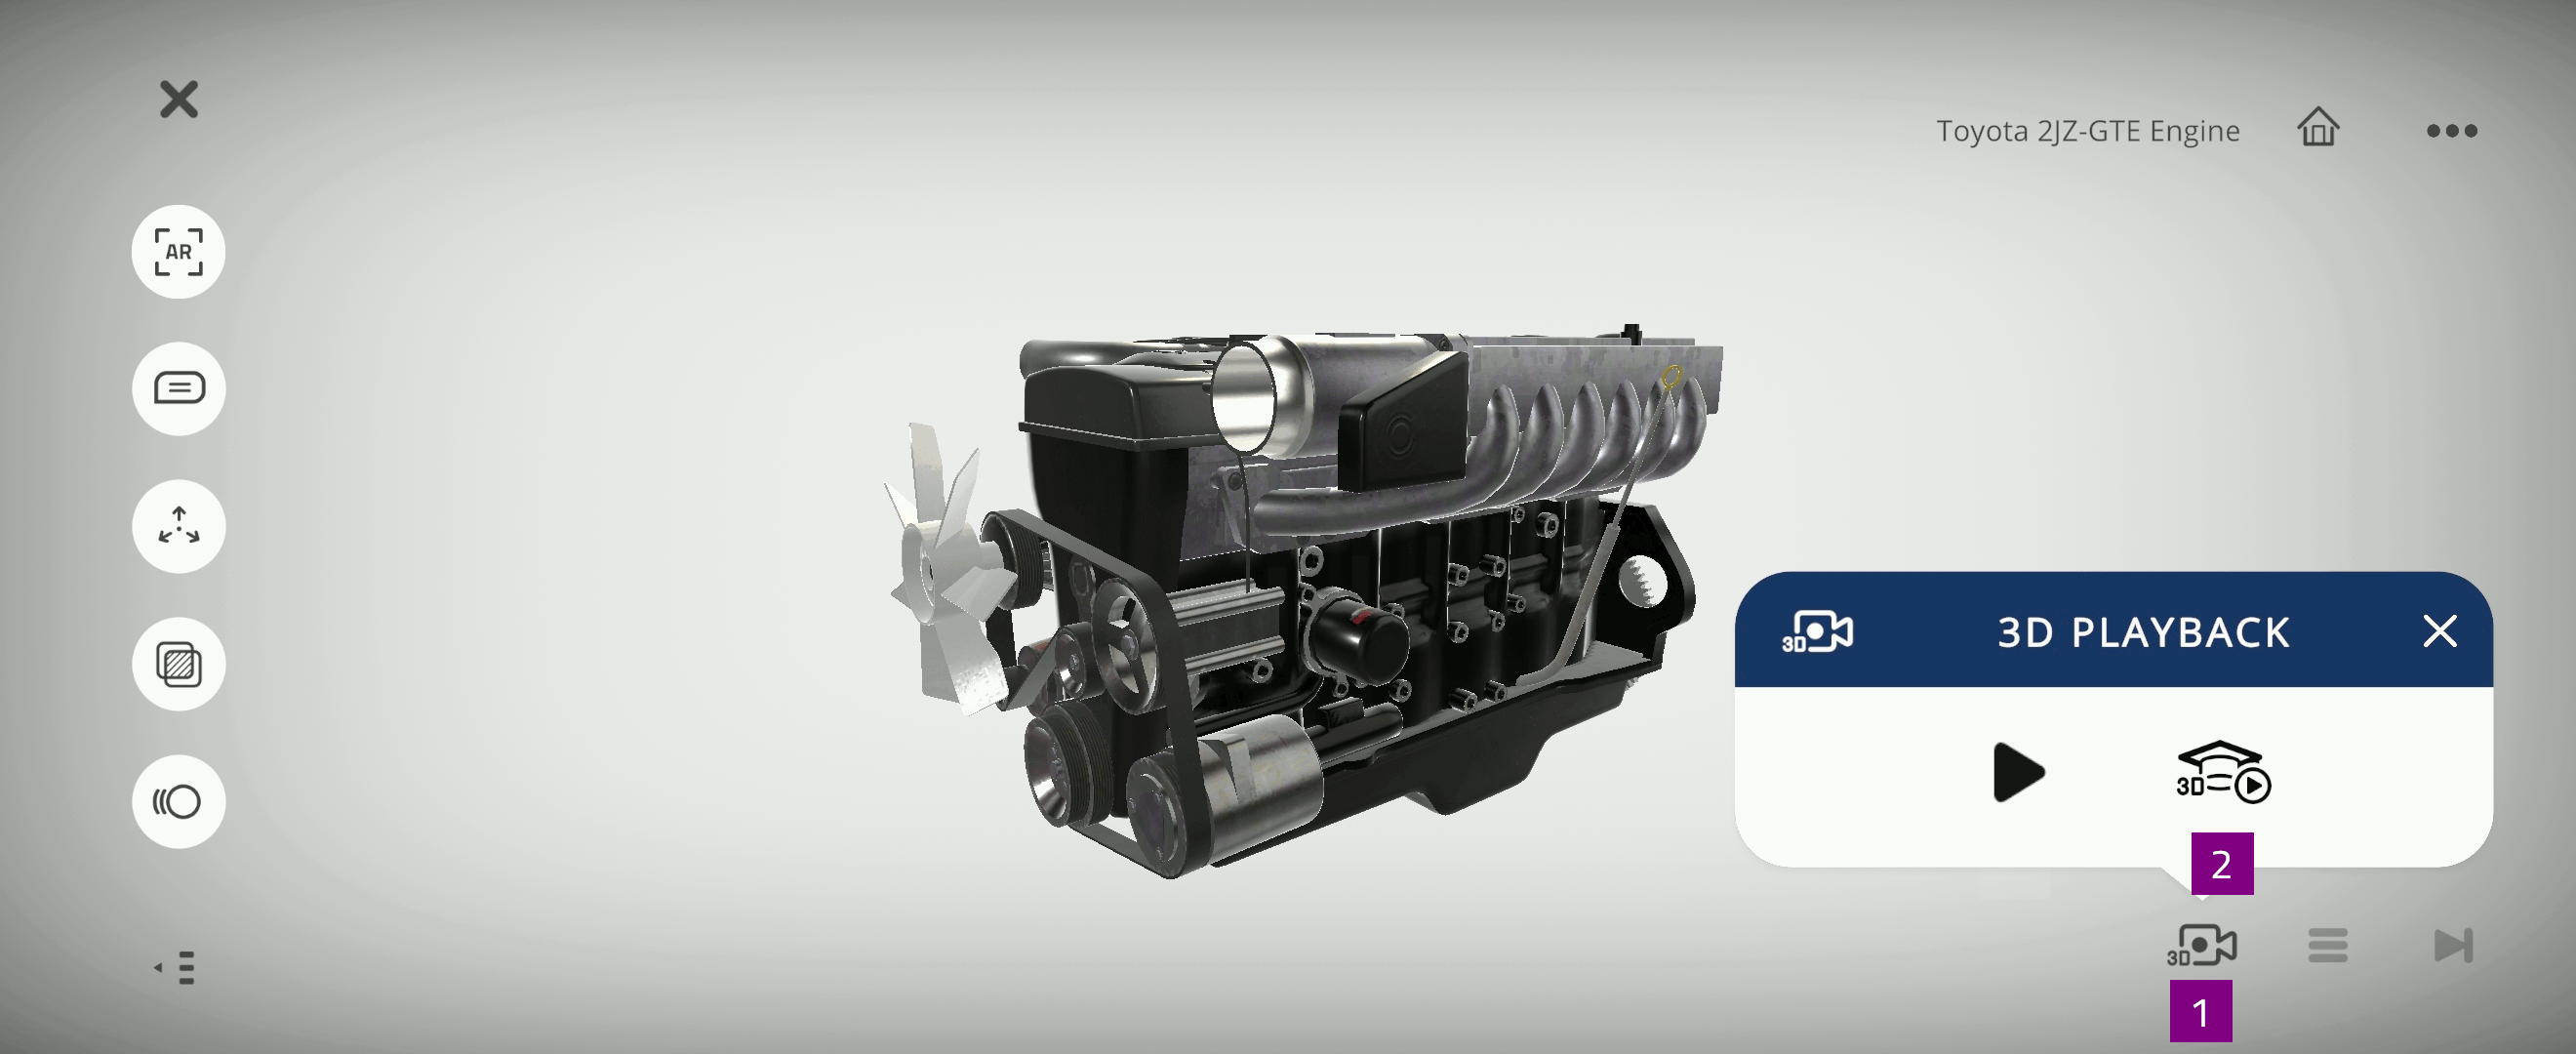
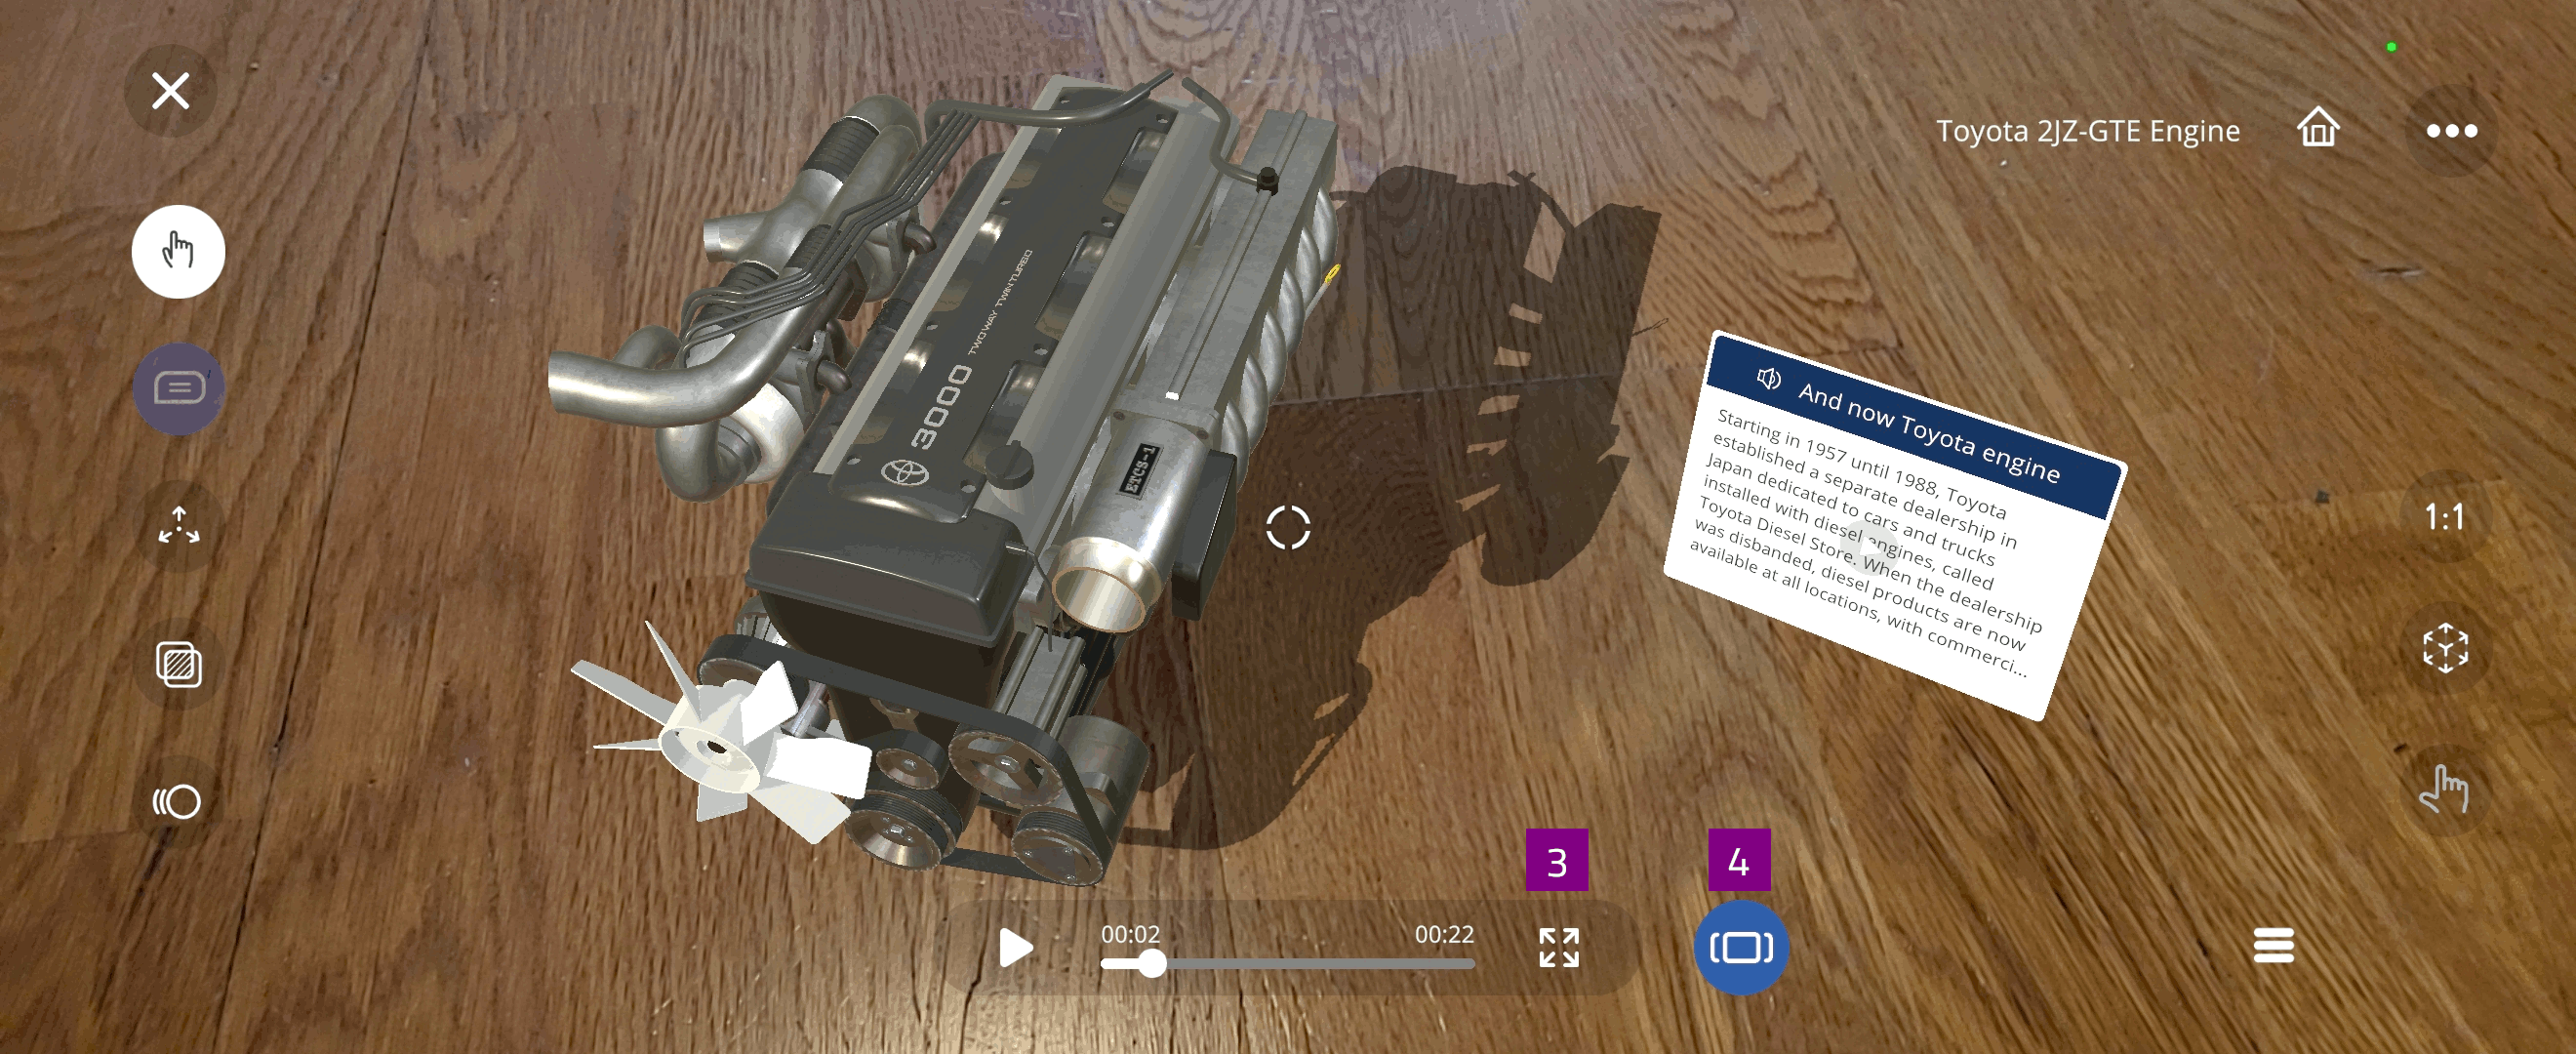
3D Playback and Assessment
The 3D Playback activity is an audiovisual animation created as a 3D Recording for the object. The 3D Playback activity includes interactions with object parts, movement, and voice recording.
In the 3D Assessment activity, you test your ability to follow the steps demonstrated in a 3D Playback. After completing the 3D Assessment, your performance scorecard is displayed.
Select
 to view the 3D Playback activity
Select
 in a 3D Playback activity to perform the associated 3D Assessment
3D Playback
Select a 3D Playback
activity in the activity menuSelect
 to start the activity
The hand avatar guides you through the activity content
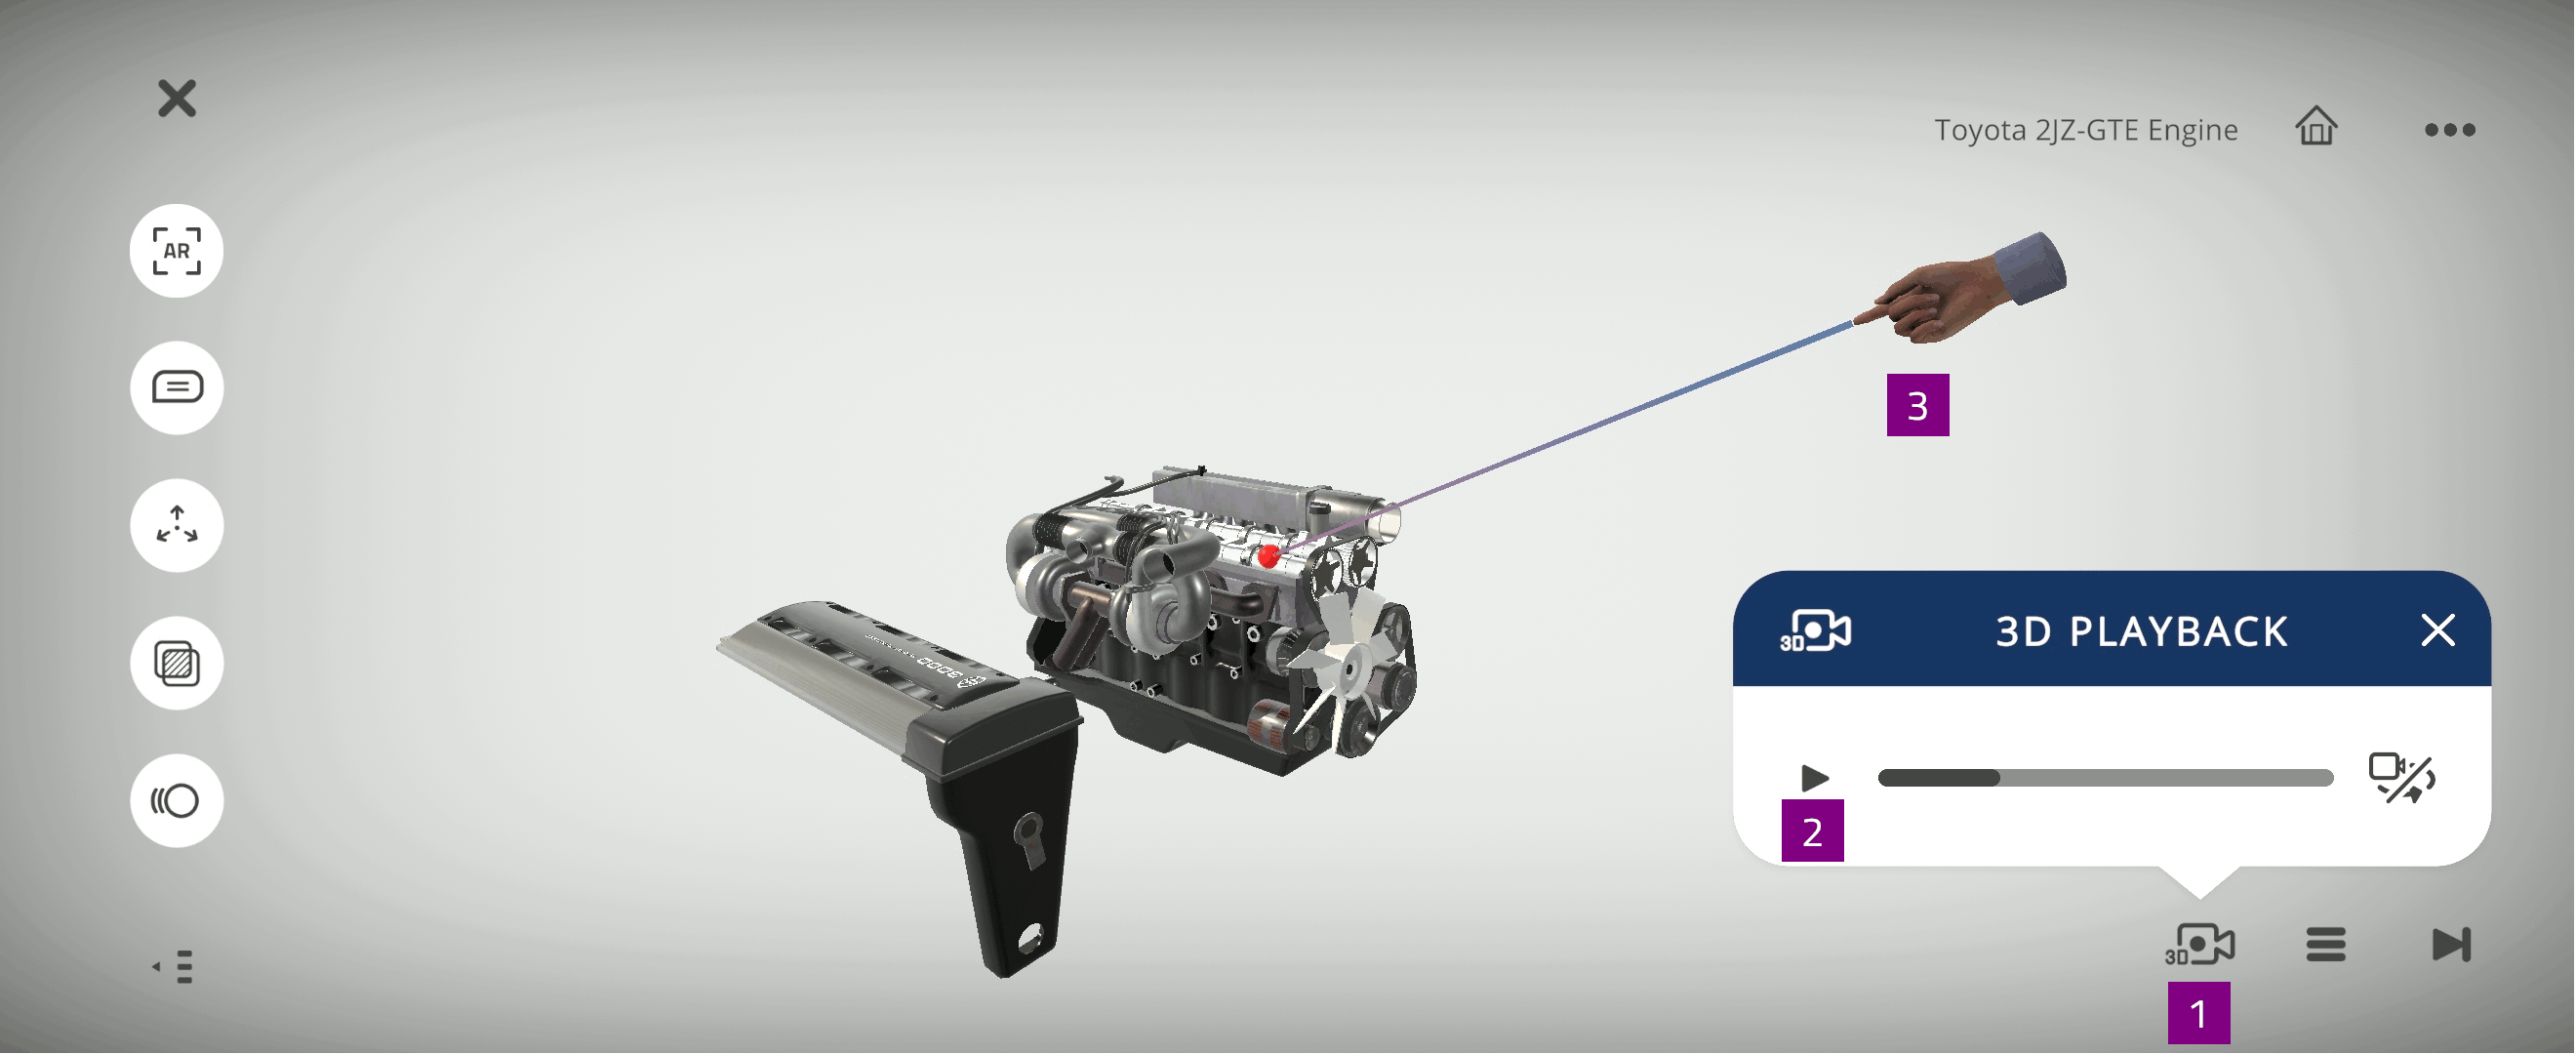
Select
and  to start and pause the activity
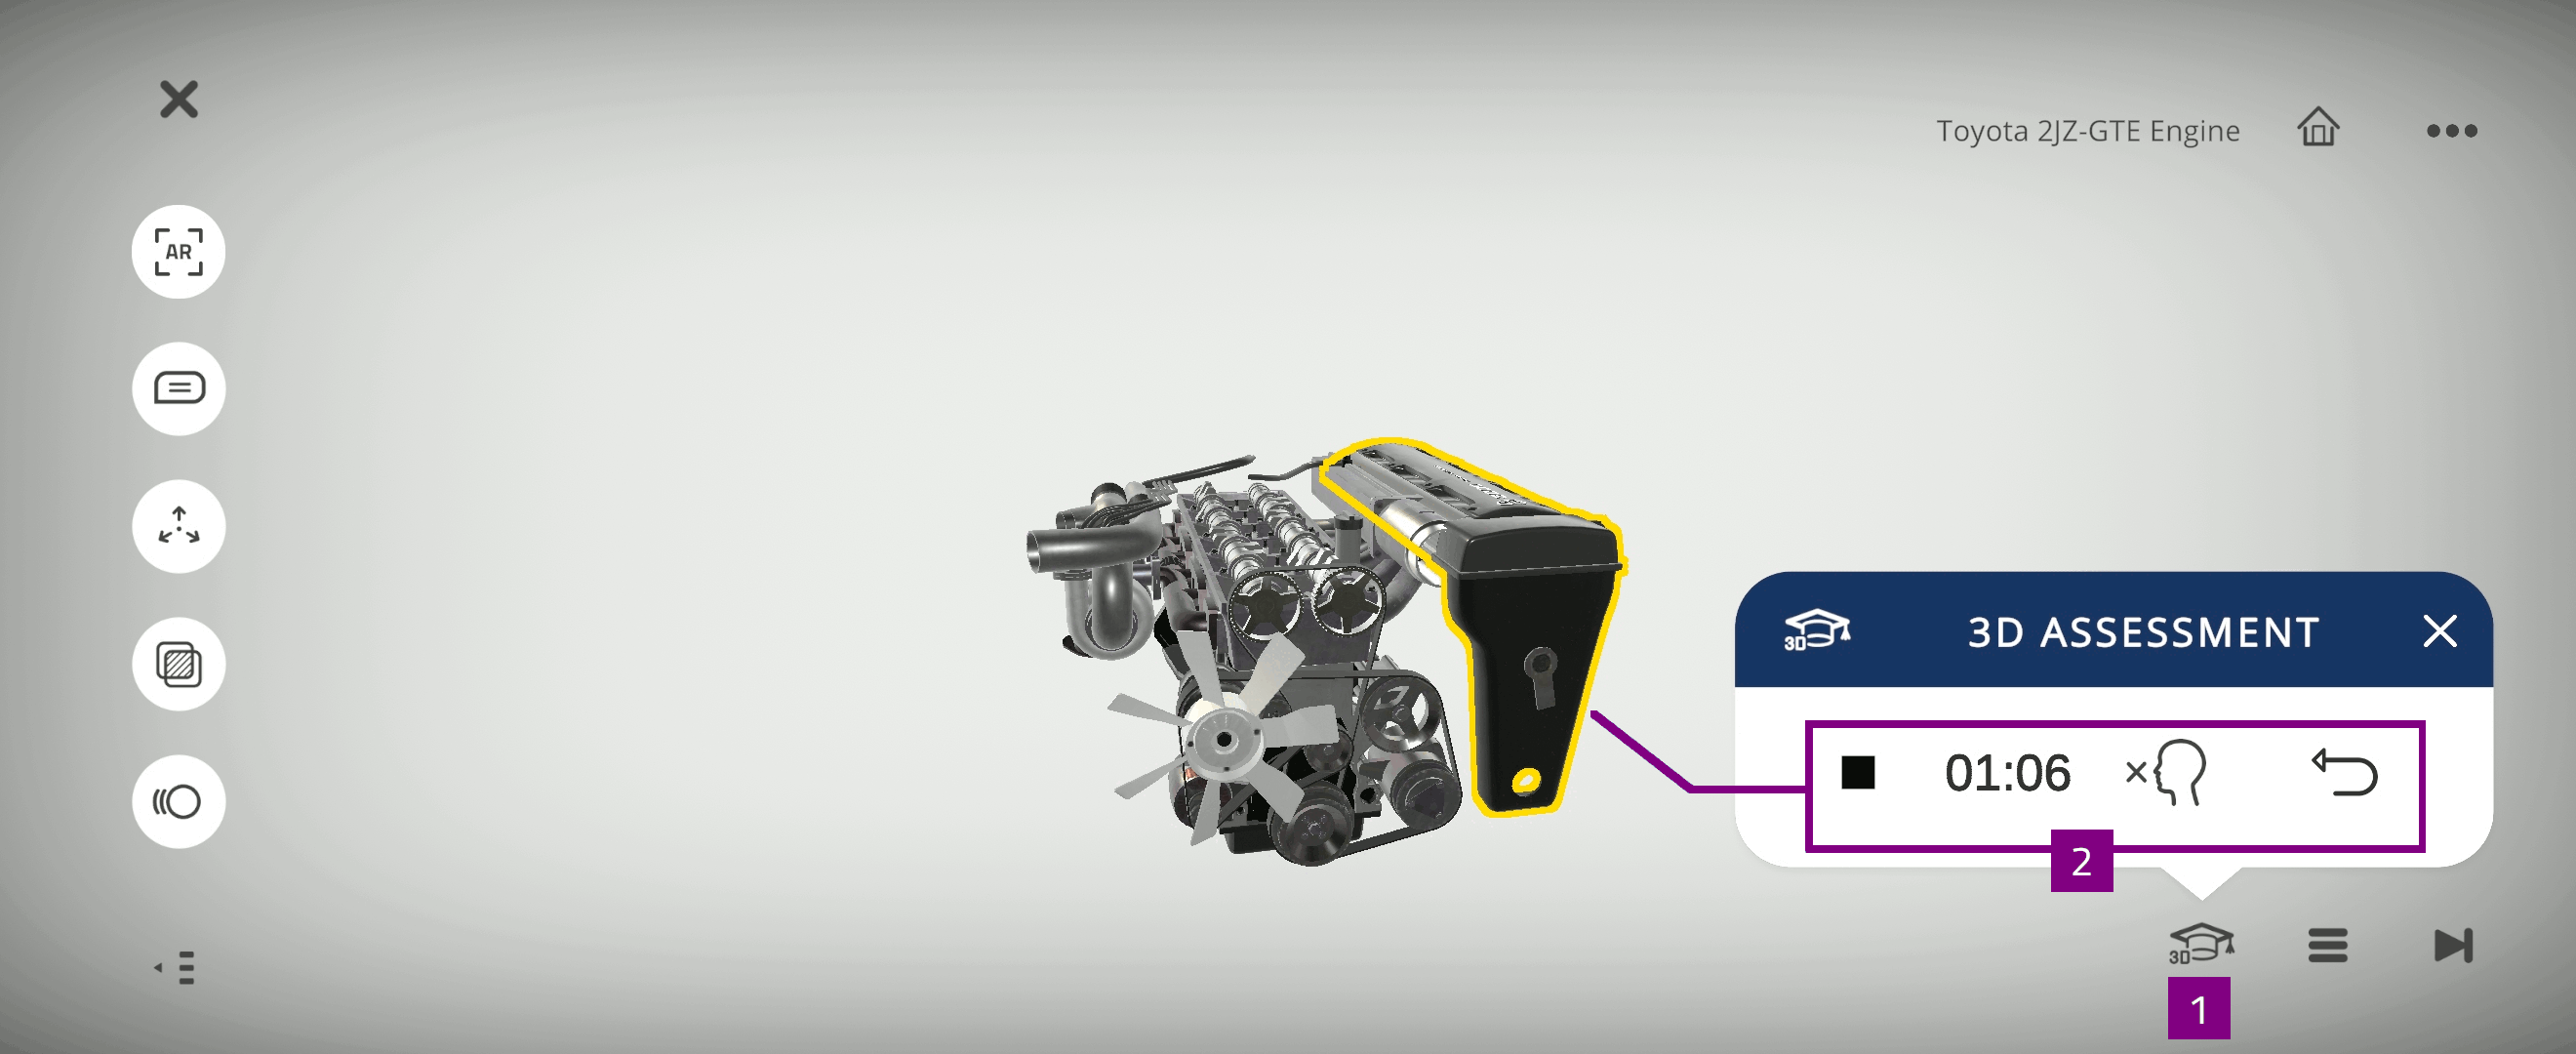
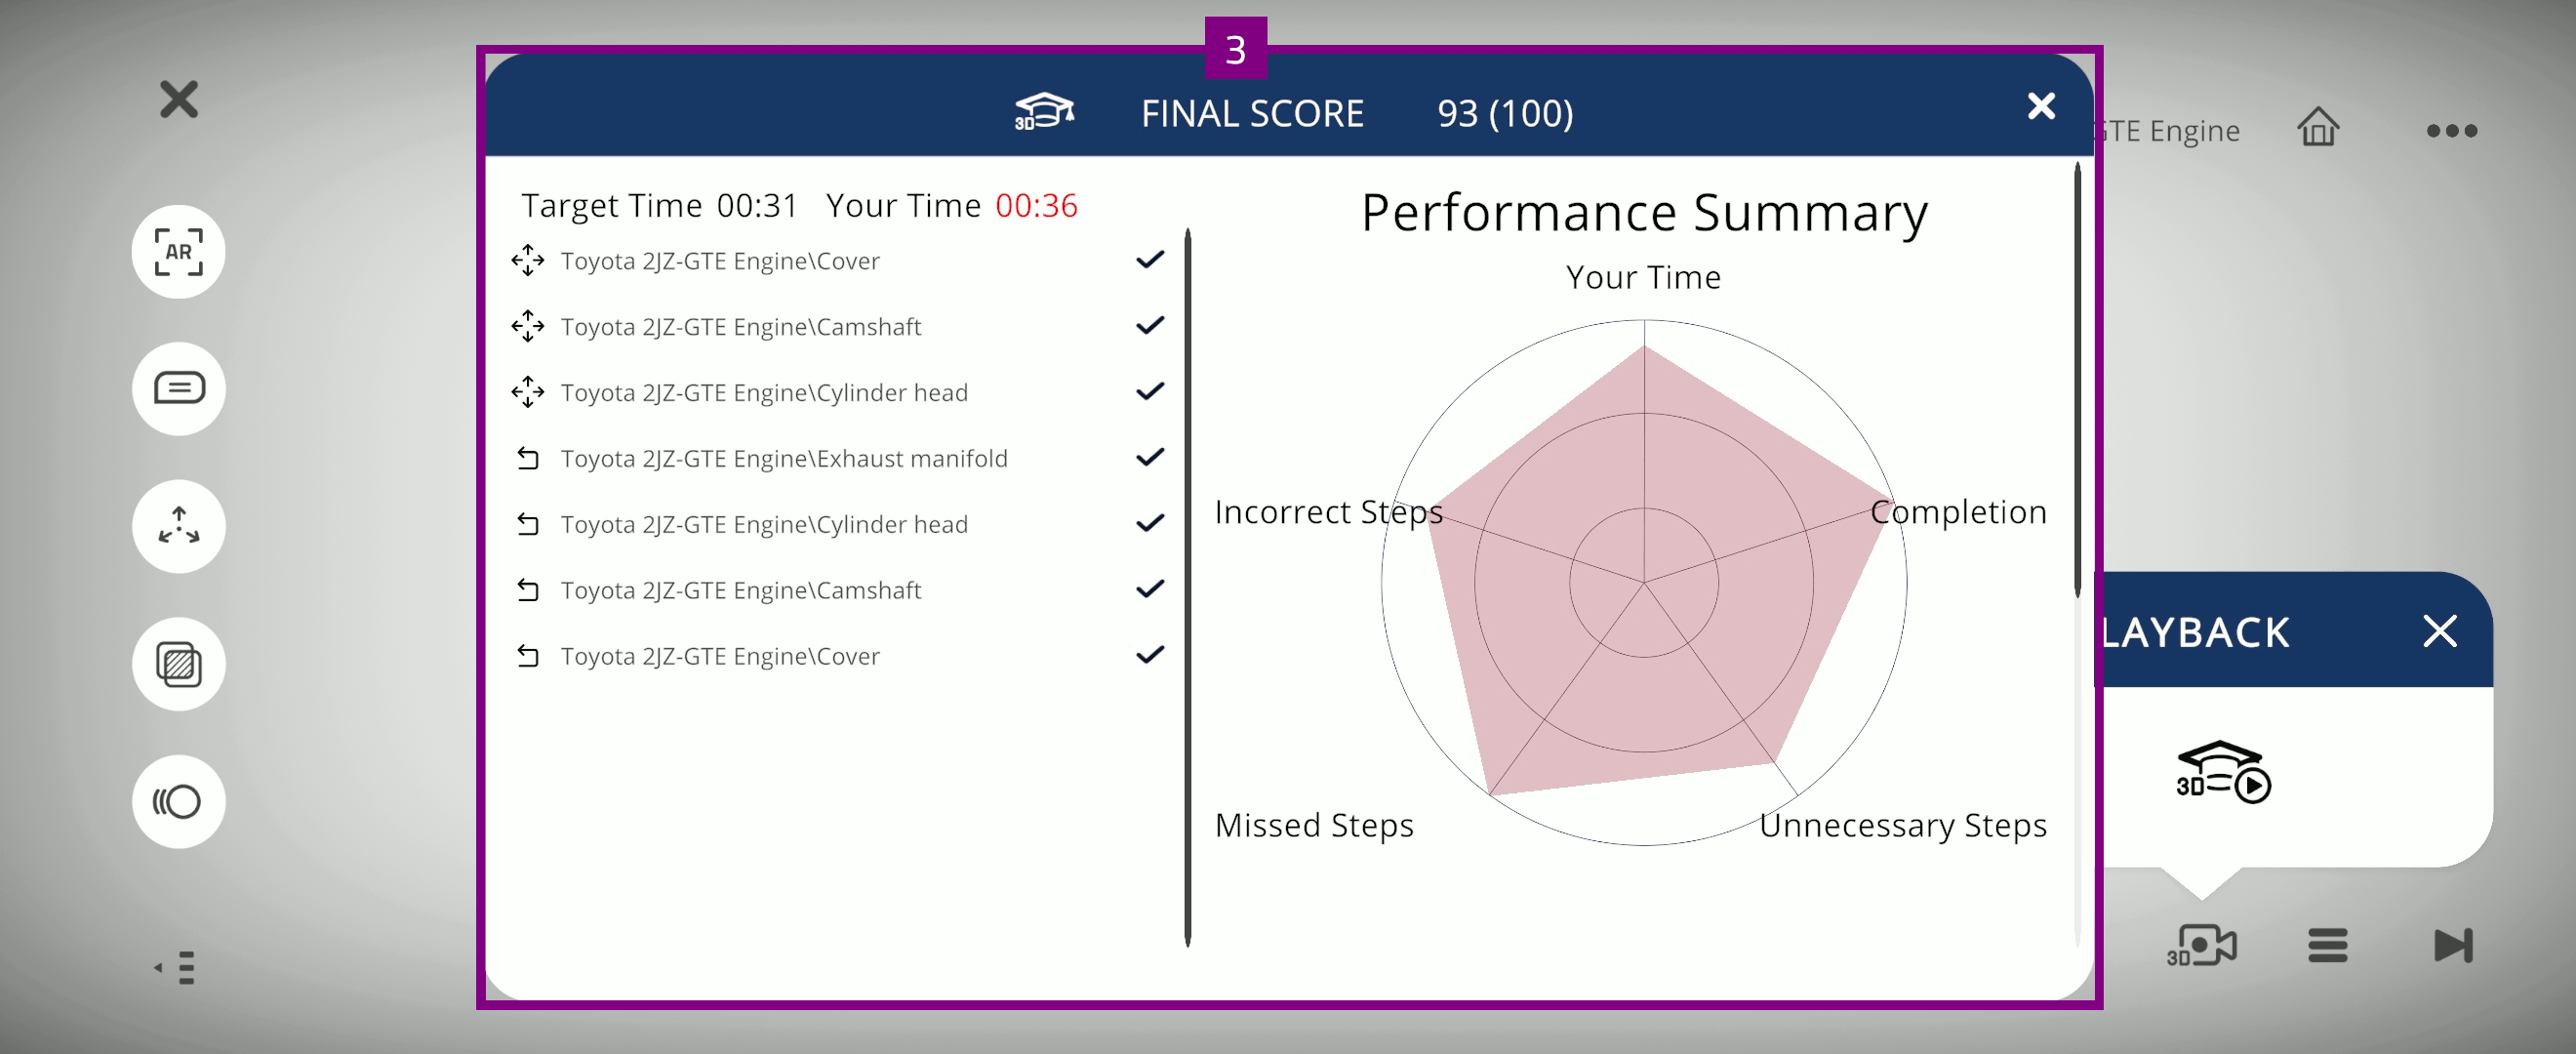
3D Assessment
Select
in the 3D Recording activityFollow the steps demonstrated in the 3D Recording activity
You can tap and hold to select certain parts of the object
Select
to finish the activity and show the performance scorecardView remaining timer duration
Select
 to listen to the recorded voice-over
Select
 to undo your previous action
View the 3D Assessment performance scorecard, which includes:
Final scores
Followed procedural steps
Graph of your performance, related to the task
Completion status
Percentage of incorrect steps
AR portals
The AR portals provide an interactive and spatial multimedia experience related to the Xperience.
AR portals are accessed in AR mode and include:
Knowledge portals
Assessment portals
Note
AR portals are only available for users with EON Merged XR license.
Knowledge portals
Knowledge portals include media content associated with individual annotations in the Xperience.
Select AR
mode and select Annotations to view Knowledge portalsSelect a Knowledge portal you want to view, such as Audio, Video, PDF, and Image
Select
 to enable / disable full screen
Select
 to view all activities in the selected knowledge portal
Note
Only activities associated with an annotation are displayed through the knowledge portals.
Assessment portal
Assessment portal include activities associated with individual annotations in the Xperience.
Select AR
mode and select activity menu to view Assessment portalsSelect desired activity from the list:
Quiz
Locate
Identify
3D Recording
and 3D Assessment
Perform tasks required for the selected activity
Select
 to move the assessment portals
Select X to exit the assessment portal
Interactions
Note
Interactions are only available while using AR mode
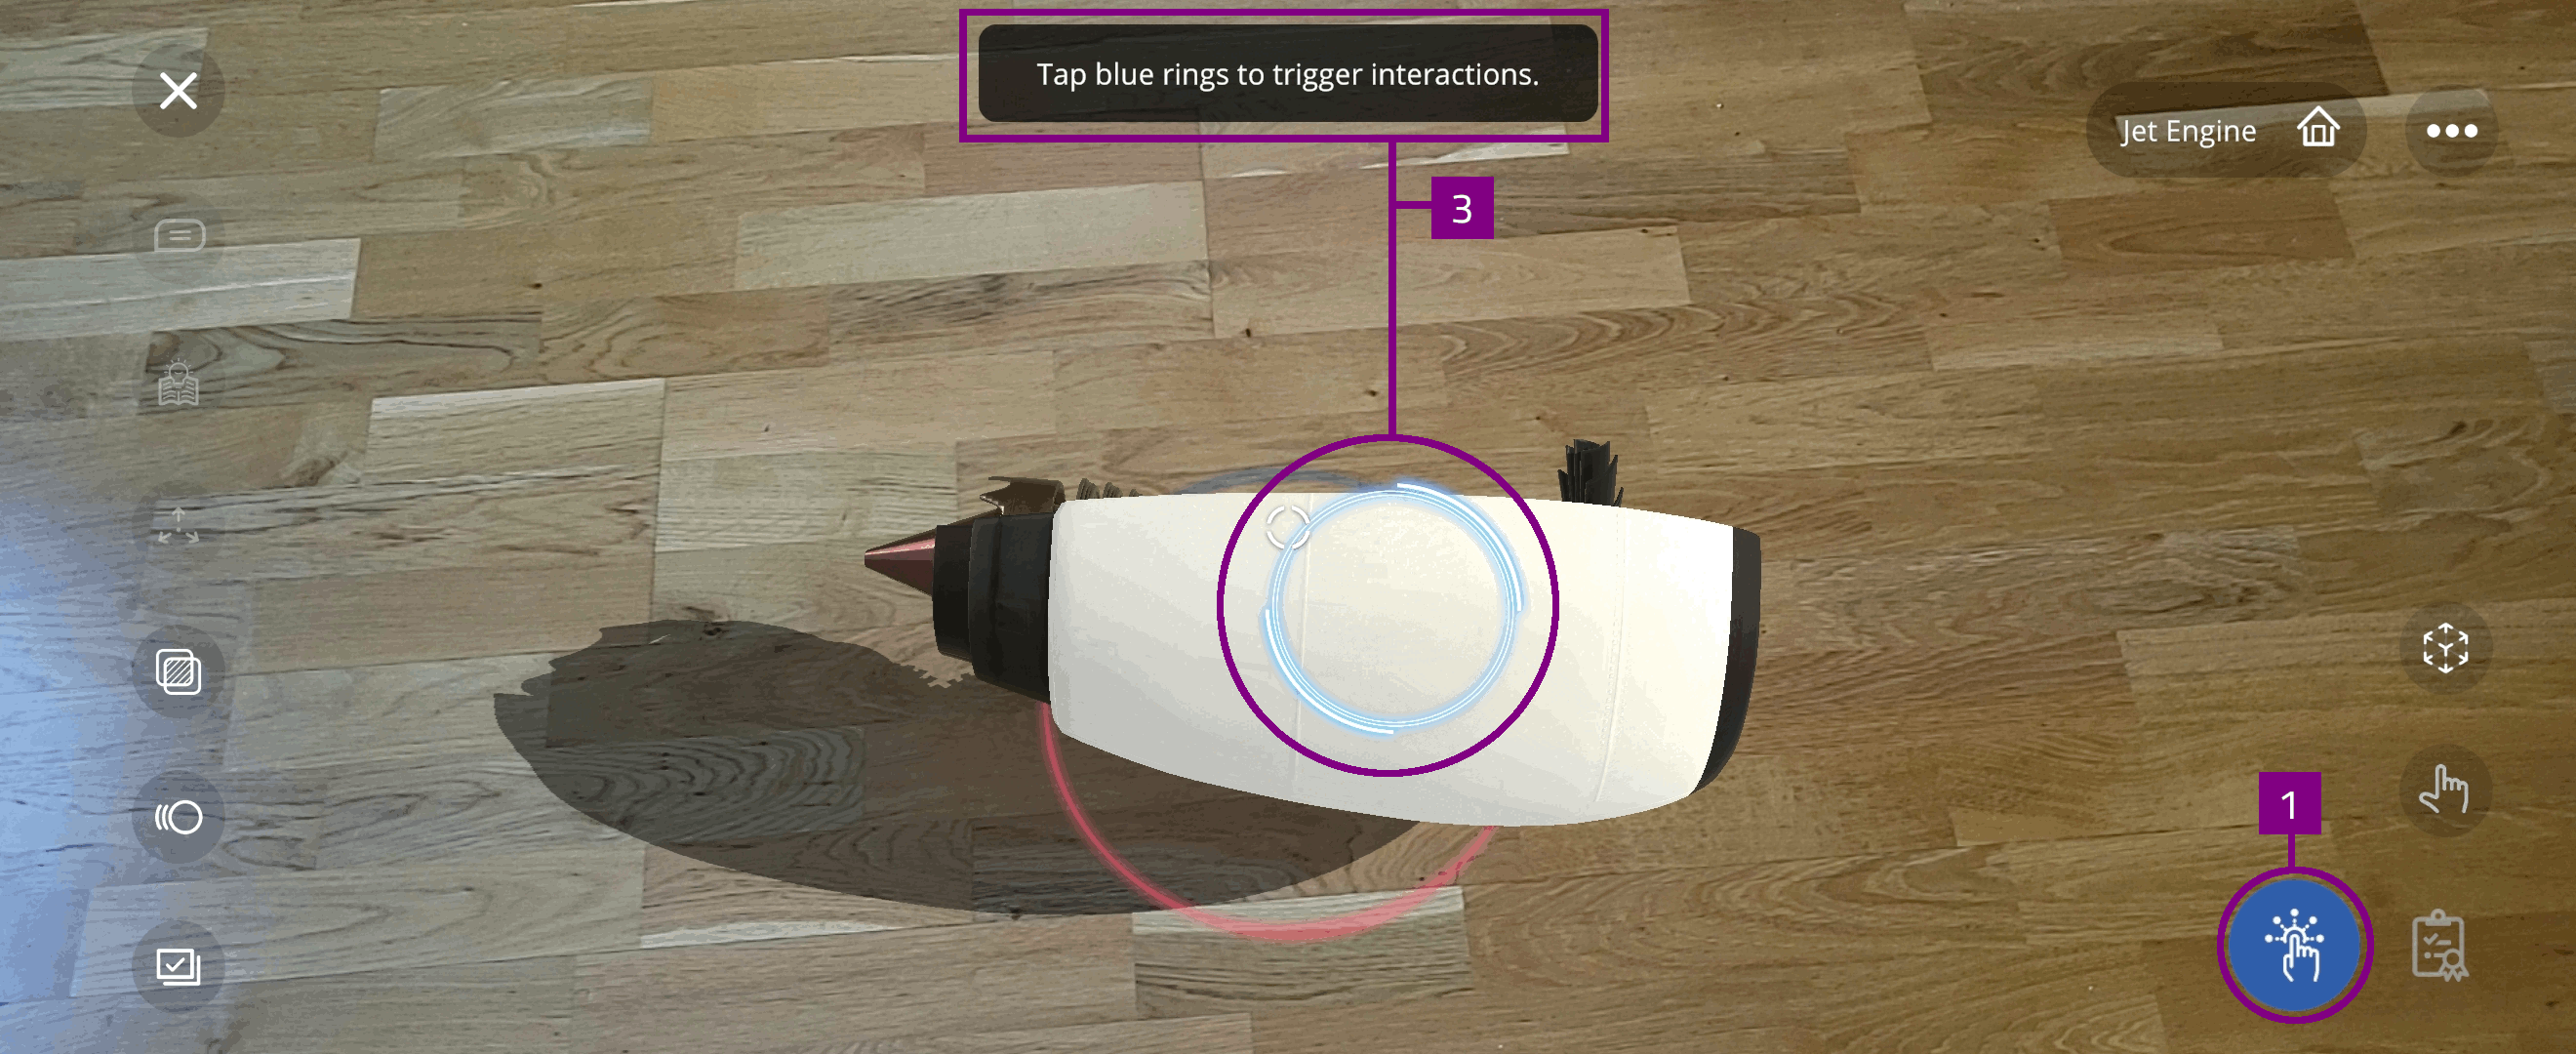
Interactions created for objects in the Xperience can activate by exploring the triggers.
Select

Note
If enabled by the author, the interaction zones are displayed on the object. Otherwise, the interaction zones are hidden.
Explore the object to find potential triggers which activates actions
Alternatively, tap beside the object to show the interaction zones
Note
If the interaction uses a proximity trigger, the interaction zone is always invisible. The interaction triggers when you walk into the invisible zone, defined by the author.
Note
If the interaction uses the assessment passed or failed trigger, it triggers when you run the specific activities in the Assessment Portal.
Geolocated Xperience
Note
Geolocated Xperiences are only available while using AR mode
In a geolocated Xperience, the objects are connected to a physical location in the real world. These objects have their exact position memorized.
Note
In the Xperience page, Geolocated Xperiences are indicated by the  icon. The connected physical location is displayed on the map.
There are two ways to display objects in a geolocated Xperience:
Place objects connected to a physical location (recommended)
EON-XR places the object in the memorized position
Requires that you start the Xperience in the correct physical location
Place object without using the memorized position
You place the object manually, without relying on the memorized location
When starting the Xperience in another physical location
Place objects connected to a physical location
When placing objects connected to a physical, you must visit the exact same physical location as the Xperience was created in.
Select Yes in the dialogue to use persistent anchor
Move to the physical location displayed in the photo
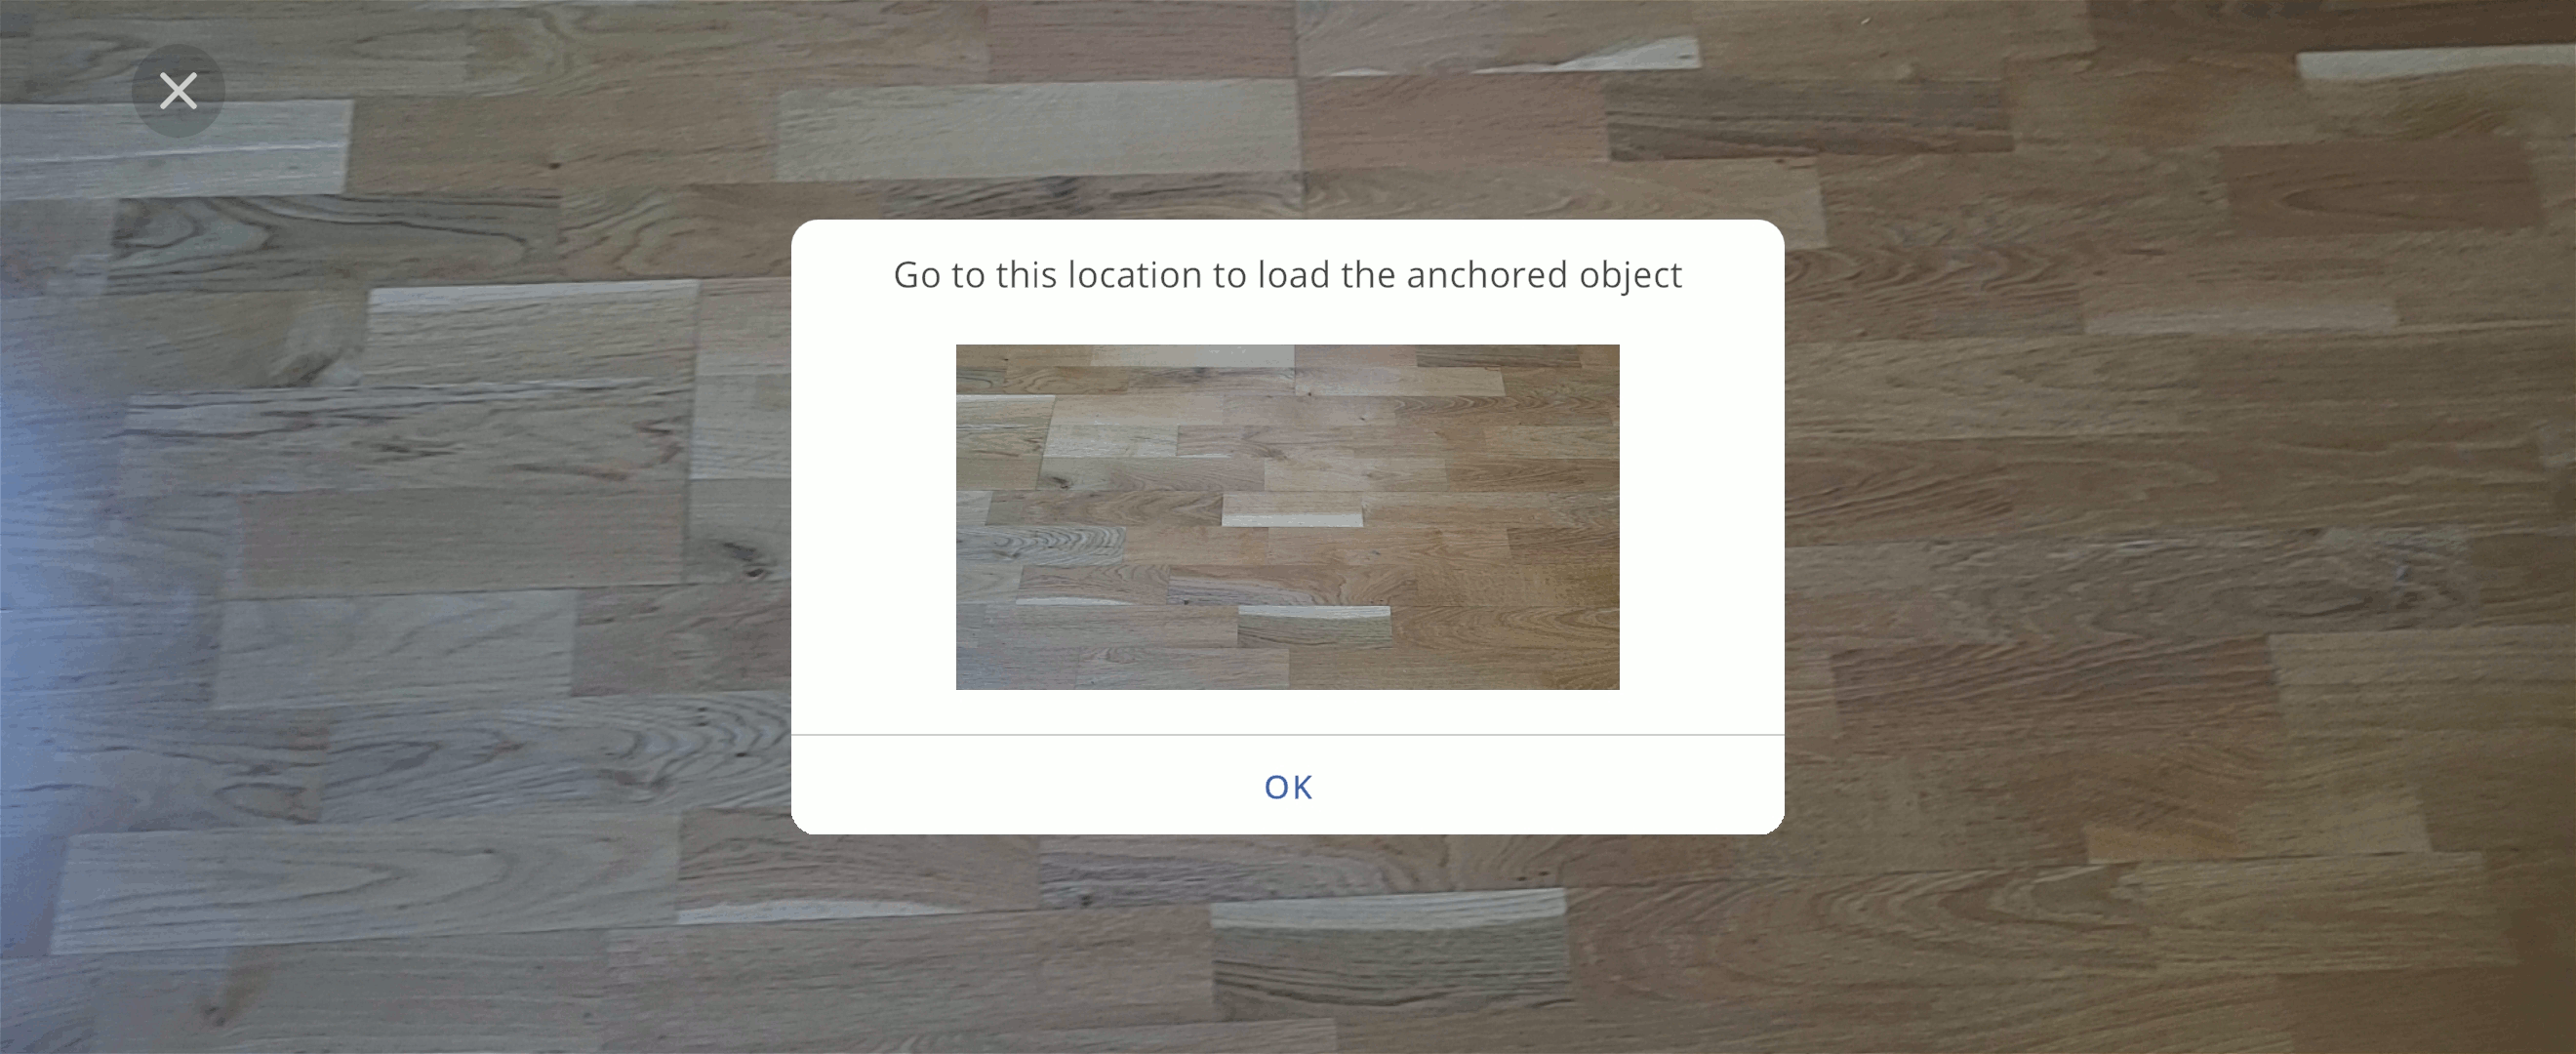
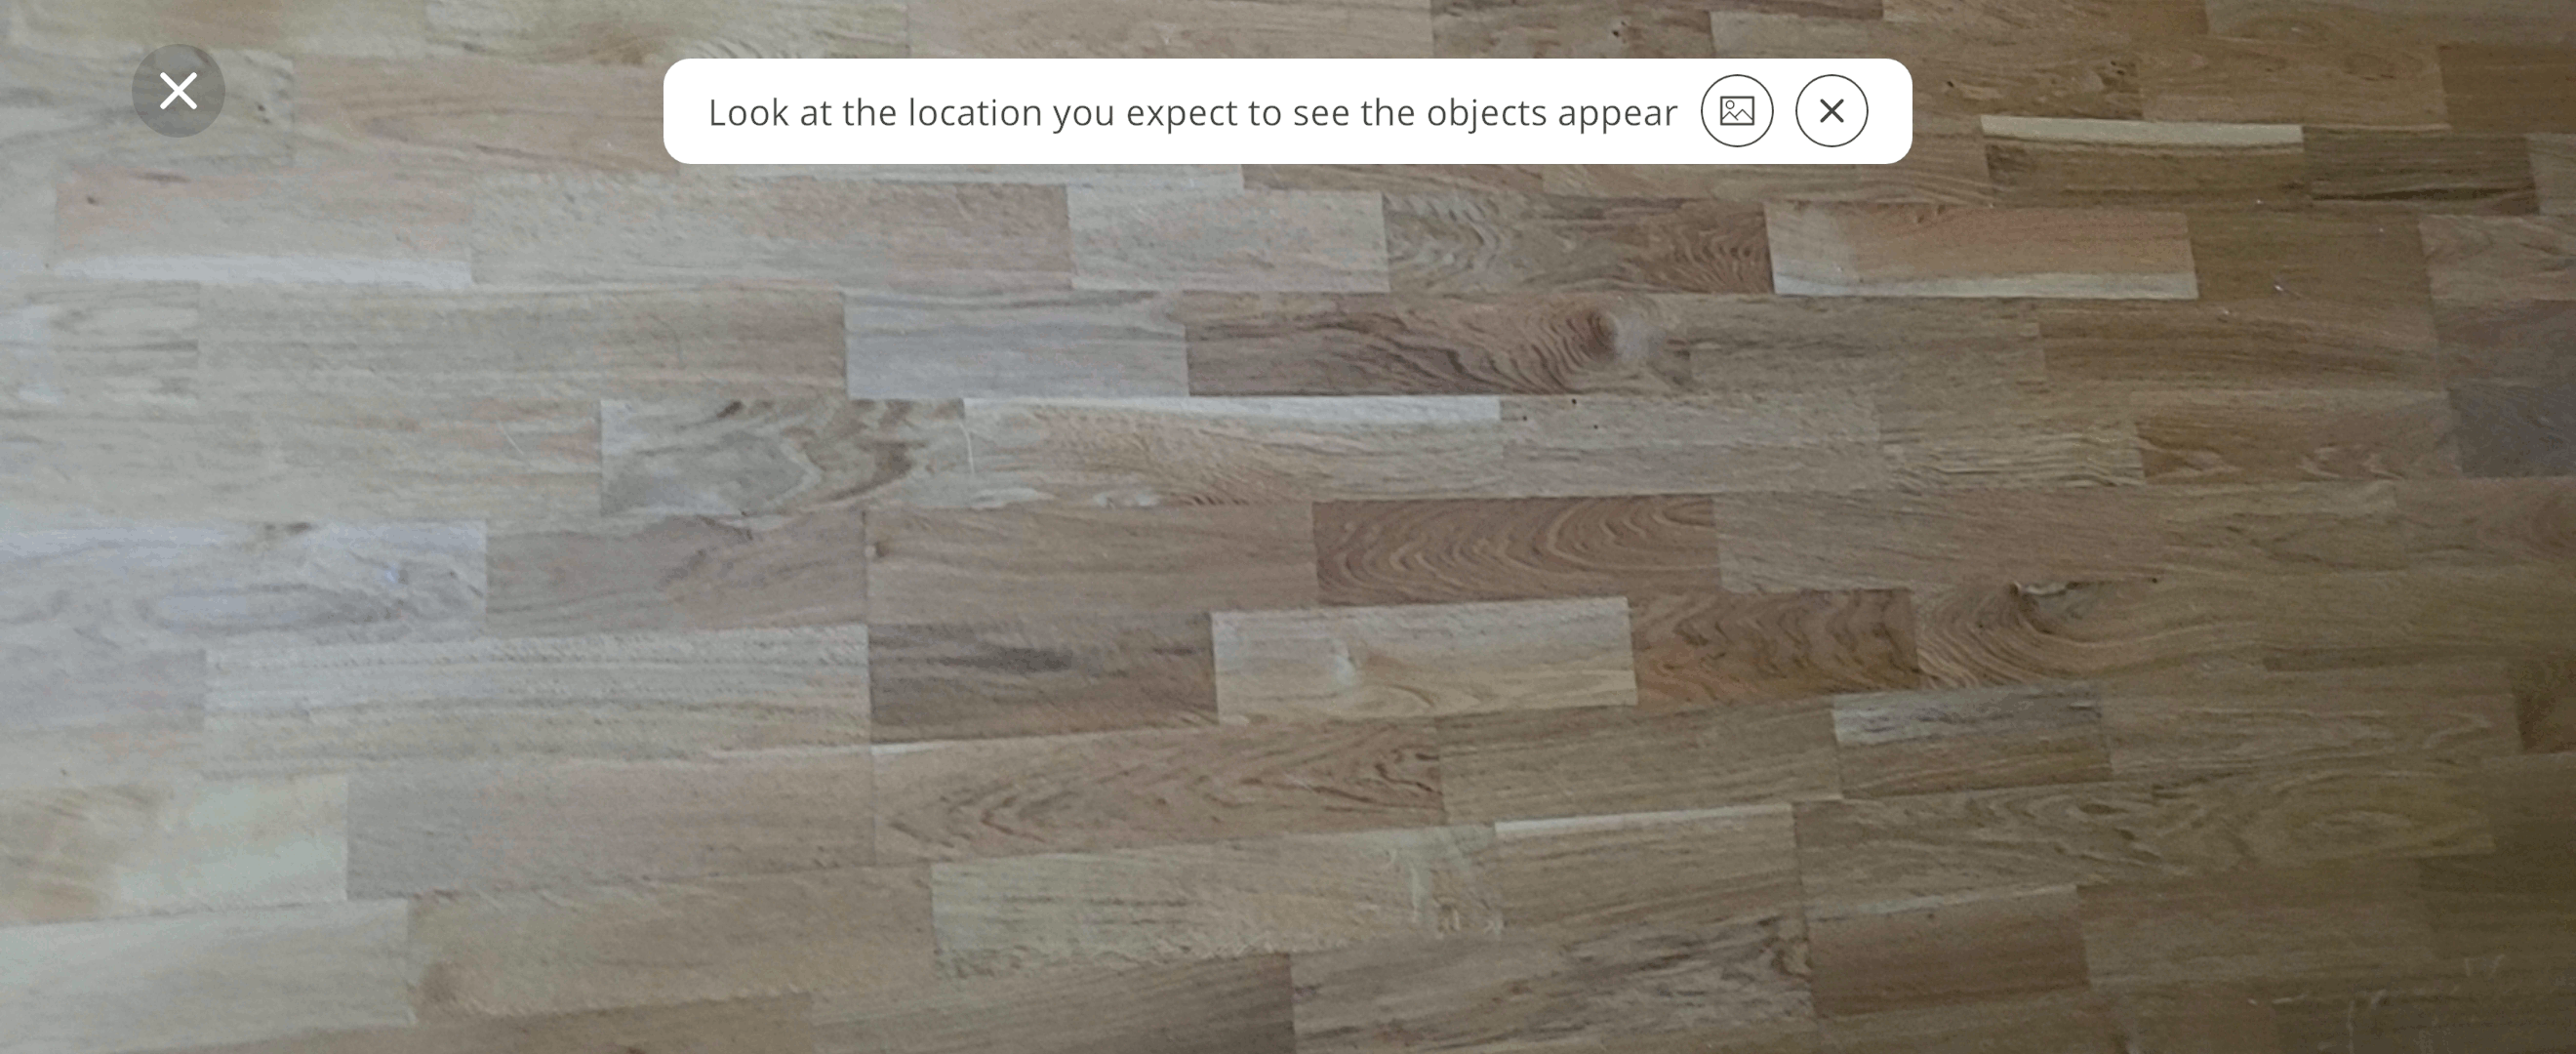
Select OK to place the 3D object
The object is placed in the memorized position using the author specified orientation
Place objects in different physical location
If you are at a different physical location, you can place the object manually, without using the location saved in the geolocated Xperience.
Select No, place manually in the dialogue
Place the object in the desired position
The object is placed without using the memorized location and author specified orientation
Note
Placing objects in Geolocated Xperiences while in another physical location may affect the objectives of the Xperience.