Interactions
You can create customized interactions from a selection of triggers and actions, using EON Interact.
Note
Creating interactions after the introduction period requires the EON Interact license.
Accessing Interact Feature
Once you have accessed/created an Xperience as an editor and have a 3D model loaded in you may access the interact feature, this will be demonstrated with a 3D model of a basic motor:
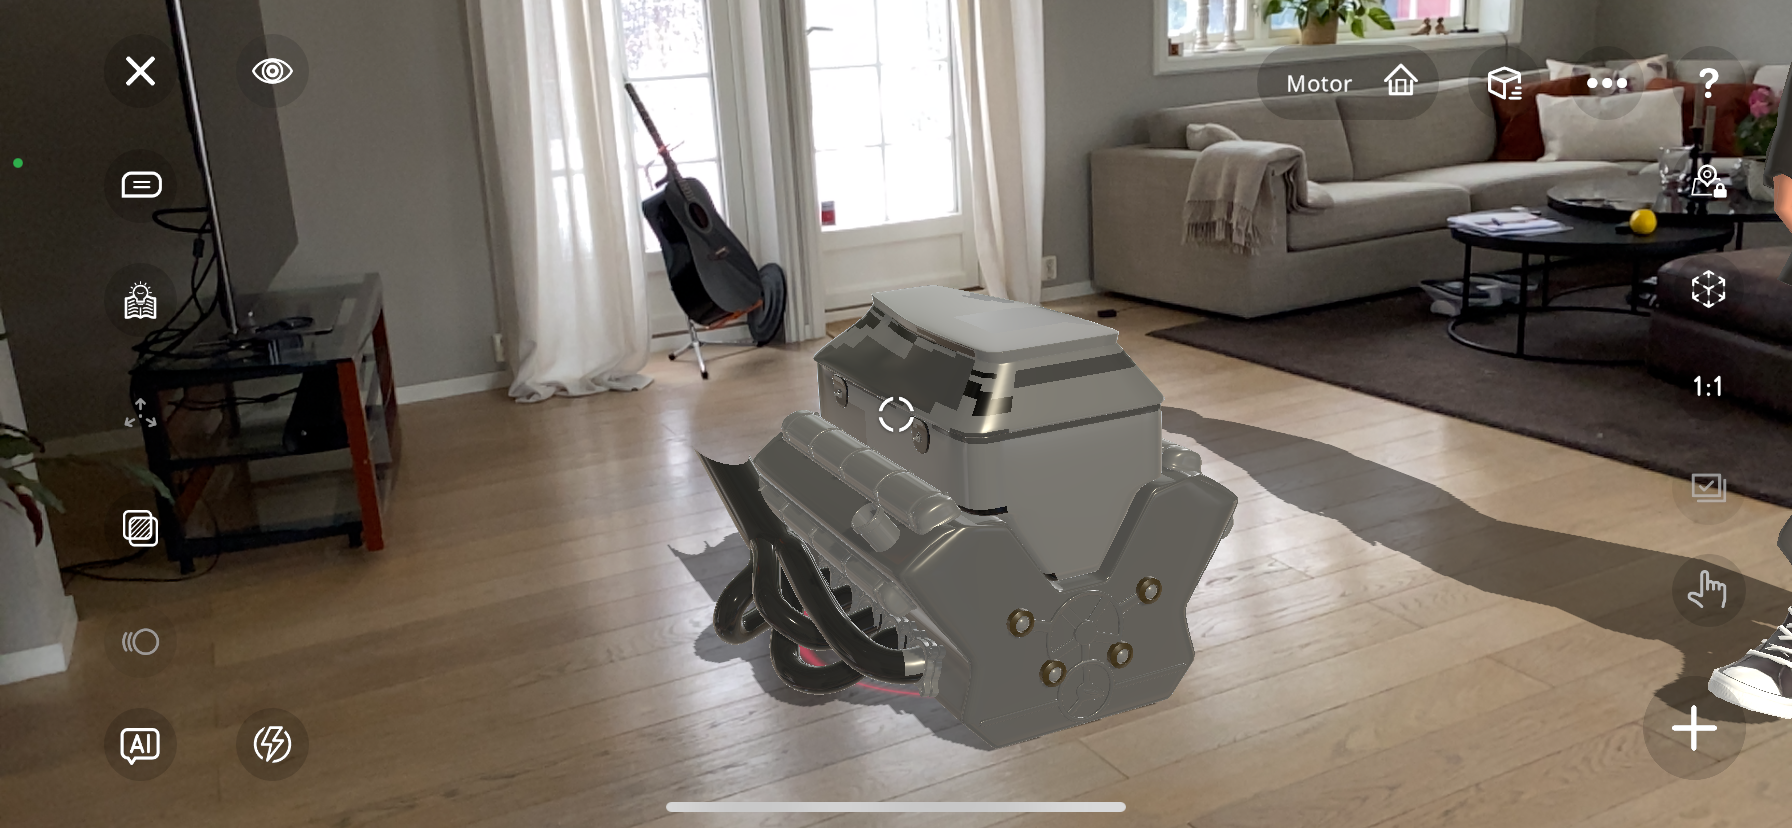
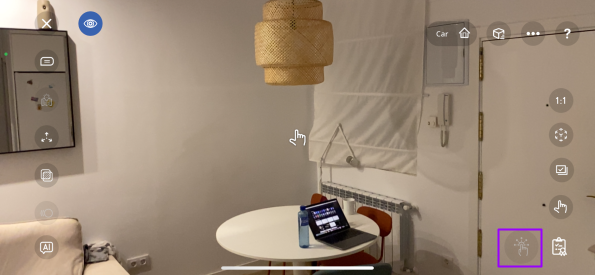
In the bottom right corner of the screen, press the “Plus” icon to add content.
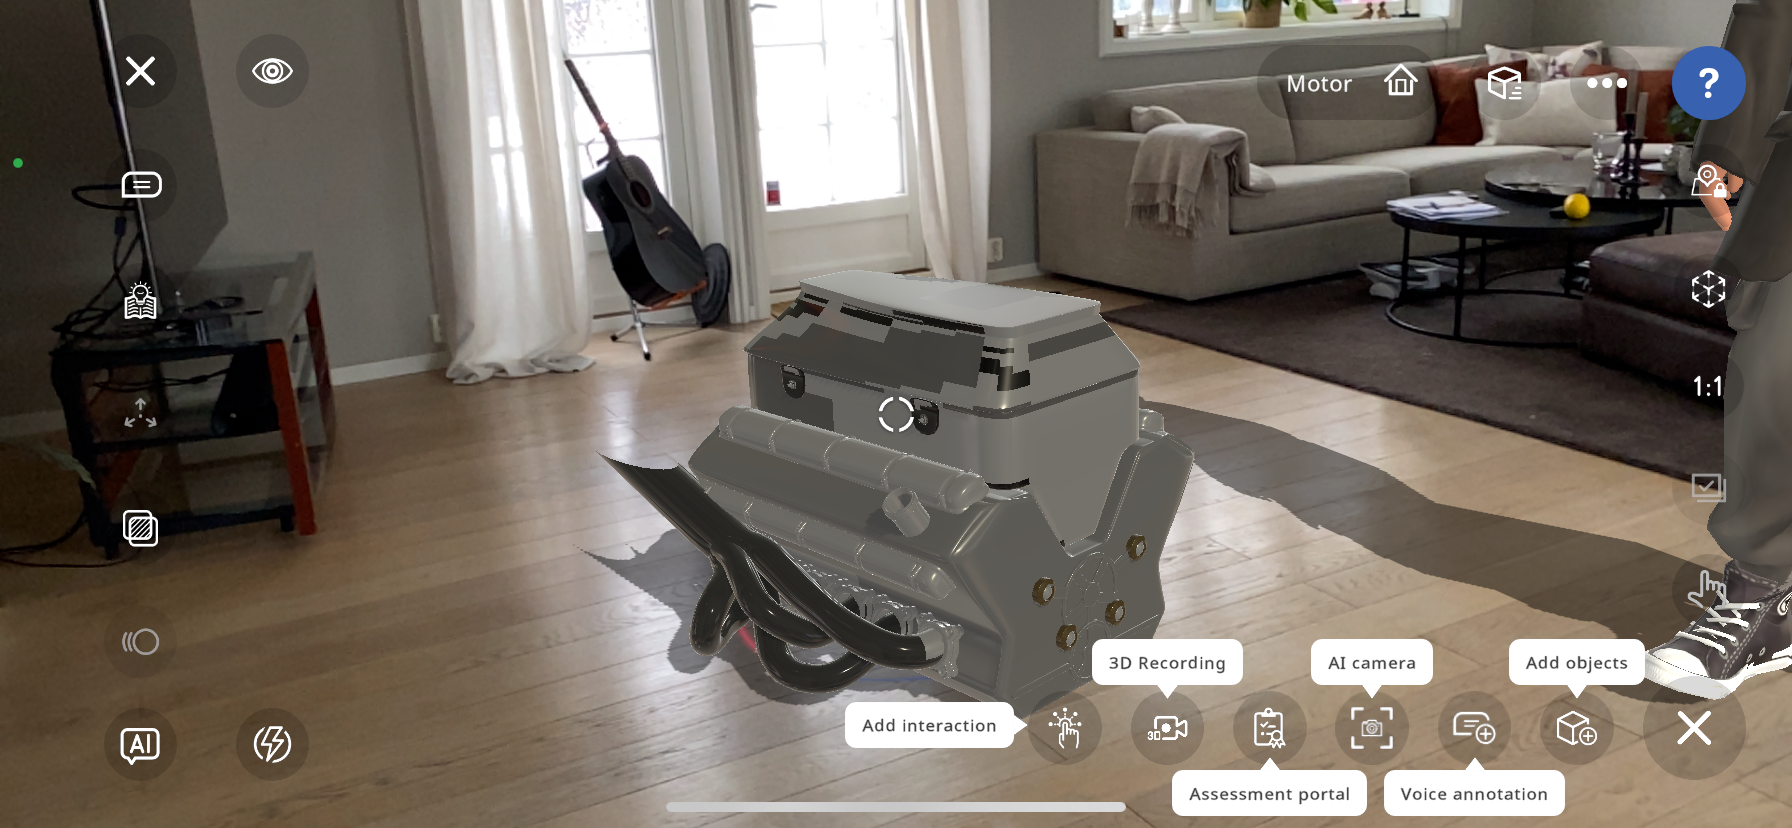
In the bottom menu, the “Add interaction” feature is now available. Press it to add an interaction.
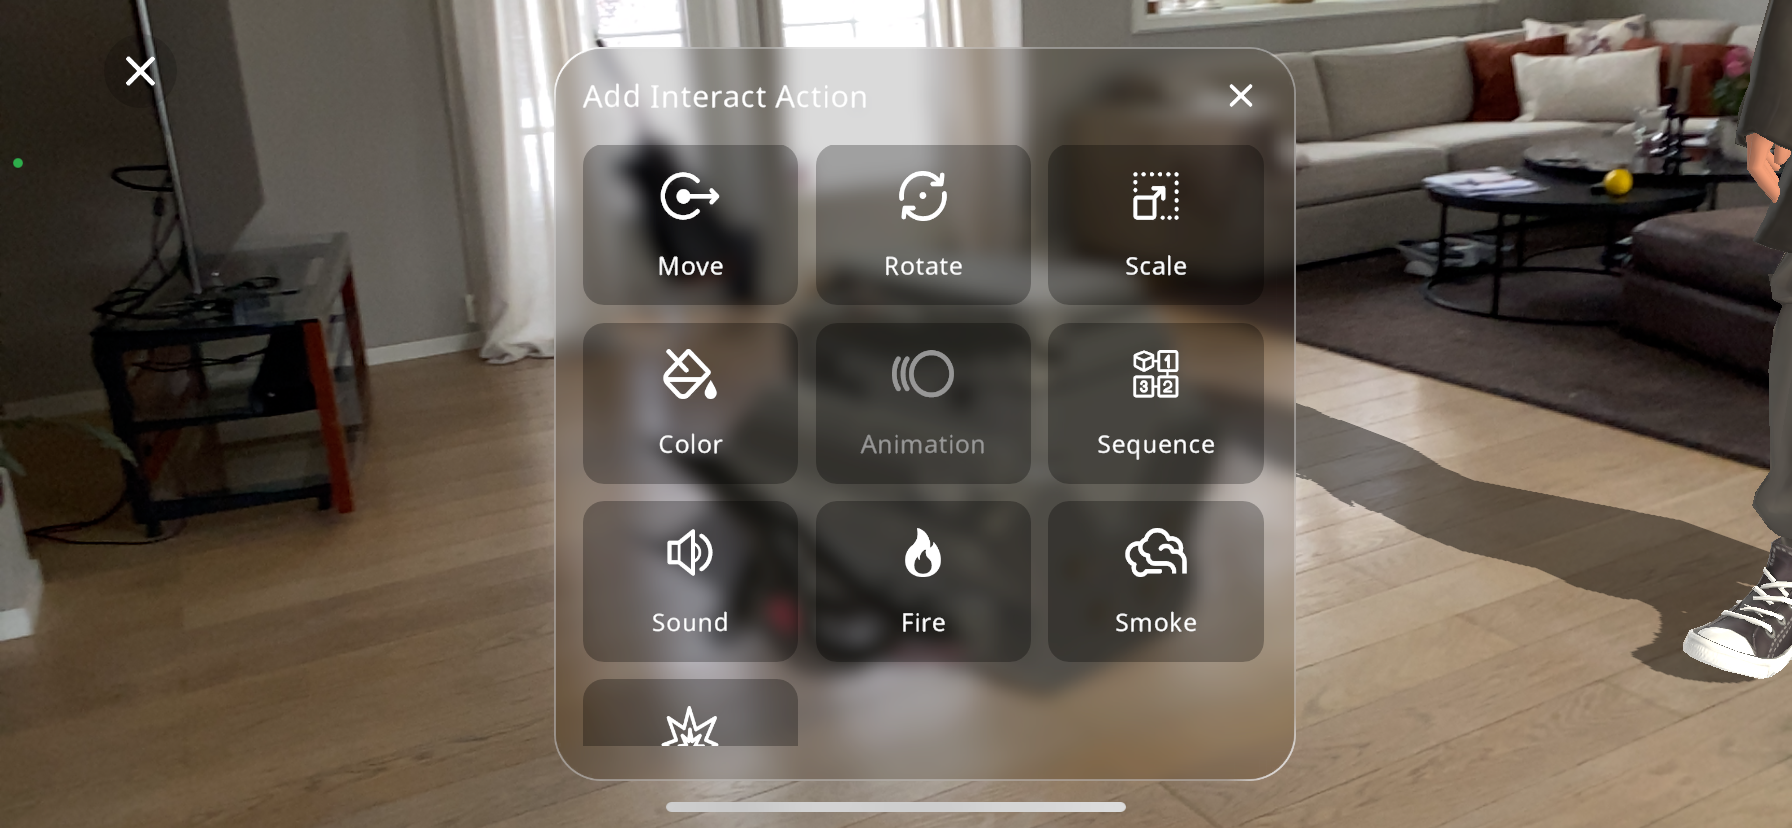
This will open the menu to select an action from the options:
Move
Rotate
Scale
Color
Animation (if available in 3D model selected)
Sequence
Sound
Fire
Smoke
Explosion
Addition of Interactions:
Adding Fire Interaction
From the actions menu select the “Fire” action.
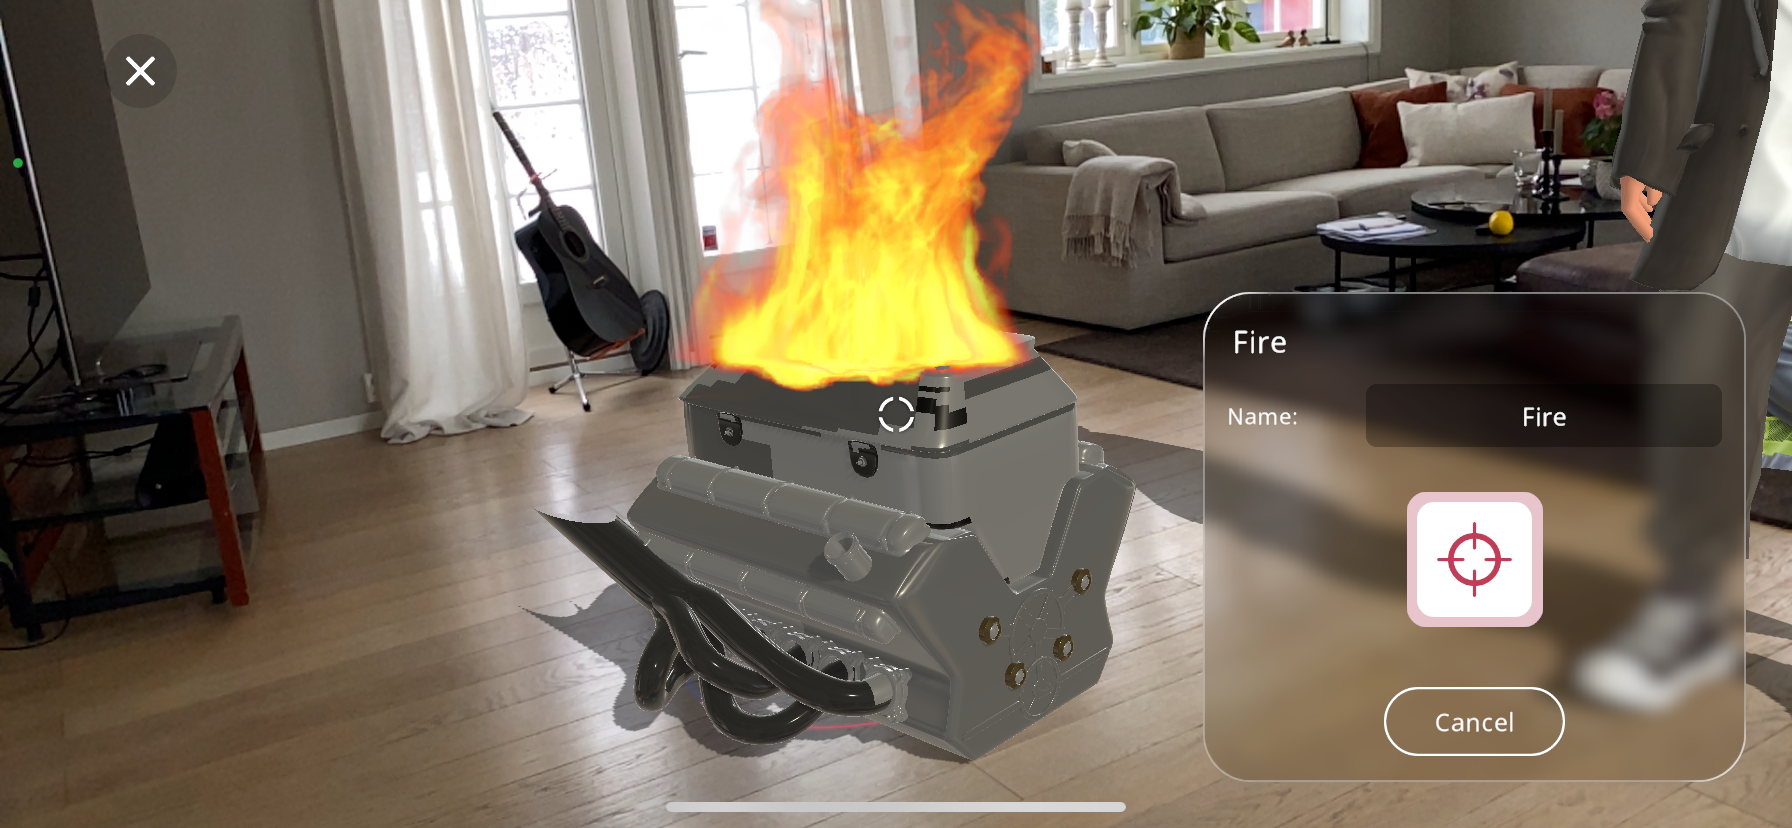
The small white crosshair in the center of the screen shows the position of the interaction; exactly where you would like the action to occur.
Move your device to a point where the crosshair is positioned where you would like the action to occur.
Use 2 fingers and pinch/enlarge the particle size, in this case the fire area.
Press the large red crosshair near the bottom right part of the screen to lock in the action’s position on the object.
If the placement isn’t quite right, you can reposition the crosshair by pressing the
 button shown below and placing the crosshair again.
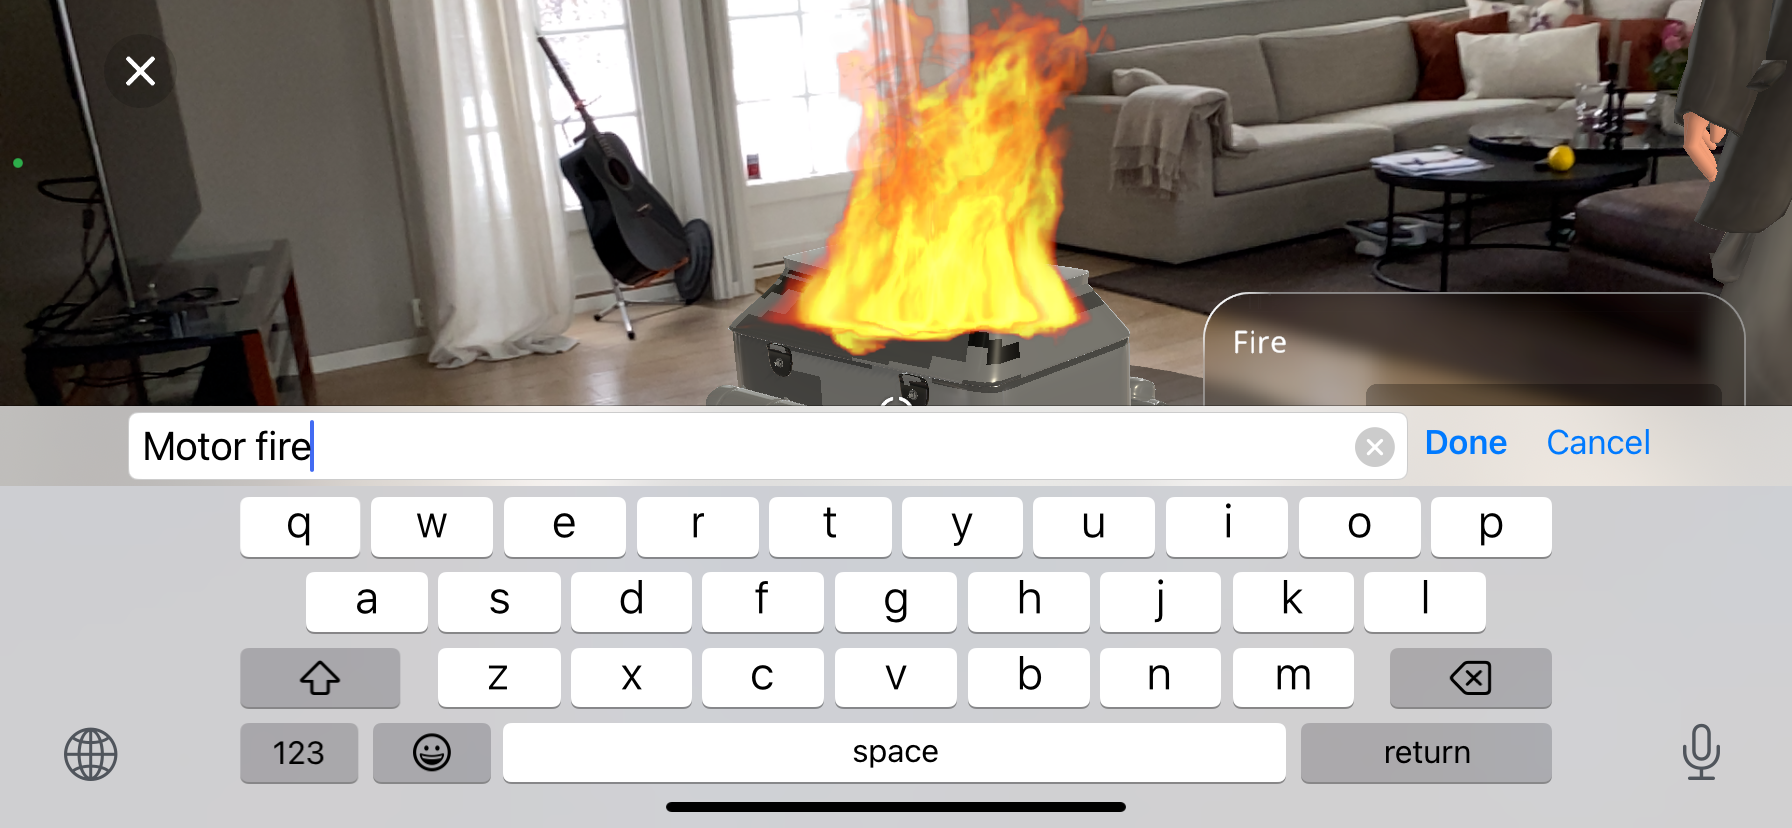
You may then rename the action you are adding, to do this, simply press on the name:

You may now type out the new name of your action and press “Done”. This is especially helpful as it can help distinguish actions once you have added many objects and actions to your Xperience:
After you are satisfied with the name given to the action, you may click on “Next”, this will take you to the “triggers” tab. For the triggers guide click on Triggers
Adding Scale Interaction
The scale action can be added to an object to change its size when triggered.
From the actions menu select the “Scale” action.
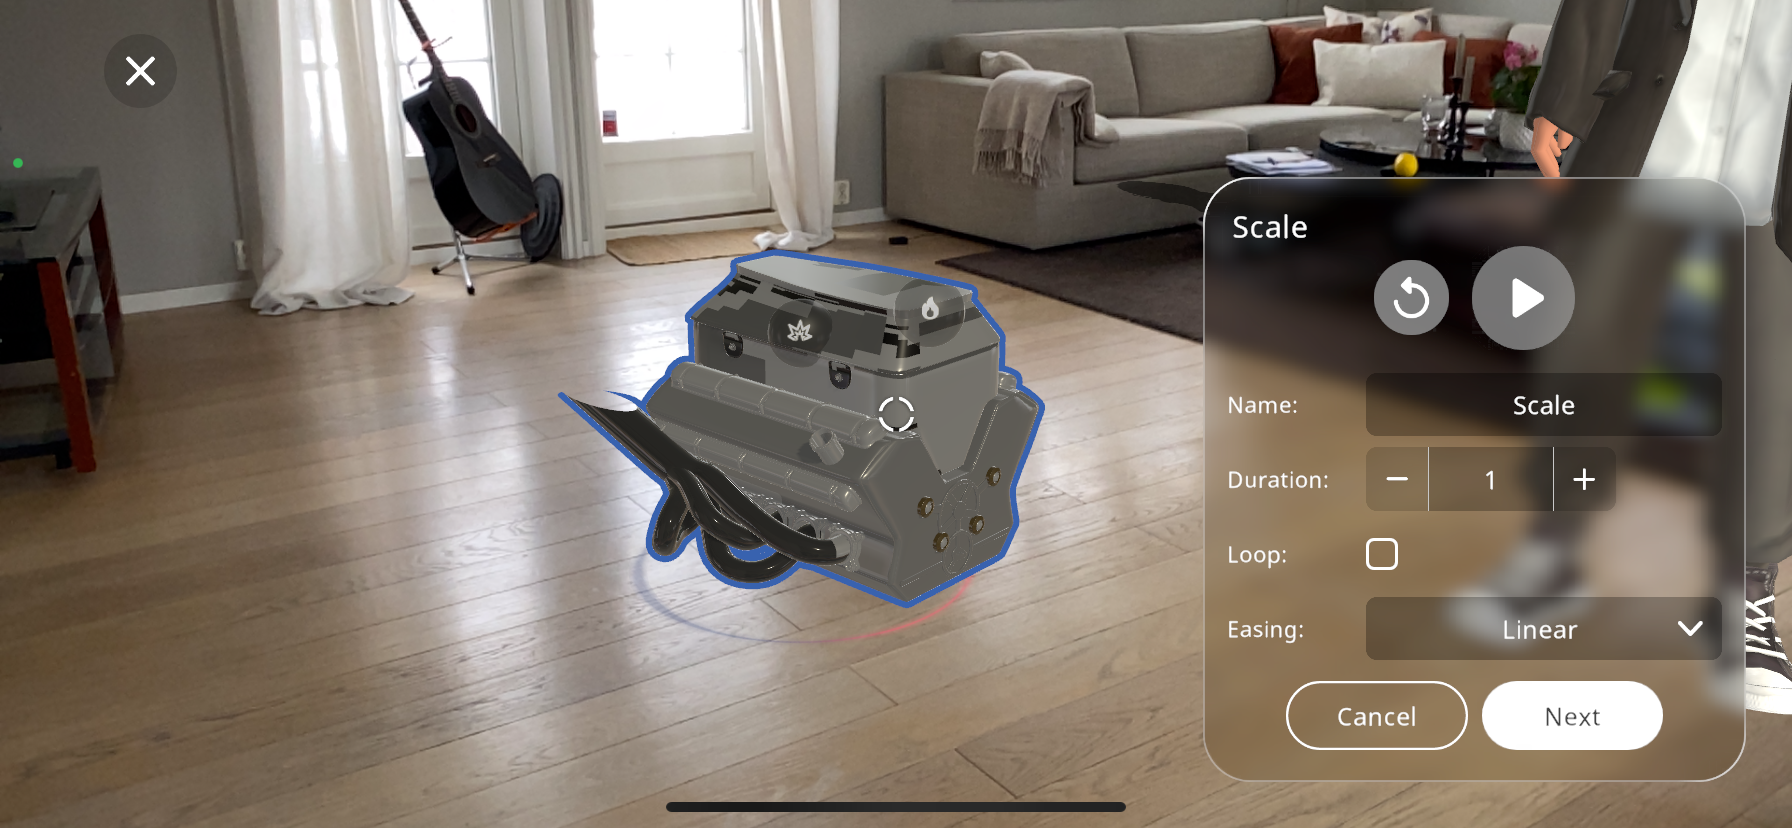
Many 3D objects are made up of multiple separate parts; you can select a child object by double tapping the child object. This will highlight it with a blue outline (you may get closer to the object the select the part with ease)
The object/part will start in its original size, use two fingers to pinch or enlarge the object to the desired size.
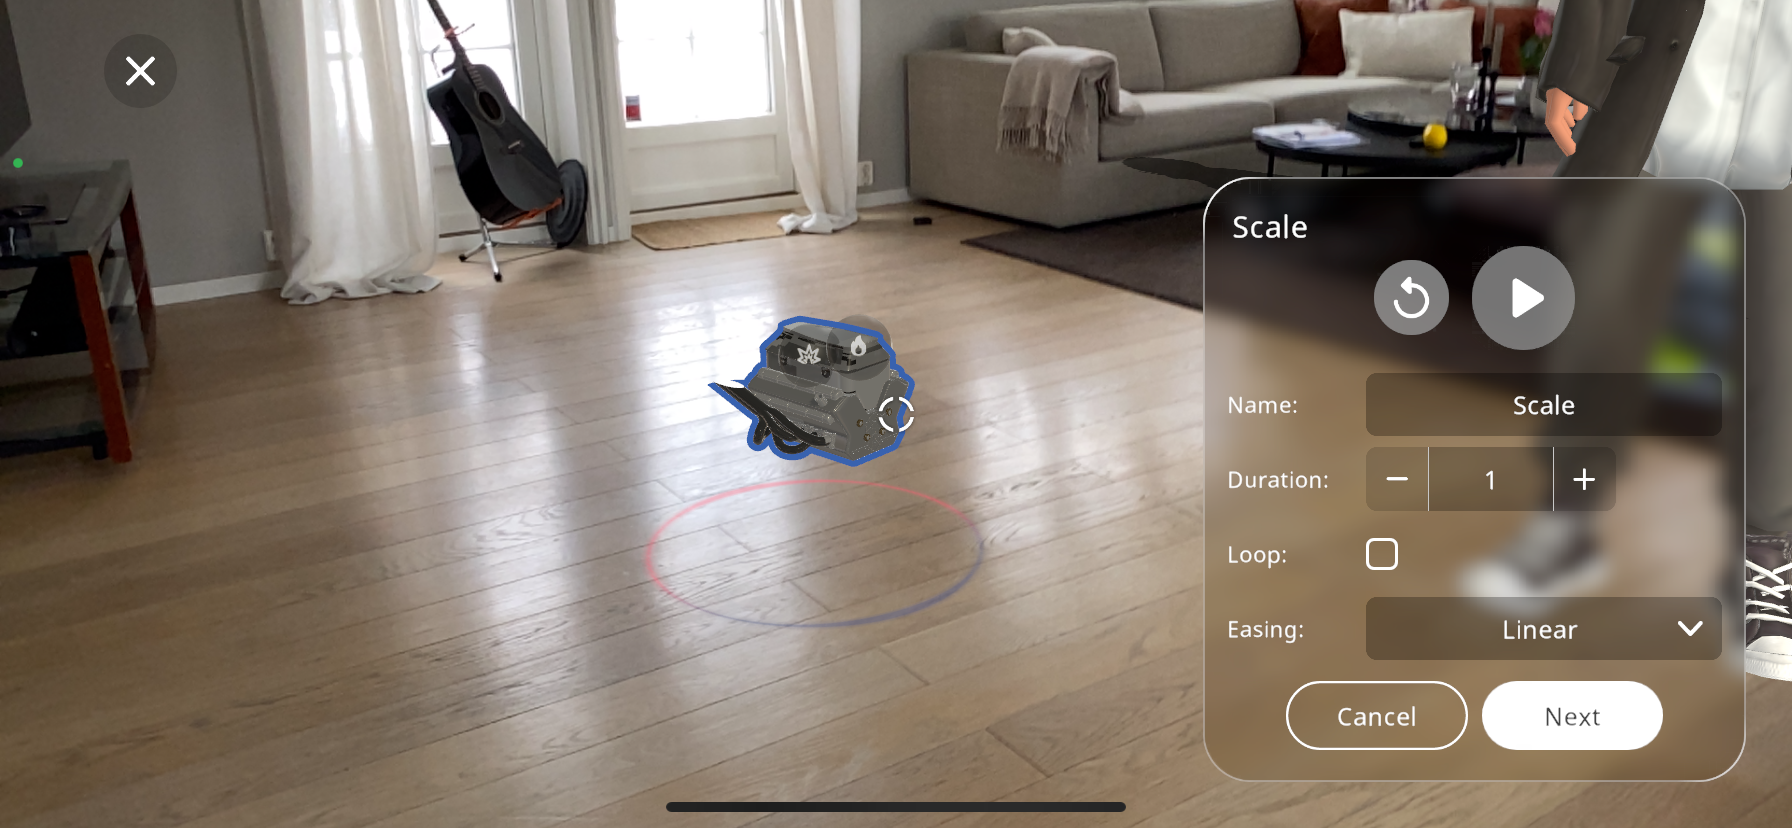
Press the
 button to view the scaling created, from the starting position to the final one. If you are not satisfied with the scaling, press the button to rescale the action.
Rename the action (Optional)
Change the “Duration” to edit the amount of time the object will take to reach its final size. This setting is in seconds, and you can use the + and - button to edit it. You may view the action by using the play button until you are satisfied with the time selected.
You may tick the “Loop” checkbox if you would like the scaling to continue looping after it has been triggered
The final “Easing” option gives an extra personalization aspect, the options do the following:
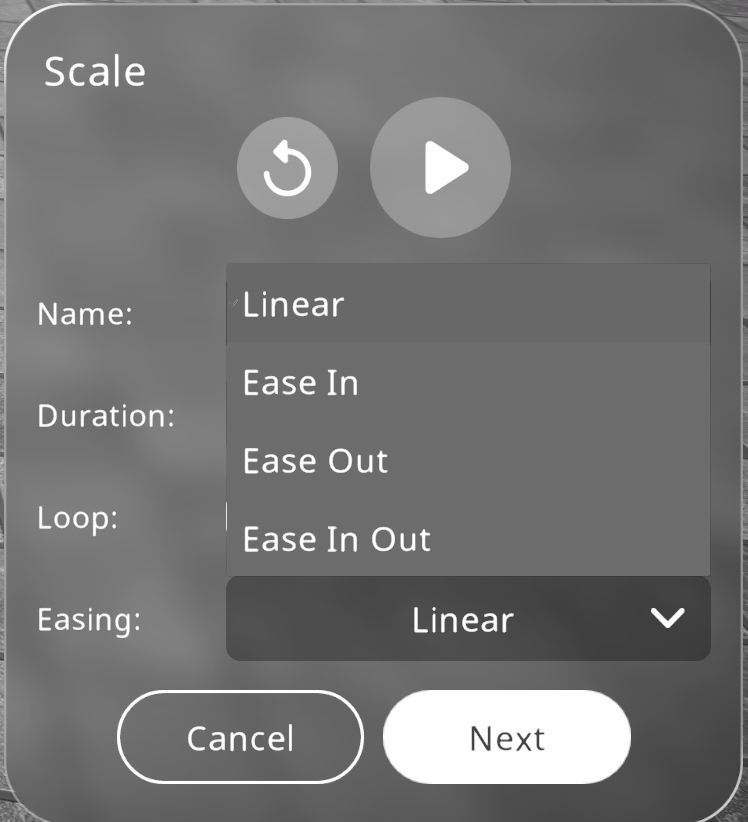
- Linear:
The object changes size at the same speed throughout the movement.
- Ease in:
The object slowly changes size at the start of the movement, then linearly for the rest of it.
- Ease out:
The object linearly changes size at the start, then slows down near the end of the movement until it reaches the final size.
- Ease in out:
This option combines the ease in and the ease out; it changes size slowly near the start, then speeds up, and finally slows down again near the end.
After you are satisfied with the name given to the action, you may click on “Next”, this will take you to the “triggers” tab. For the triggers guide click on Triggers
Adding Move Interaction
The “Move” action makes it possible to move the 3D object, from the desired starting position to the desired final position:
From the actions menu select the “Move” action.
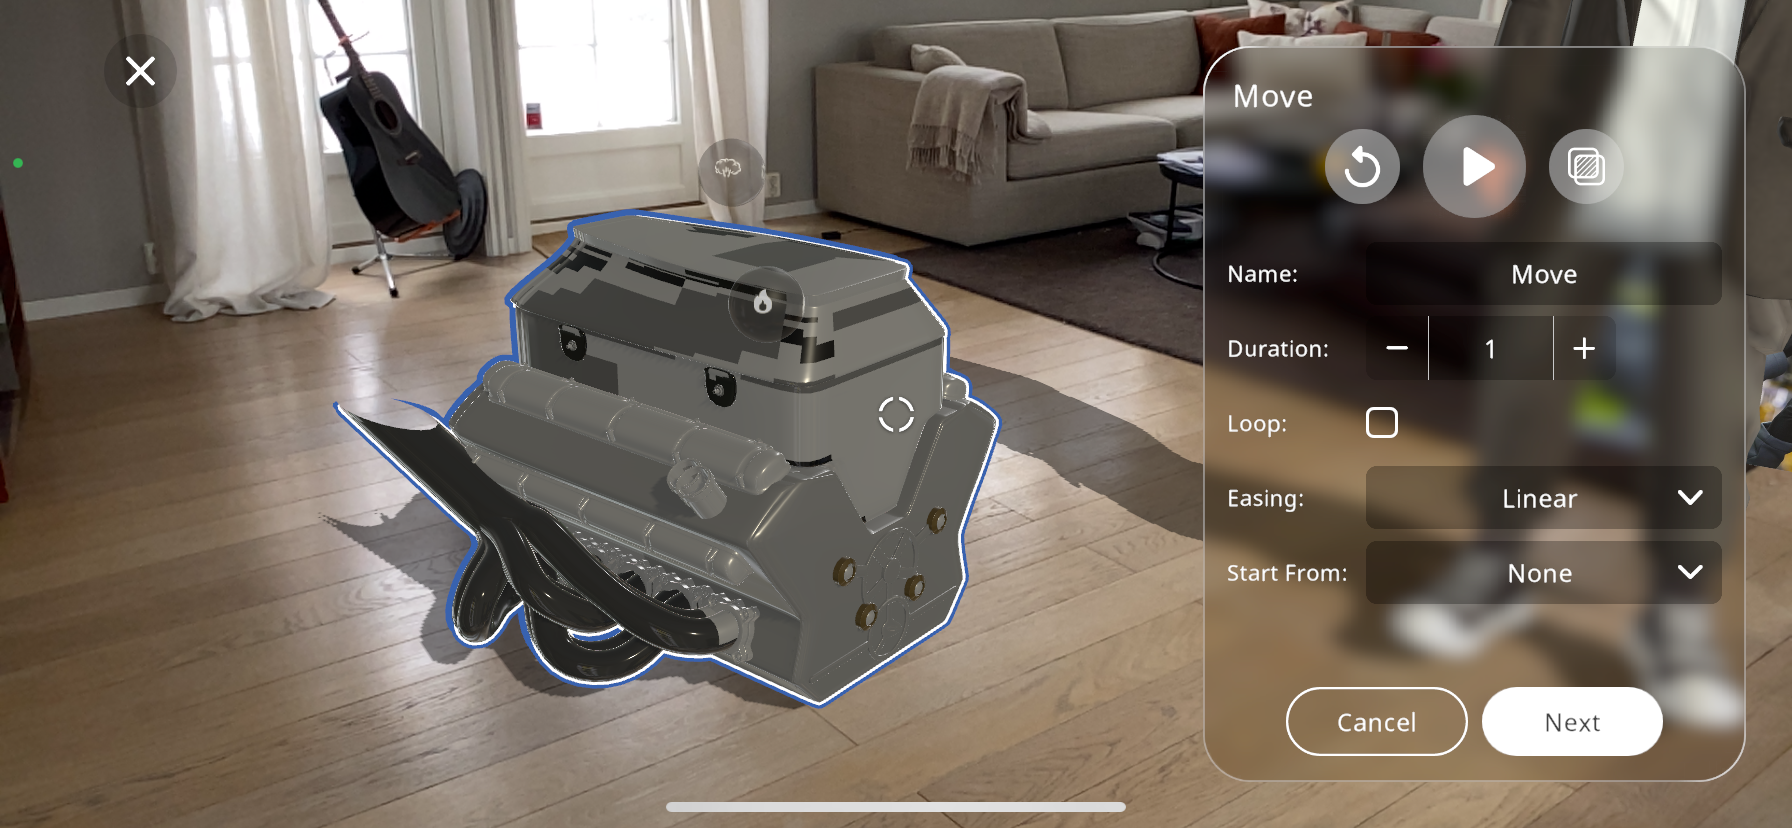
Many 3D objects are made up of multiple separate parts; you can select a child object by double tapping the child object. This will highlight it with a blue outline (you may get closer to the object the select the part with ease)
Use two fingers to drag the object/part to the end position
Press the
button to view the movement created, from the starting position to the final one. If you are not satisfied with the movement, press the button to change the positions.Press the
 button if you would like to alternate the transparency of the object in order to reveal the surrounding elements around this object, enabling the user to precisely manipulate the object in precise reference to the rest of them.
Rename the action (Optional)
Change the “Duration” to edit the amount of time the object will take to reach its final position. This setting is in seconds, and you can use the + and - button to edit it, viewing the action by using the play button until you are satisfied.
You may tick the “Loop” checkbox if you would like the movement to continue looping after it has been triggered.
The final “Easing” option gives an extra personalization aspect, the options do the following:
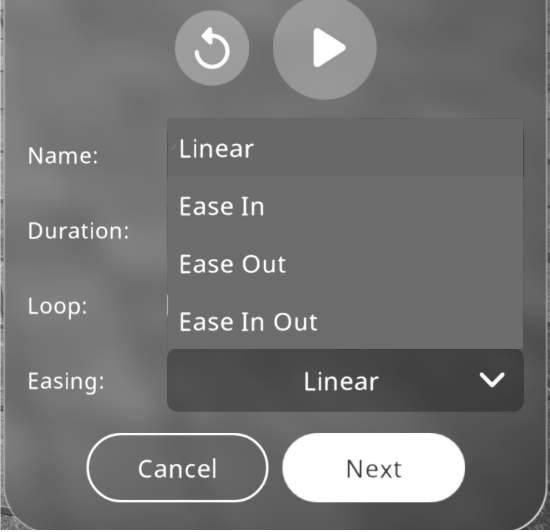
- Linear:
The object changes position at the same speed throughout the movement.
- Ease in:
The object slowly changes position at the start of the movement, then linearly for the rest of it.
- Ease out:
The object linearly changes position at the start, then slows down near the end of the movement until it reaches the final position.
- Ease in out:
This option combines the ease in and the ease out; it changes position slowly near the start, then speeds up, and finally slows down again near the end.
The “Start From” dropdown menu allows you to choose an already created move/ rotate action, and the ending position of the selected action will be the starting position of the current action being created. This way you will be able to create a sequence of move and rotate actions when triggered.
After you are satisfied with the name given to the action, you may click on “Next”, this will take you to the “triggers” tab. For the triggers guide click on Triggers
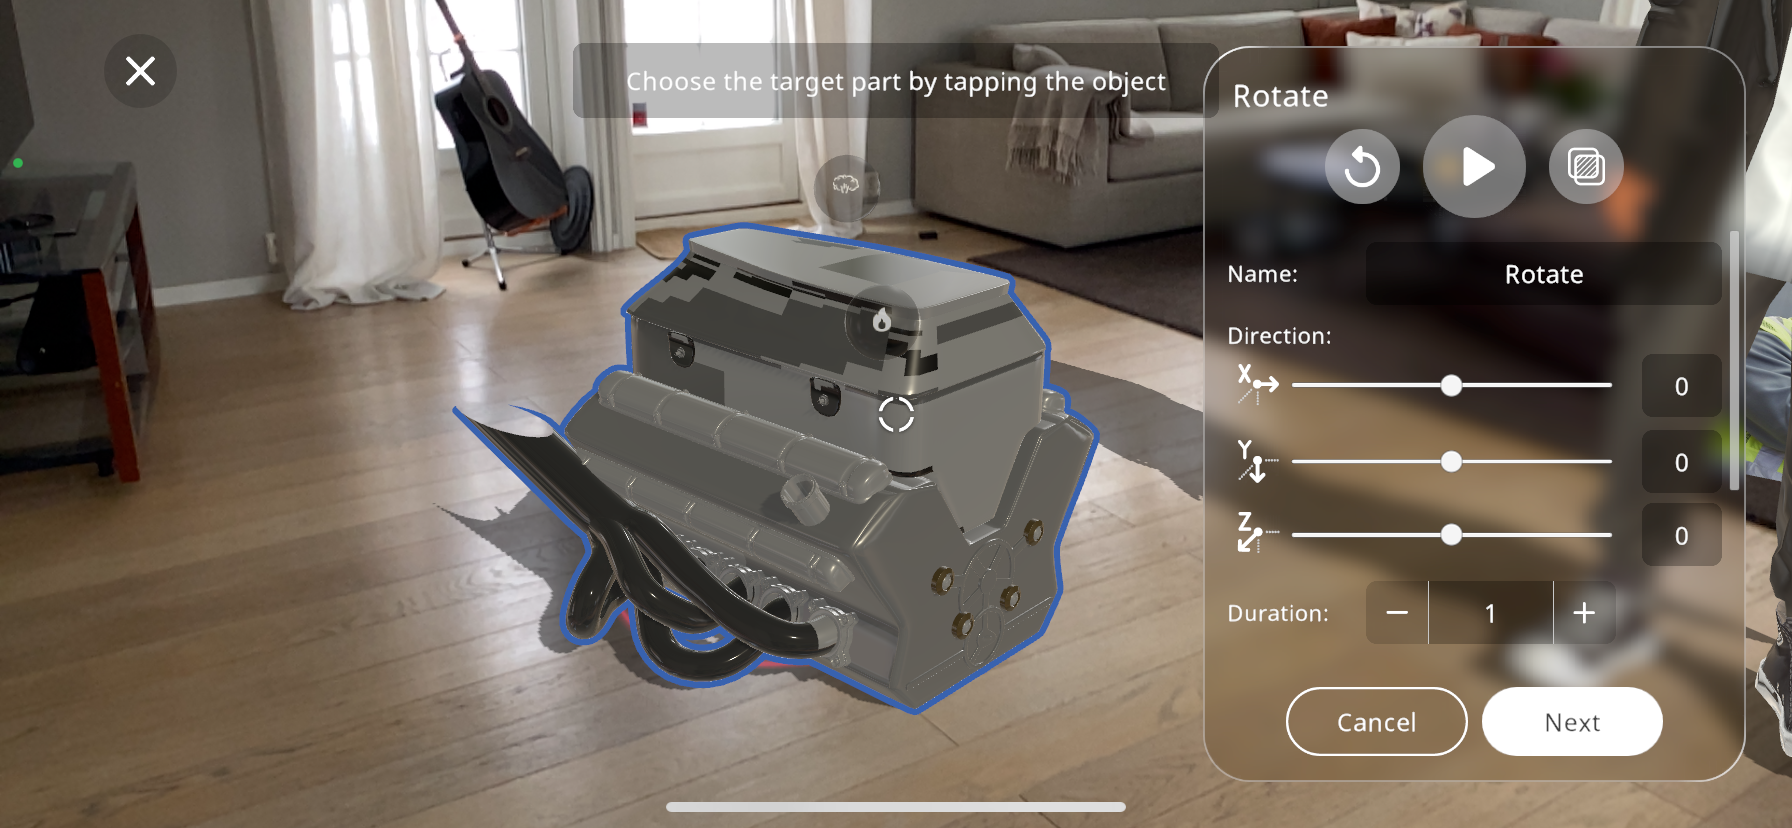
Adding Rotate Interaction
From the actions menu select the “Rotate” action.
Press the
button if you would like to alternate the transparency of the object in order to reveal the surrounding elements around this object, enabling you to precisely manipulate the object in precise reference to the rest of them.Many 3D objects are made up of multiple separate parts; you can select a child object by double tapping the child object. This will highlight it with a blue outline (you may get closer to the object the select the part with ease)
The on-screen settings represent the axes around which the object can rotate. Use these sliders to define the rotation direction and axis.
Utilize the sliders corresponding to the X, Y, and Z axes to specify the degrees of rotation. The X-axis runs horizontally, Y-axis vertically, and the Z-axis perpendicularly out of the screen, for example:
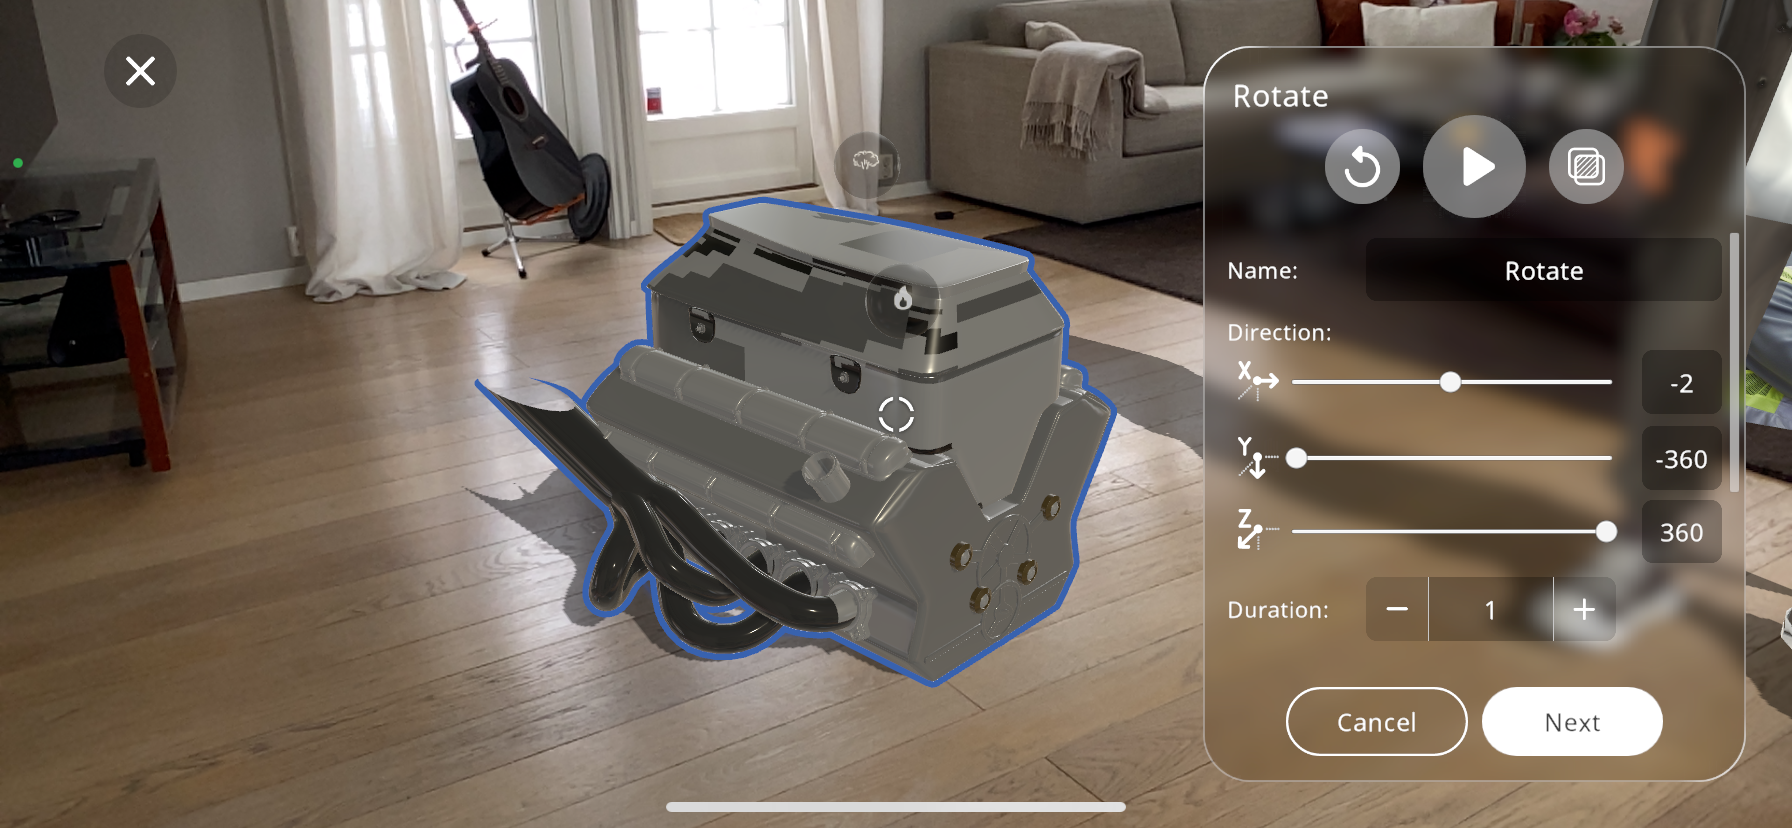
Adjust the “Duration” slider to set the time in seconds for the rotation to complete. This allows for controlling the speed of the rotation.
By toggling the “Loop” option, you can make the rotation continuous.
The “Easing” function offers further customization of the rotation’s motion dynamics:
Linear:
The object rotates at the same speed throughout the movement.
Ease in:
Starts the rotation slowly, then moves linearly for the remainder.
Ease out:
Begins rotating linearly, then decelerates towards the end.
Ease in out:
Combines both easing effects, starting and ending slowly with a linear movement in between.
The “Start From” dropdown menu allows you to choose an already created move/ rotate action, and the ending position of the selected action will be the starting position of the current action being created. This way you will be able to create a sequence of move and rotate actions when triggered.
Adjust the “Pivot Size” to control the radius around which your object rotates. This will generate a yellow sphere according to the pivot size you have selected. This can create a swinging effect if set larger than the object, or a standard rotation if it matches the object’s dimensions.
Press the
button to view the movement created, from the starting position to the final one. If you are not satisfied with the movement, press the button to restart to the initial position.Once the rotation appears as desired, you can optionally rename the action for easy identification later on.
After you are satisfied with the name given to the action, you may click on “Next”, this will take you to the “triggers” tab. For the triggers guide click on Triggers
Adding Color Interaction
Enhance the visual appeal of your 3D model by applying the “Color” action, which allows you to change the color of an object within your Xperience.
From the actions menu select the “Color” action.
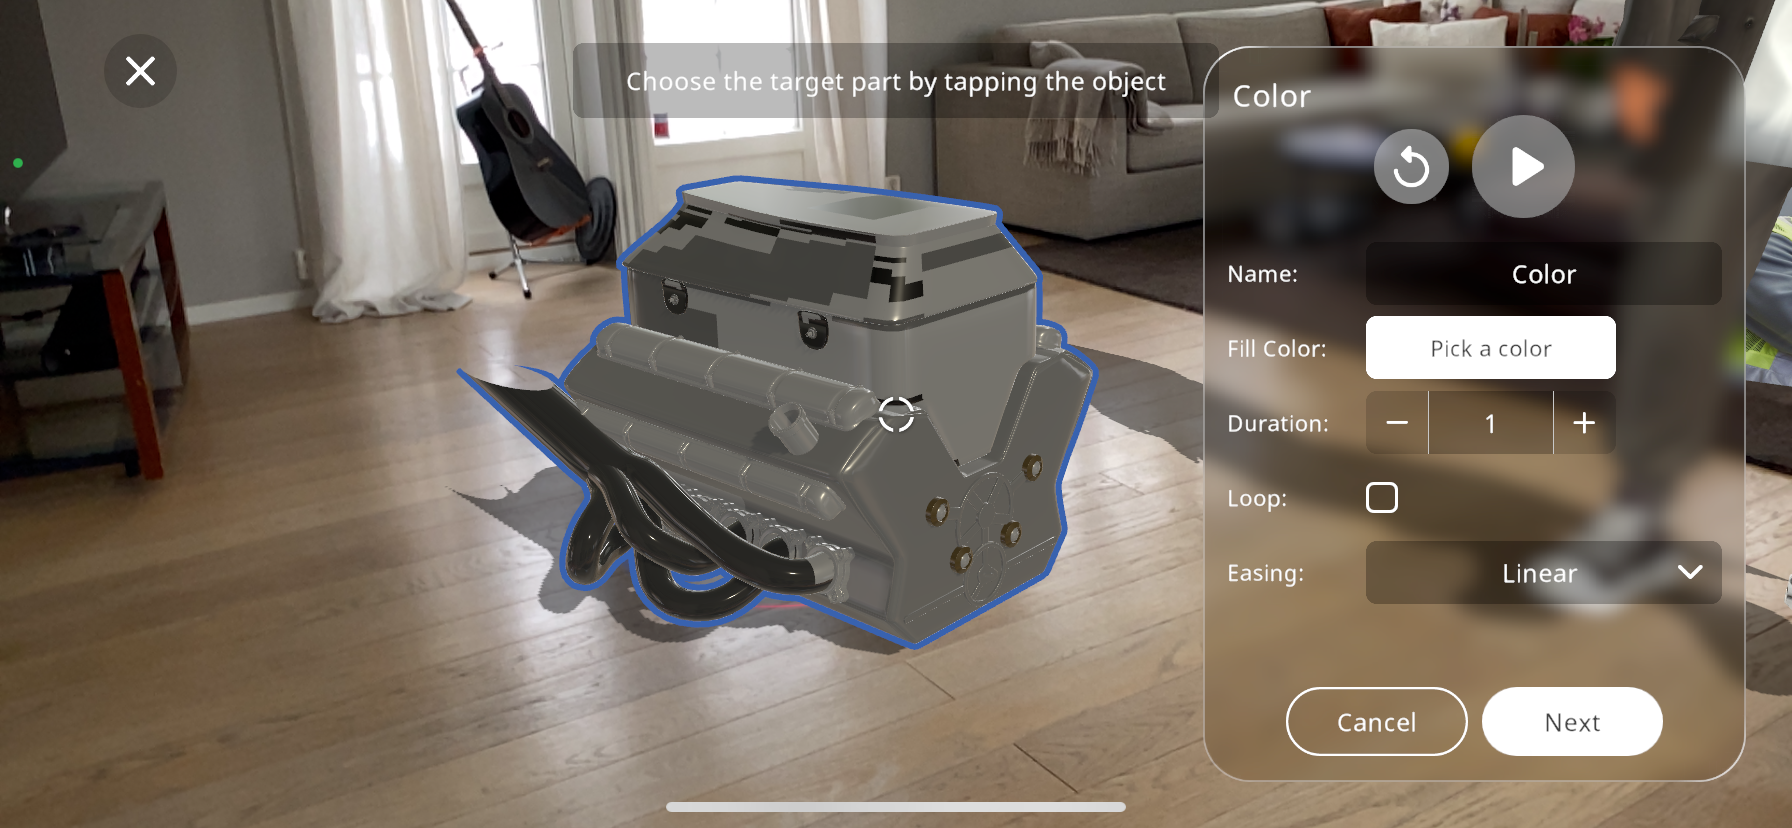
On the screen, you will be prompted to choose the target object you wish to color. Tap the desired object to proceed.
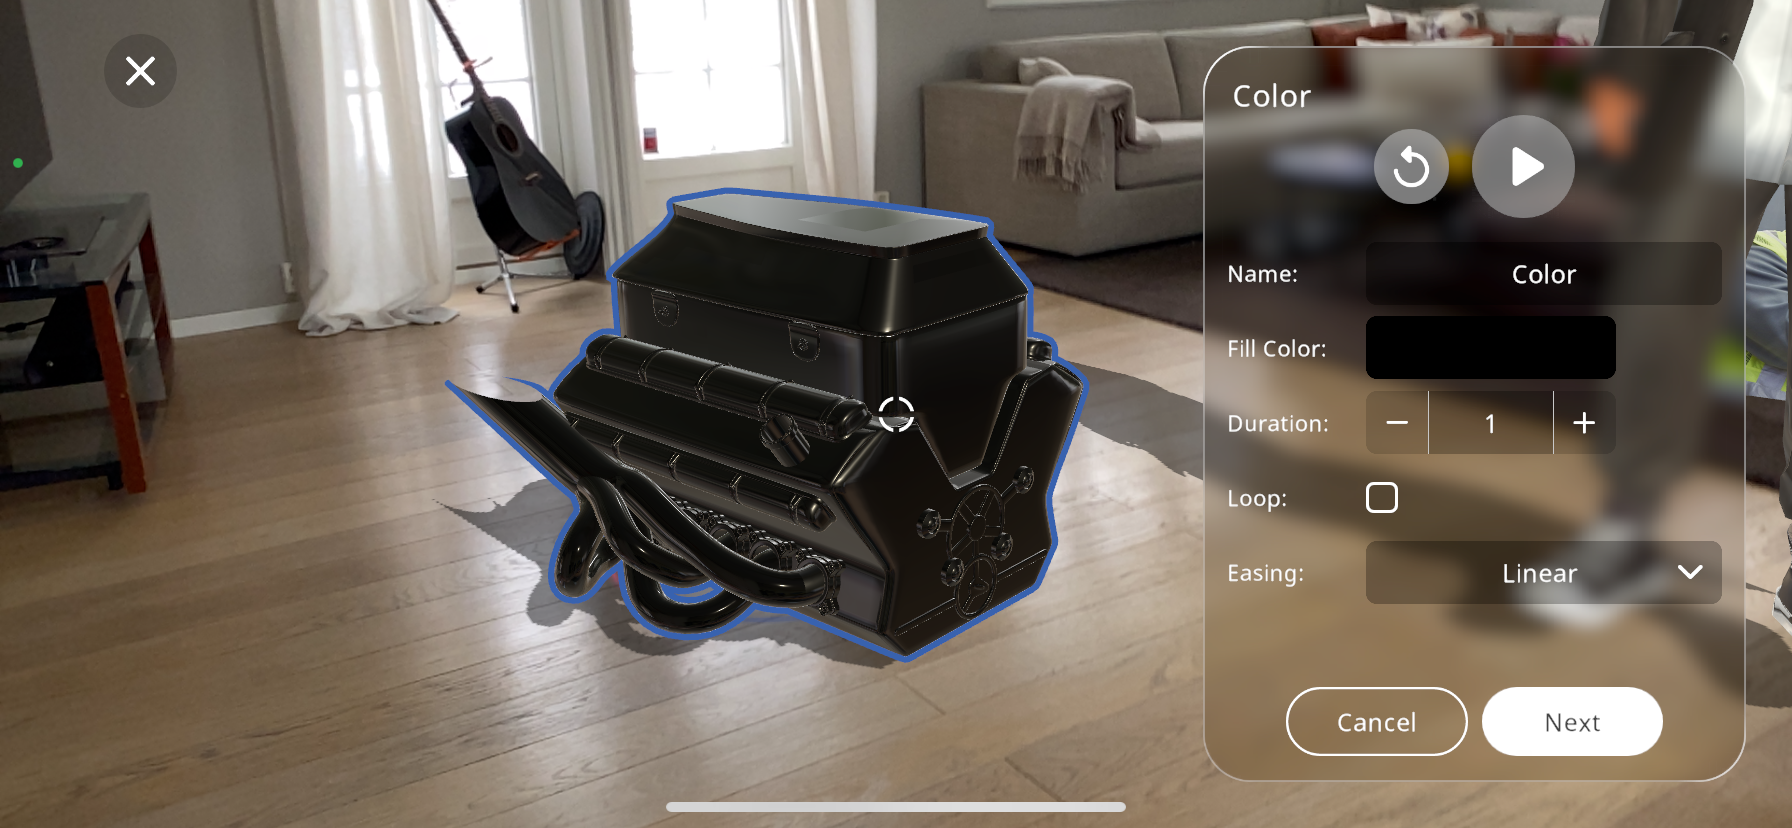
Once the target part is selected, tap on “Pick a color” to open the color palette. Here you can pick the new color you want the object to change to when the action is triggered.
Adjust the “Duration” slider to set the time in seconds for the color transition, controlling how quickly or slowly the color change takes place.
If you want the color change to repeat, toggle the “Loop” checkbox. This will cause the color change to continuously cycle.
Select an “Easing” option from the dropdown menu to determine how the color change will progress:
- Linear:
“Linear” ensures the color change happens at a consistent rate.
- Ease in:
“Ease in” will start the color transition slowly and then speed up.
- Ease out:
“Ease out” will make the transition start quickly and slow down towards the end.
- Ease in out:
“Ease in out” will begin and end the transition slowly, with a quicker transition in the middle.
Preview the color change by tapping the
button. If the effect is not as desired, you can easily go back and adjust the color or the settings.
Optionally, rename the action to keep track of it, especially useful if you have multiple color changes within the same Xperience.
After you are satisfied with the name given to the action, you may click on “Next”, this will take you to the “triggers” tab. For the triggers guide click on Triggers
Adding Sound Interaction
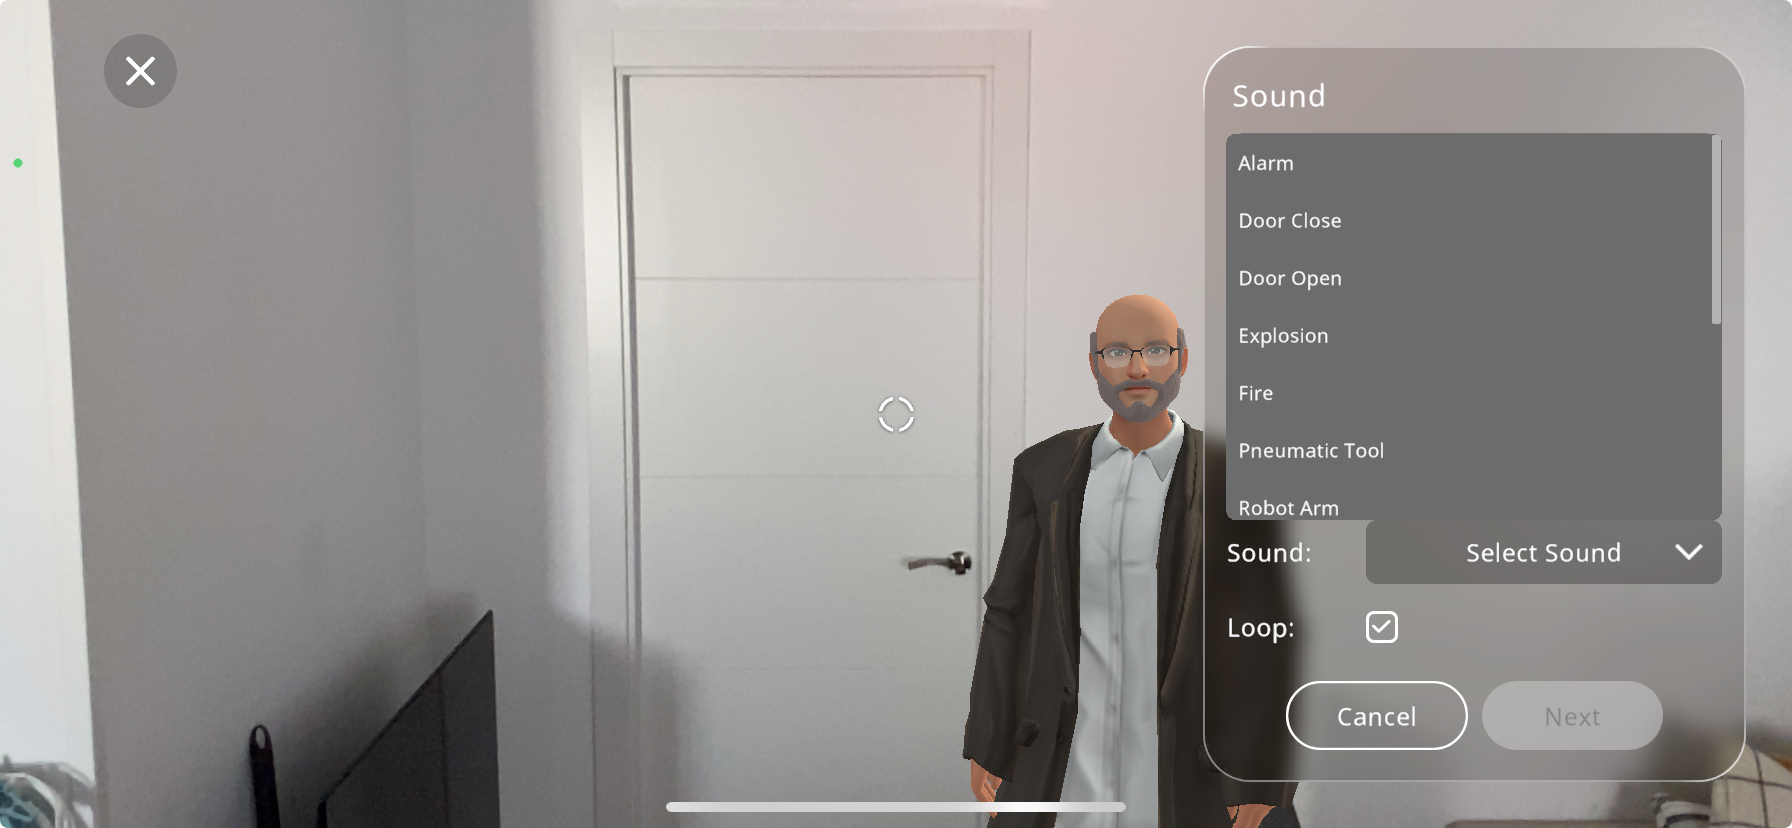
From the actions menu select the “Sound” action.
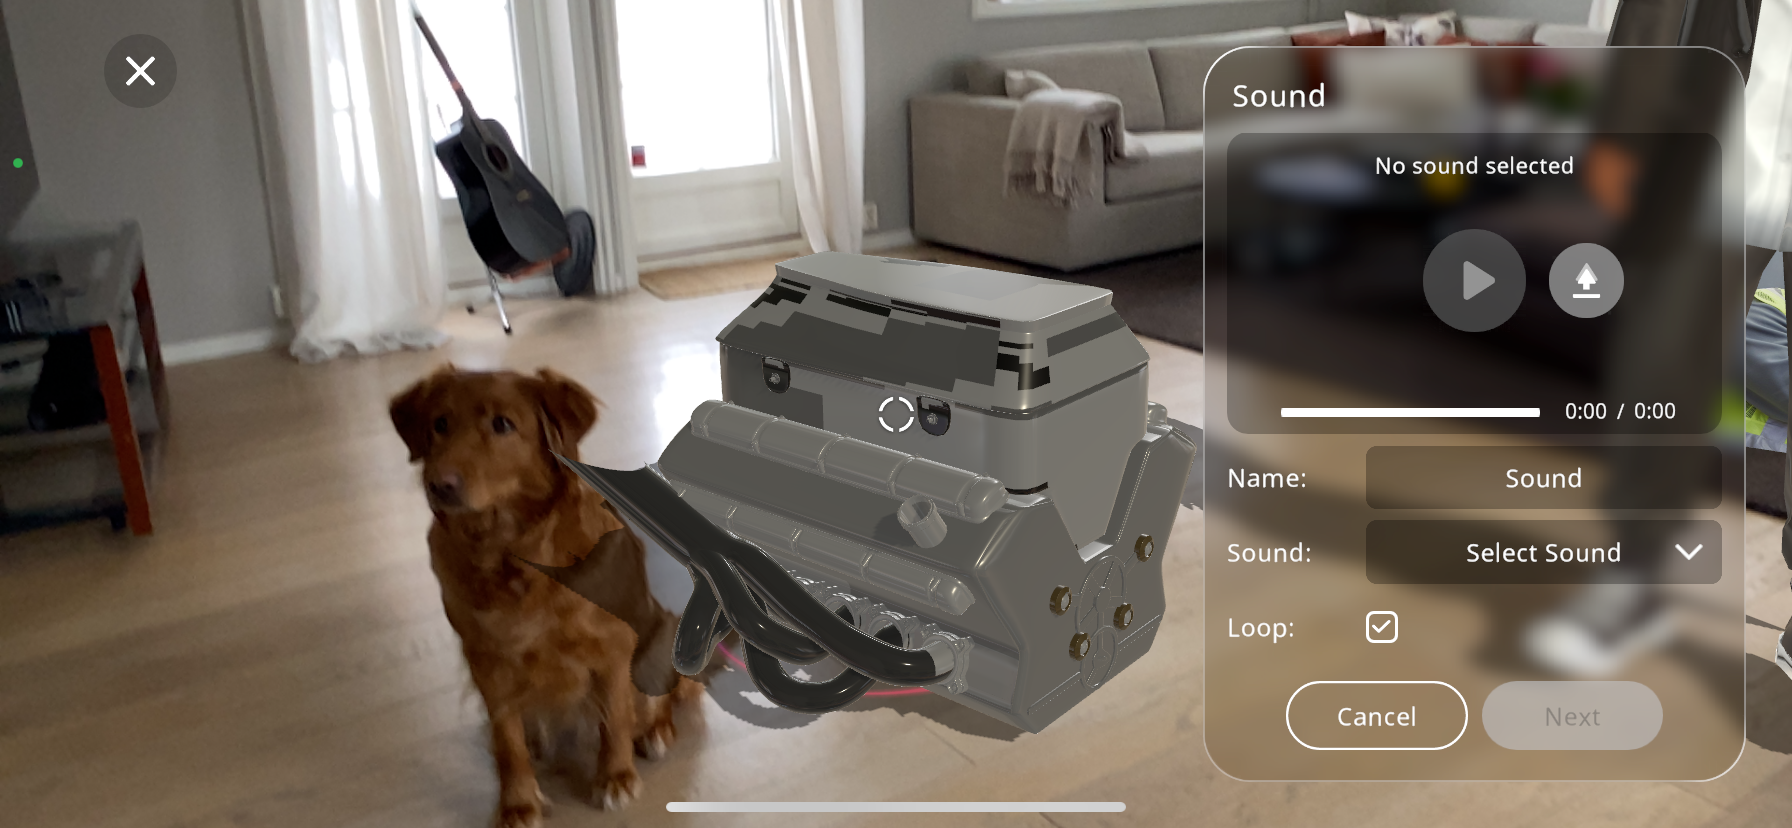
Tap on the
 button to upload a new audio file from your device. Choose the sound that best fits the interaction you are designing. You may also pick an existing sound effect from our library if you wish by pressing the drop down menu labeled “Select Sound”:
After selecting the sound, you have the option to preview it by pressing the play button. This ensures that the correct audio file is chosen and it functions as expected.
The “Loop” checkbox is available for you to make the sound repeat continuously. This is useful for background music or continuous sound effects.
Optionally, you can rename the action to something more descriptive, which can be beneficial for organizing multiple sounds within the same Xperience.
After you are satisfied with the name given to the action, you may click on “Next”, this will take you to the “triggers” tab. For the triggers guide click on Triggers
Adding Smoke Interaction
To add a sense of realism or indicate a malfunction within your Xperience, the “Smoke” action can be utilized to simulate a smoke effect and sound emanating from a particular part of the 3D model.
From the actions menu select the “Smoke” action.
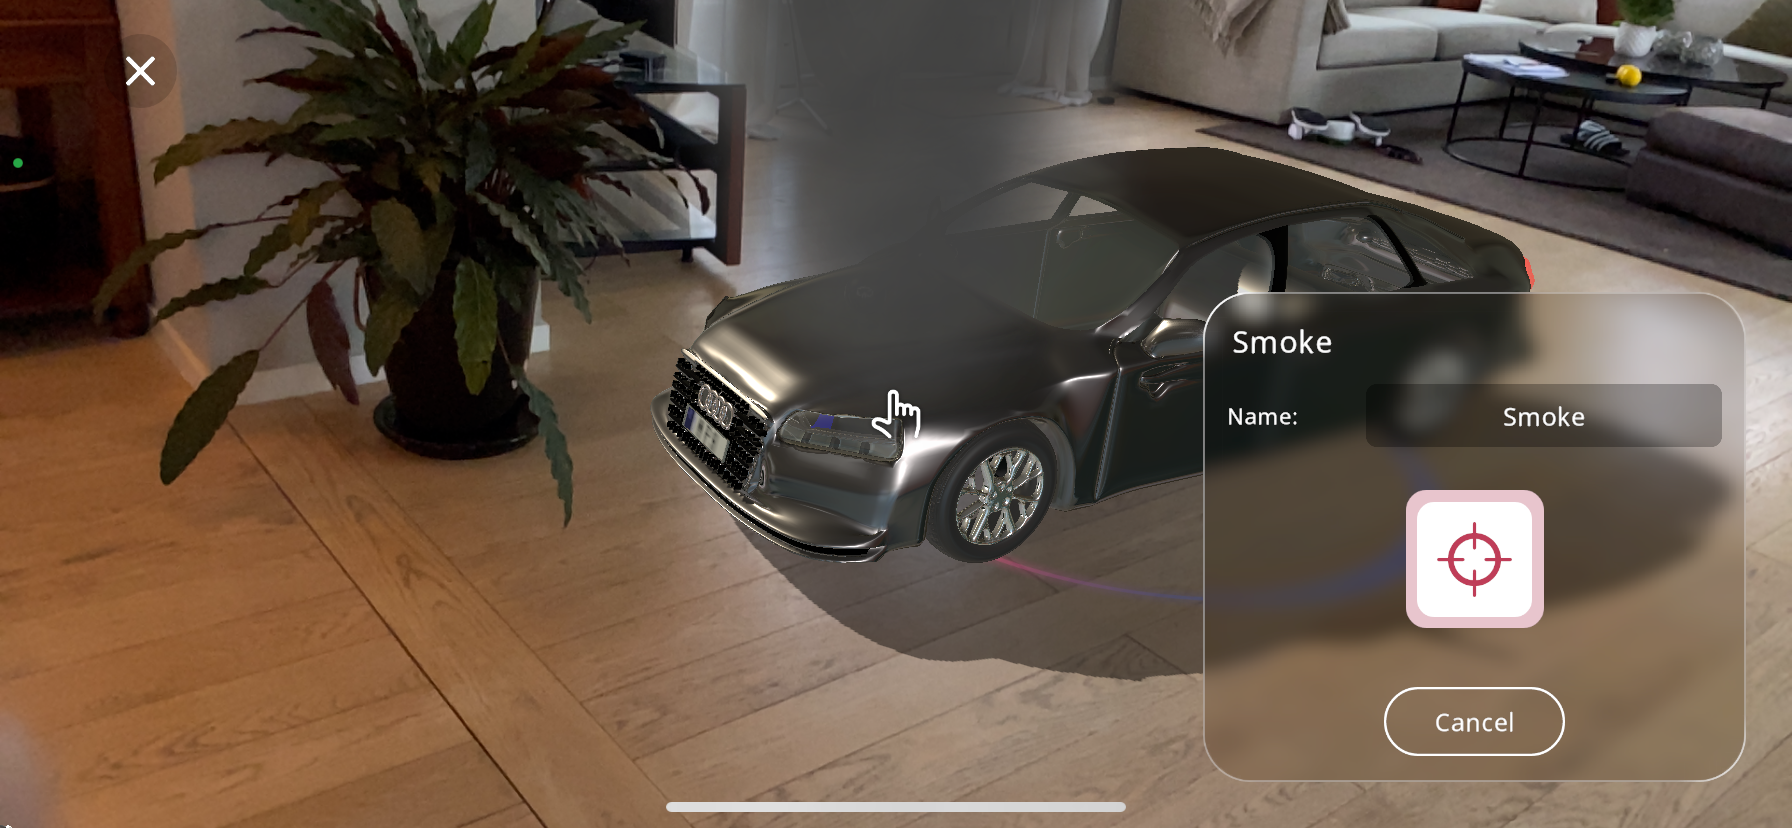
Position your device so that the crosshair aligns with the area of the object where you want the smoke to originate.
Use 2 fingers and pinch/enlarge the particle size, in this case the smoke area.
Tap the large red crosshair button, located at the bottom right part of the screen, to set the smoke action’s location on the object. If you need to adjust the positioning, simply tap the cancel button and reposition the crosshair accordingly.
In the “Name” field, enter a specific identifier for the smoke action. This is particularly helpful when your Xperience includes multiple effects and you need to differentiate between them.
After you are satisfied with the name given to the action, you may click on “Next”, this will take you to the “triggers” tab. For the triggers guide click on Triggers
Adding Explosion Interaction
To create a dramatic effect within your Xperience, the “Explosion” action can be added to simulate a powerful burst, appropriate for creating high-impact scenes or emphasizing interactions.
From the actions menu select the “Explosion” action.
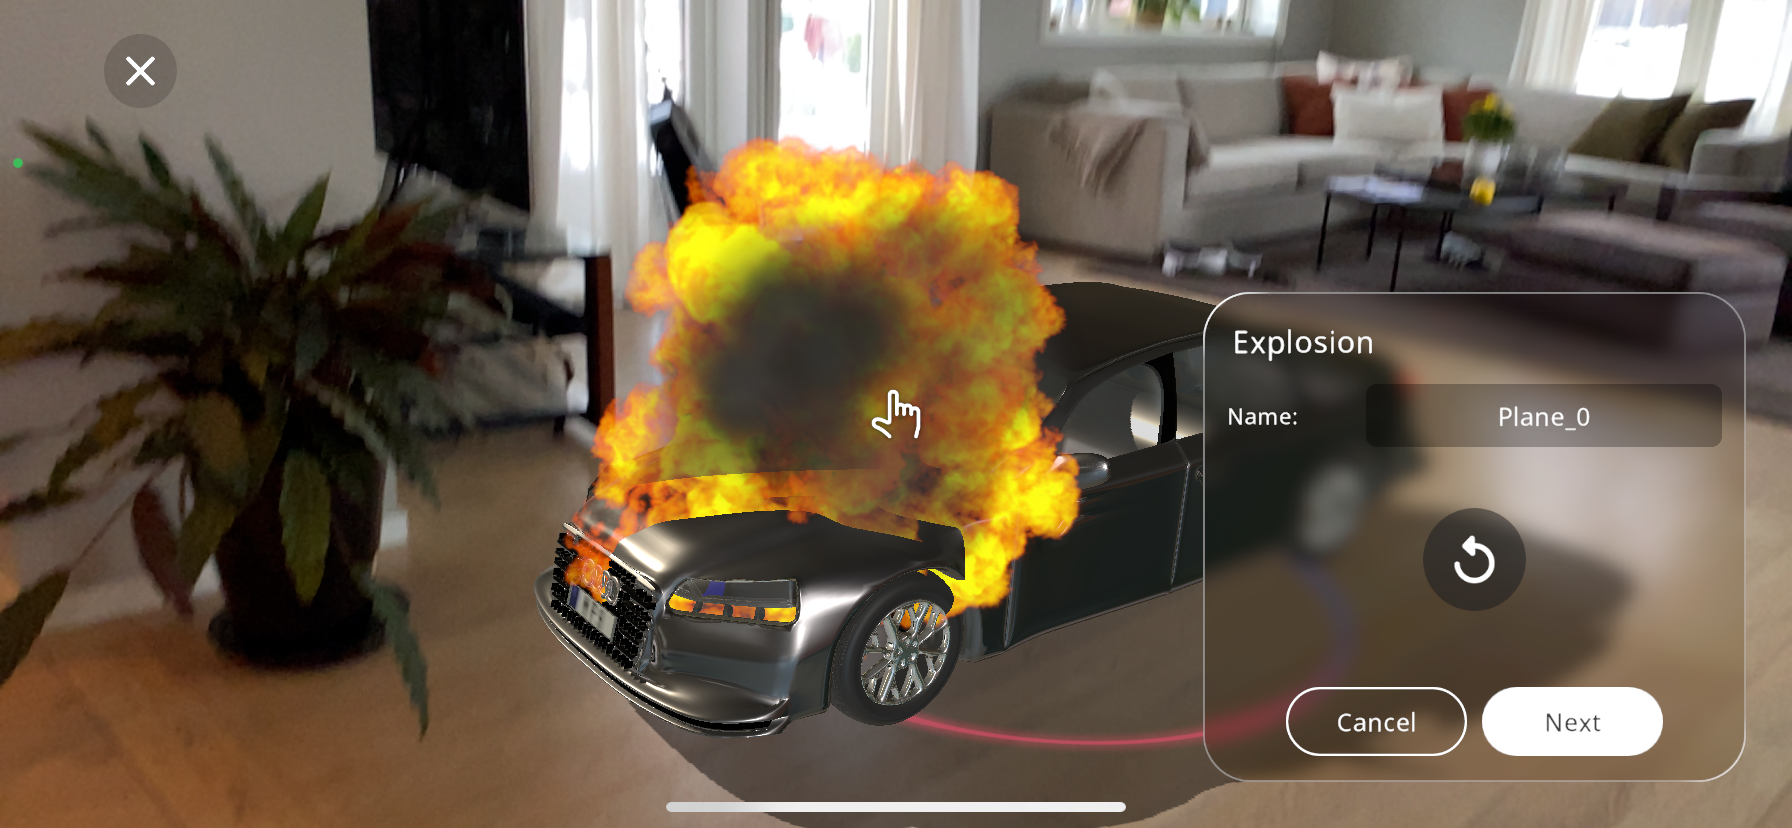
Move your device to a point where the crosshair is positioned where you would like the action to occur.
Use 2 fingers and pinch/enlarge the particle size, in this case the explosion area.
Press the large red crosshair near the bottom right part of the screen to lock in the action’s position on the object.
If the placement isn’t quite right, you can reposition the crosshair by pressing the cancel button and placing the action again.
The “Name” field allows you to assign a unique identifier to the action, which is especially useful for distinguishing between multiple effects within your Xperience.
After you are satisfied with the name given to the action, you may click on “Next”, this will take you to the “triggers” tab. For the triggers guide click on Triggers
Adding Animation Interaction
There are many 3D models available in the EON-XR library that have animations that can be activated on triggers. To check if a 3D object has an animation, look for the  symbol in the bottom right corner of the model when selecting it:
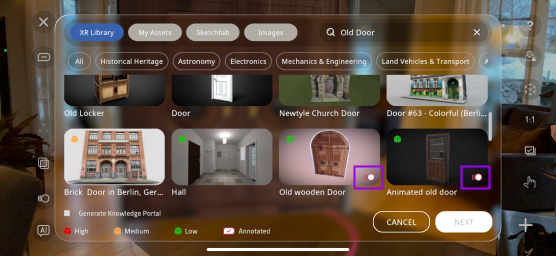
If you have already imported an object, and are unsure whether it has an animation, you can check the “Animation” button when creating an interaction. If the animation button looks darker than the rest of the actions, it means the selected object does not have an animation and you will not be able to press it:
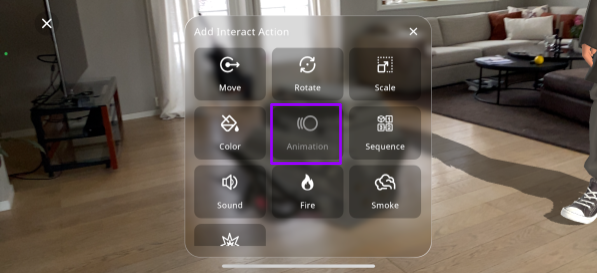
However, if the button is the same color as the rest, you are able to create an interaction with the object’s animation:

From the actions menu select the “Animation” action.

A list of pre-made animations applicable to your model will appear. Select the desired action that suits your needs. In this example, this “Old Door” model for example has the action, “DoorAction”, which opens the door.
The animation plays out once selected, if you are satisfied with the animation you may continue, if not, you can return and add a different 3D object with animation.
Give your animation a unique name for easy reference (Optional).
Check the “Loop” checkbox if you’d like animation to loop continuously.
After you are satisfied with the animation settings, you may click on “Next”, this will take you to the “triggers” tab:
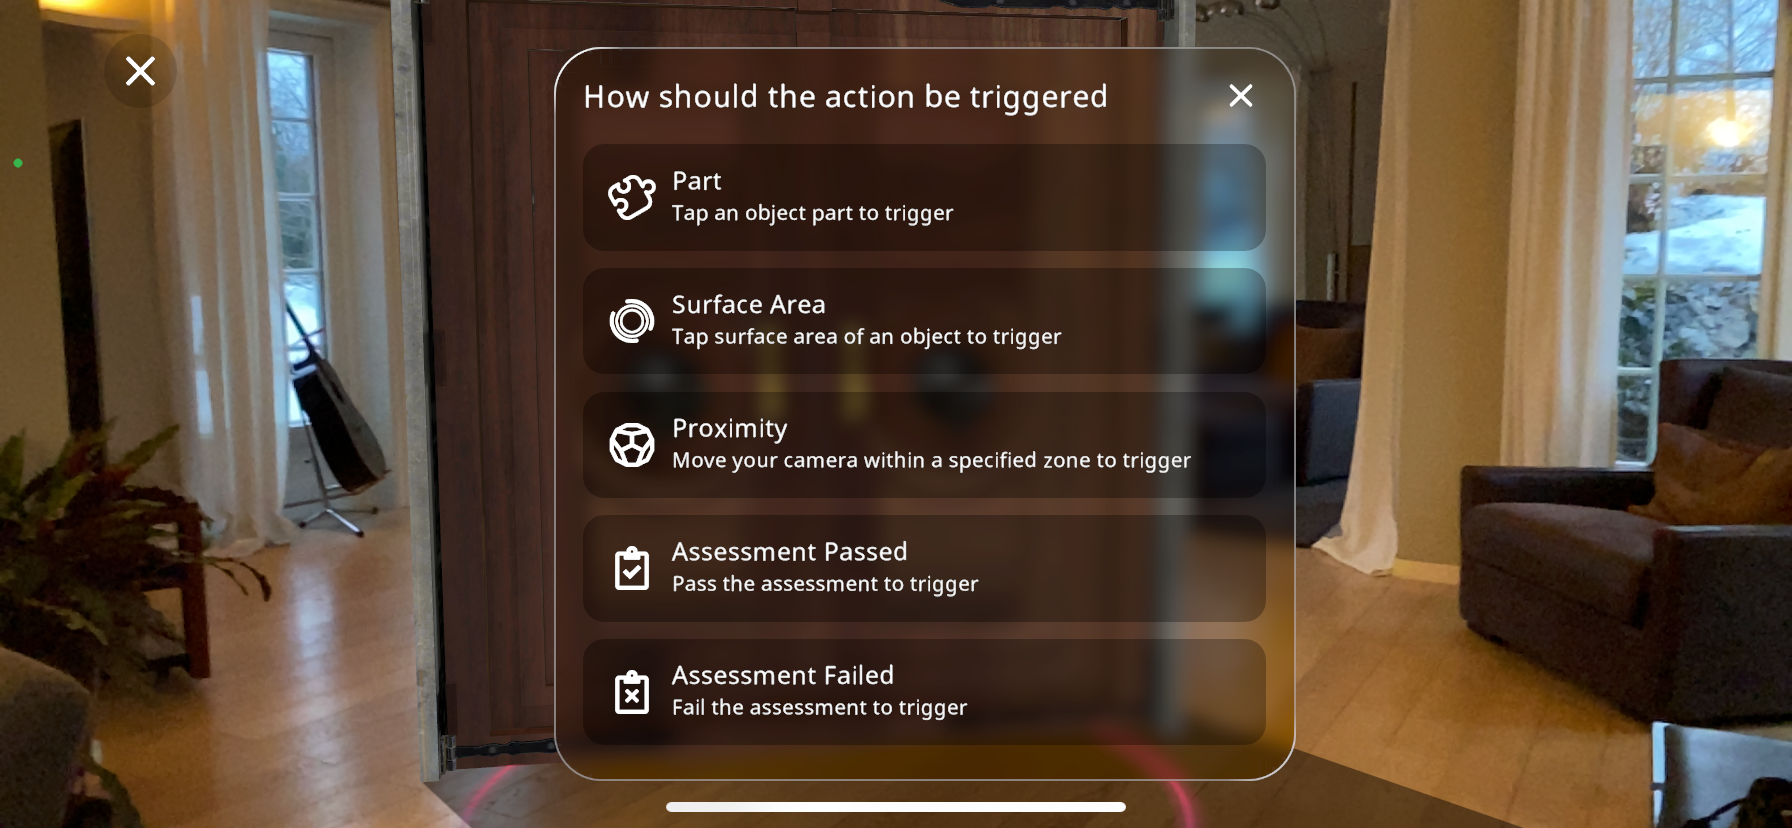
7. Select a trigger. For this example “Part” is chosen: 1147-doorpartselect.png
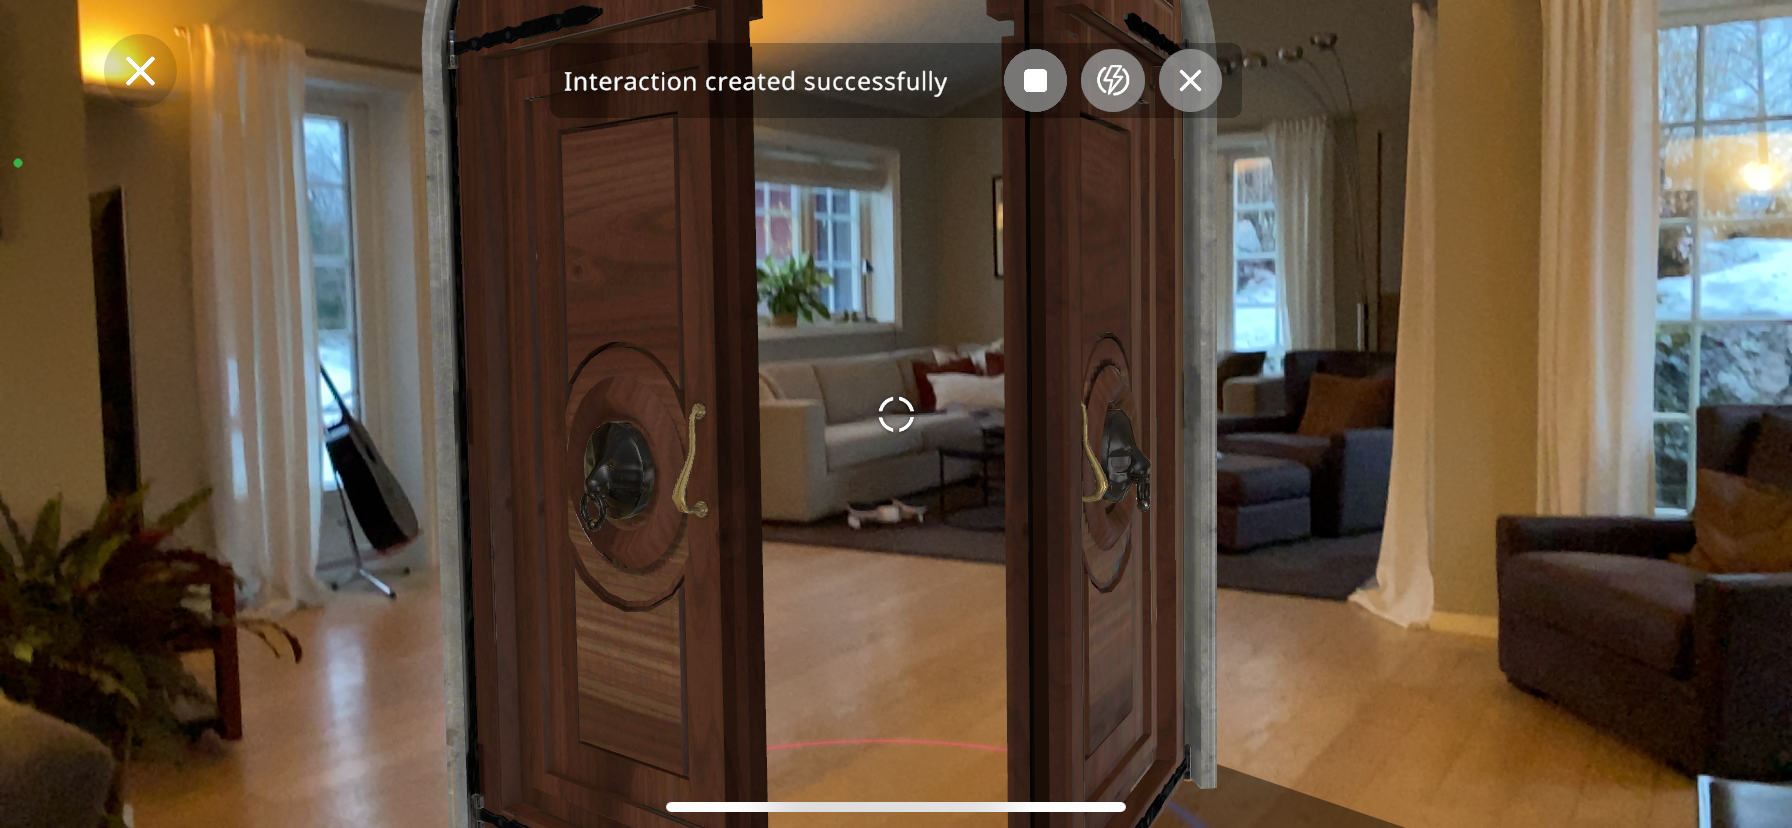
The animation is created successfully.
Press the  button to stop the animation.
Press the  button to go to the Interact Portal.
Press the  button to return to the “add content” screen.
Triggers
Once you have chosen the desired action you’d like to add to your Xperience, you must select a trigger. This is where you decide how the viewers of the Xperience will trigger the action when viewing the Xperience. The options are the following:
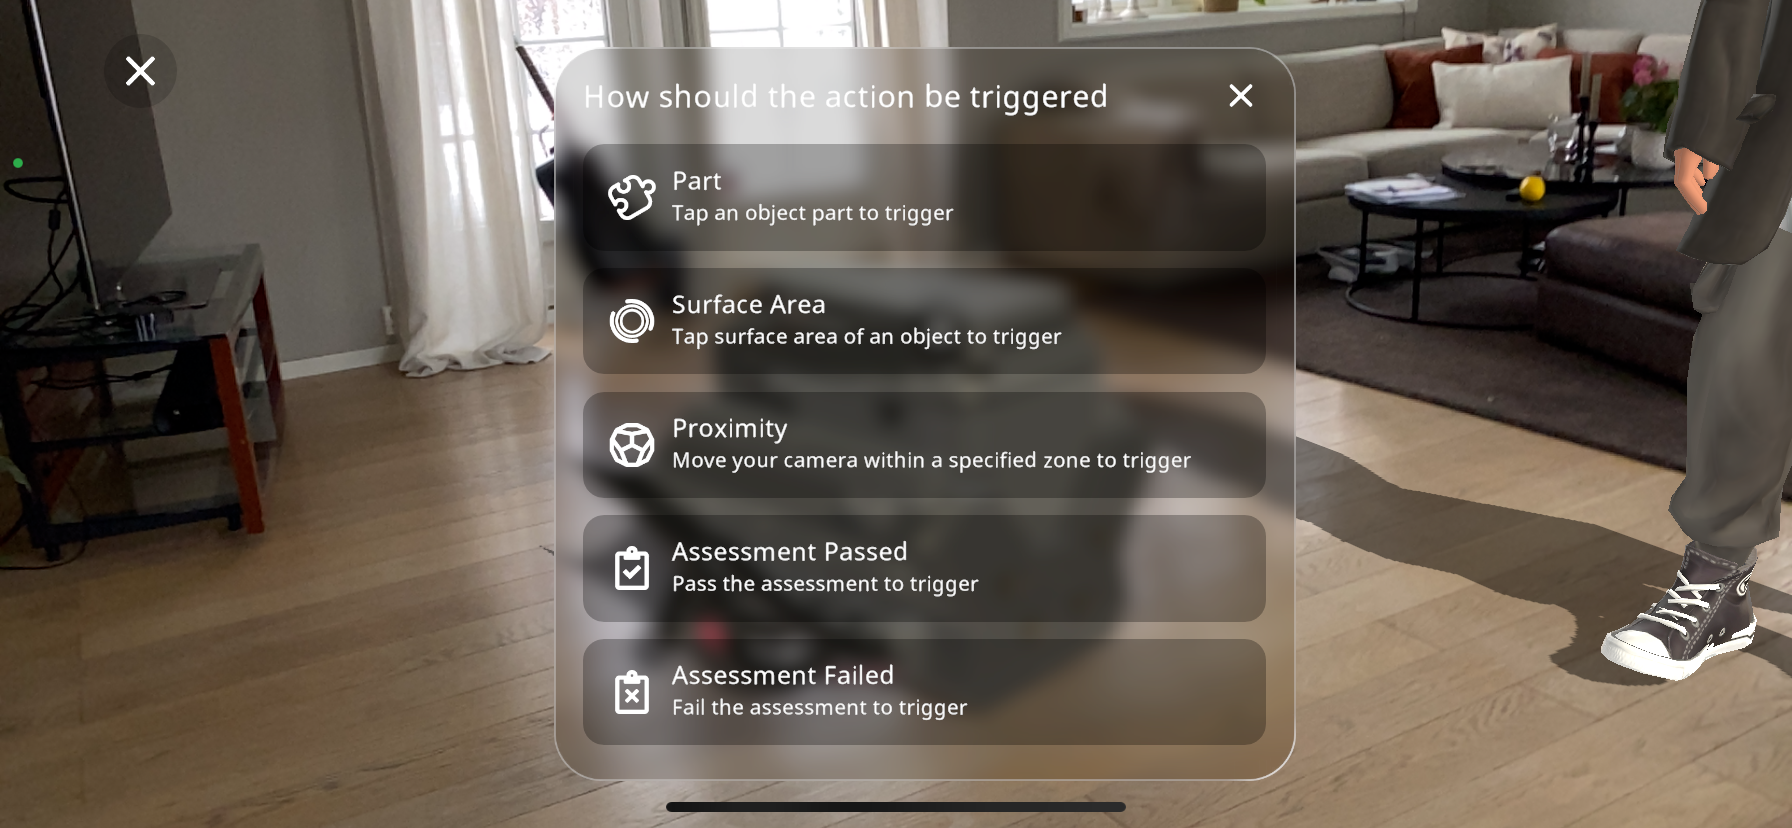
Part: The interaction is triggered when the viewer taps the object that the interaction has been added to.
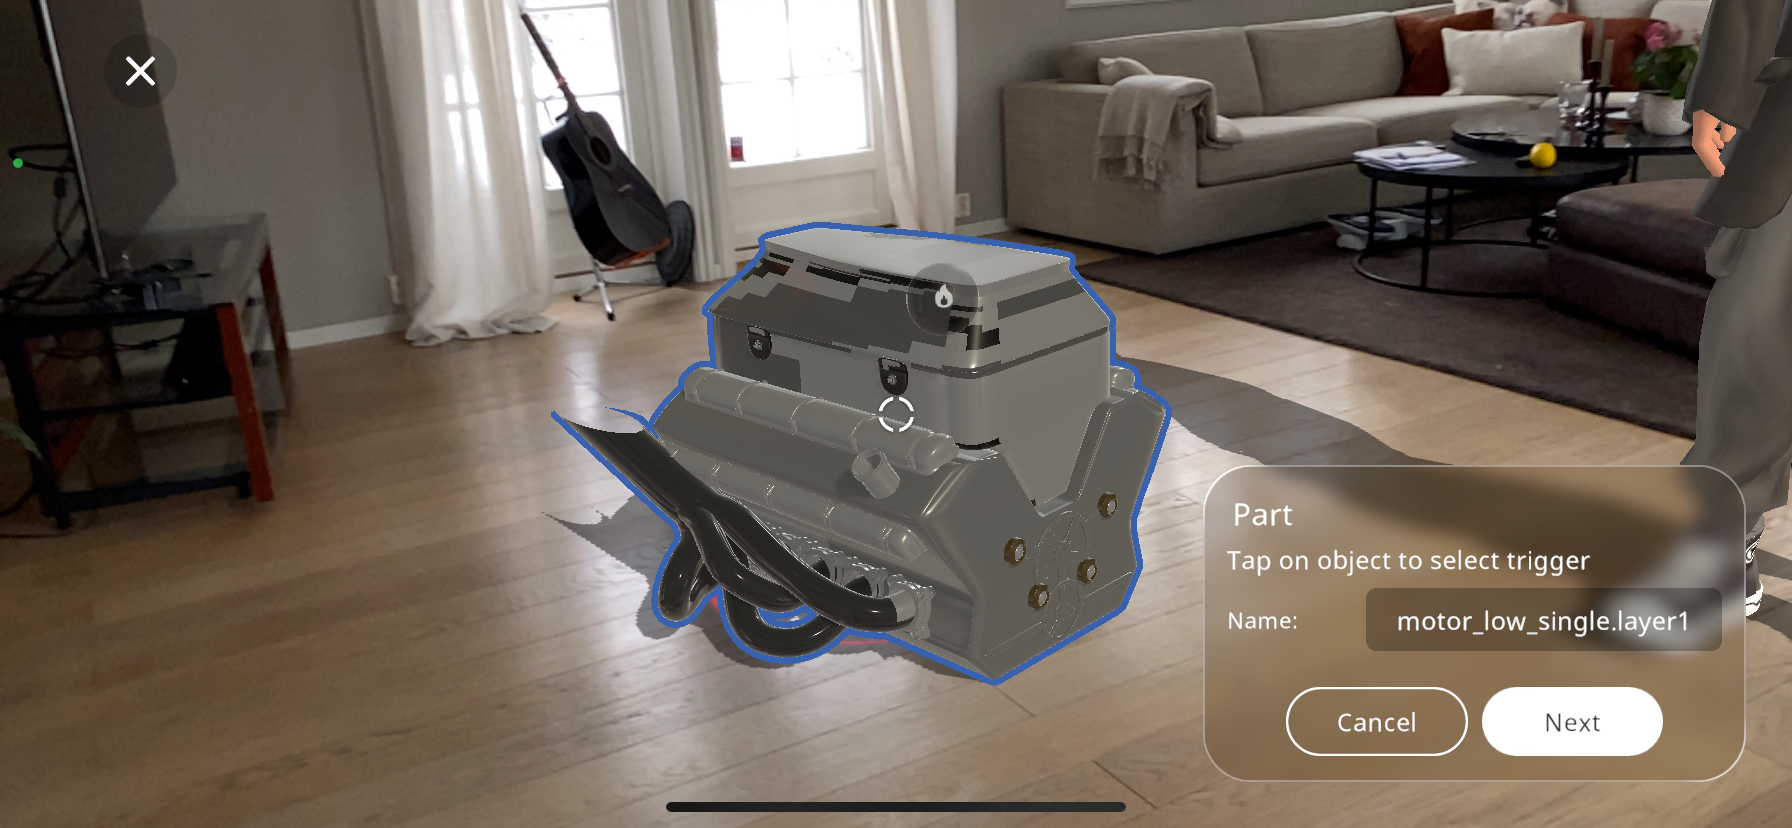
To set up this ”Part” trigger, you must tap the 3D object that you’d like to be the trigger until it is highlighted as can be seen above. Now, you can rename the trigger and press Next.
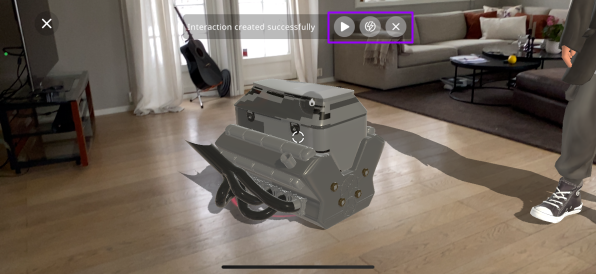
This will show a “Interaction created successfully” message in the upper part of the screen.
To view the recently created interaction, you can press the button in the purple box, demonstrating how the viewer will see it.
The button in the purple box will let you return to the editor Xperience screen, where you’ll be able to add more content.
The button opens the Interact Portal, where you can see the interactions you have created, and you can edit/delete/add new ones.
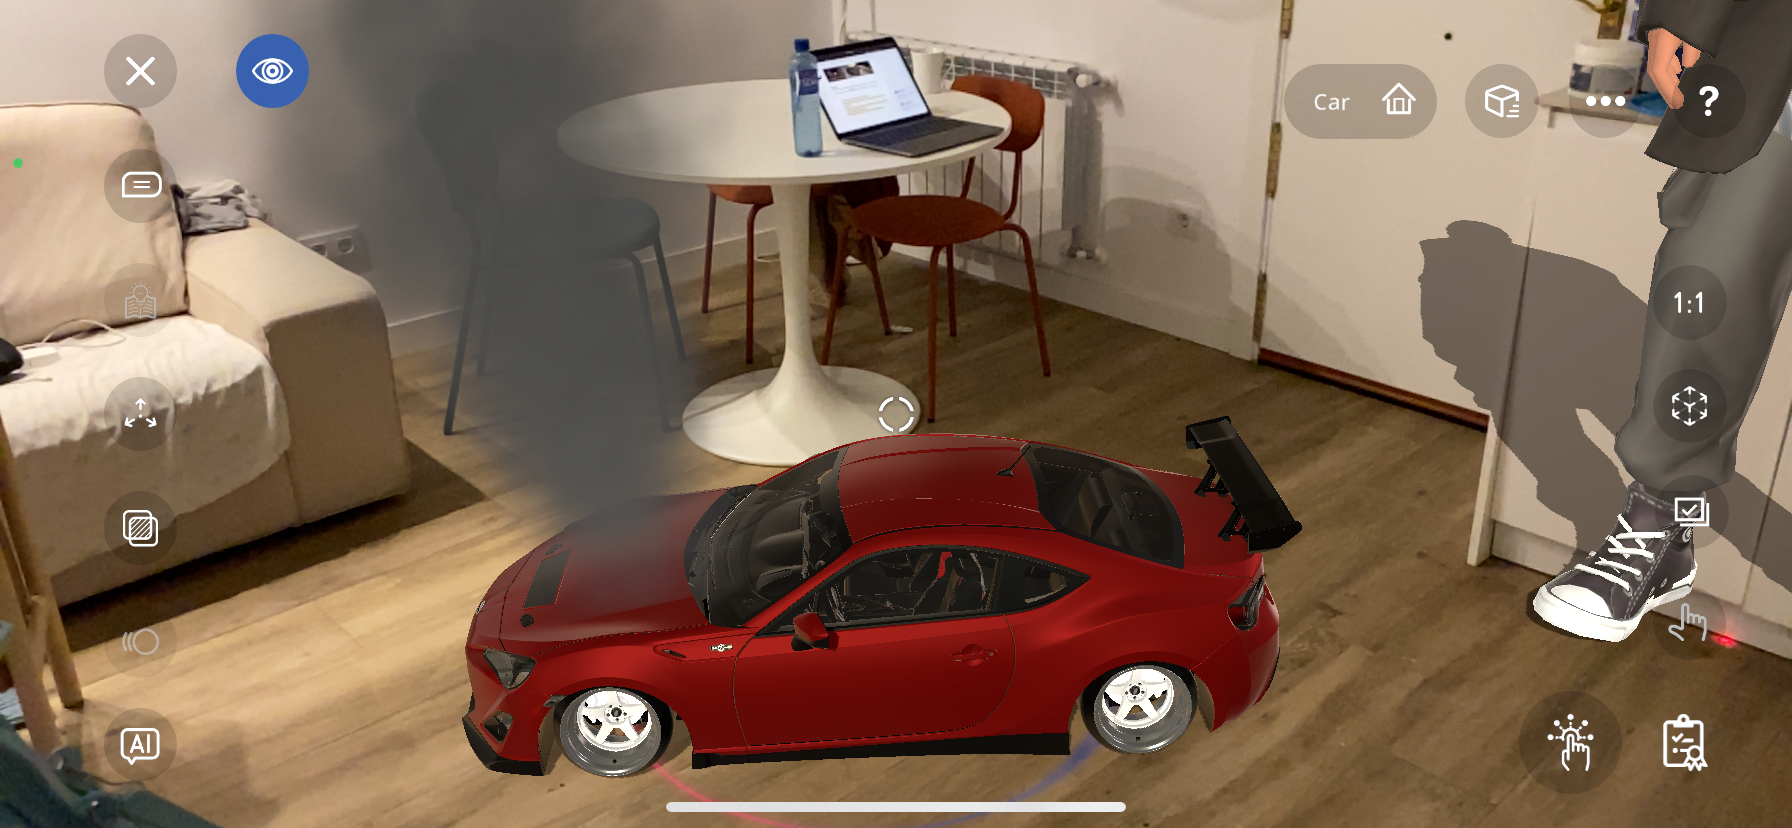
Surface Area: The interaction is triggered when the viewer taps the surface area of an object that the interaction has been added to.
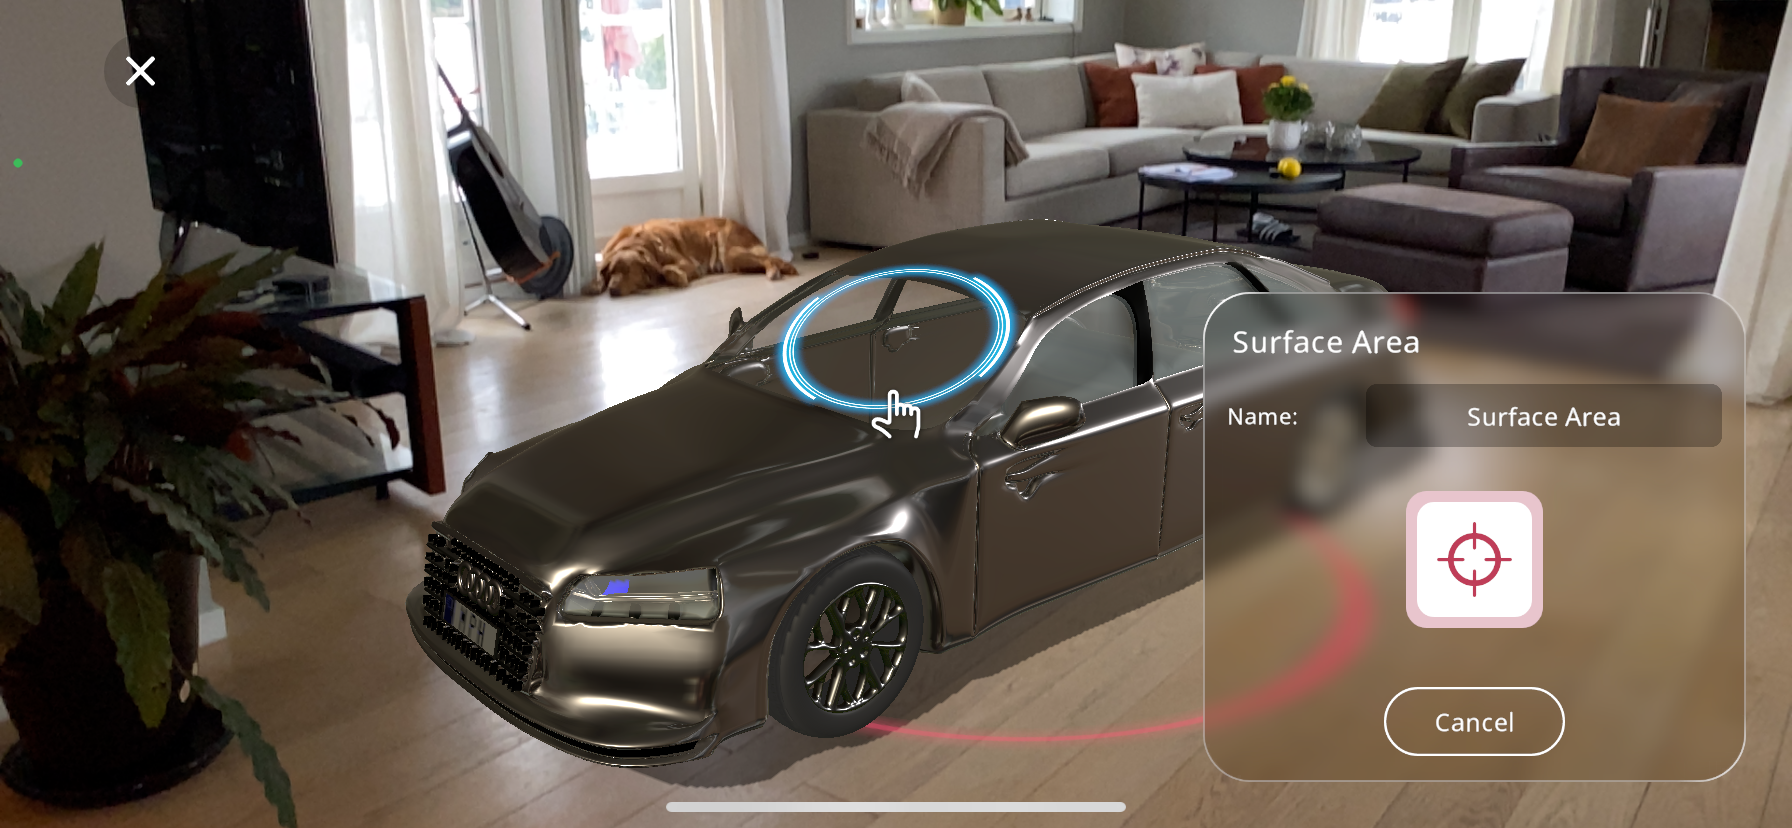
As can be seen above, this option allows the selection of a specific surface area to act as the trigger, so the viewer of the Xperience will have to press that specific surface, in this case the windshield of the car, for the action to trigger.
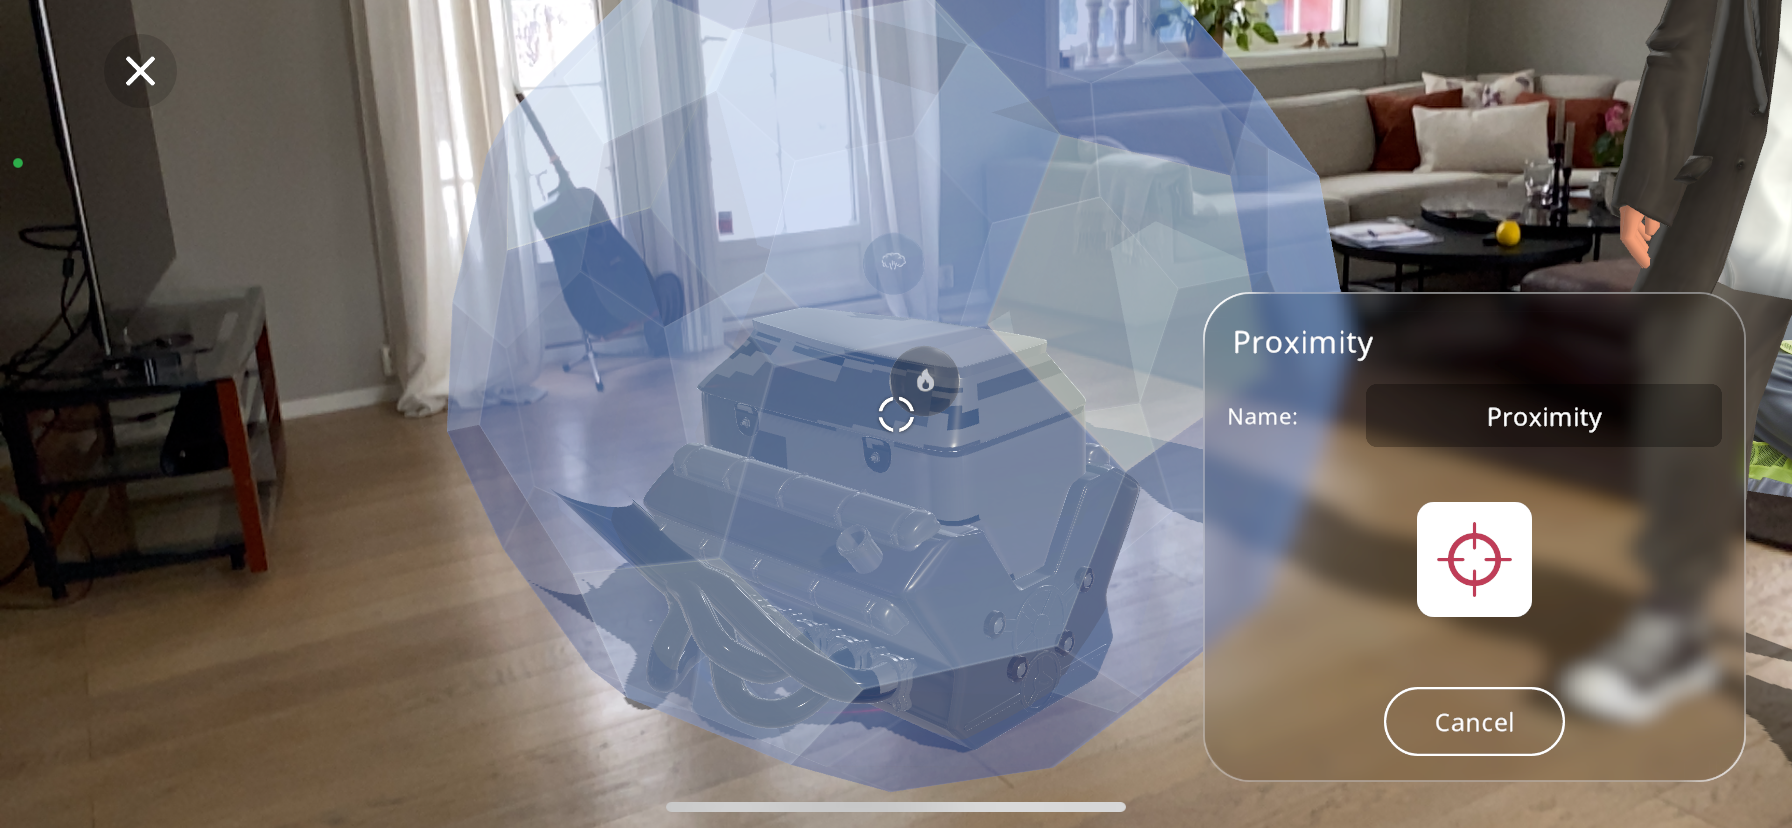
Proximity: The interaction is triggered when the viewer enters the specified blue zone in the Xperience with their device, edit the size of this activation area by using two fingers to pinch/enlarge the area.
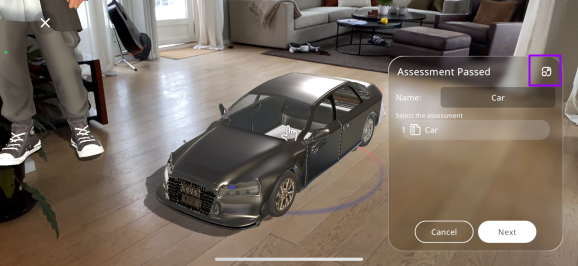
Assessment Passed: The interaction is triggered when the viewer passes an assessment. Simply select the assignment that should trigger the action and press “Next”.
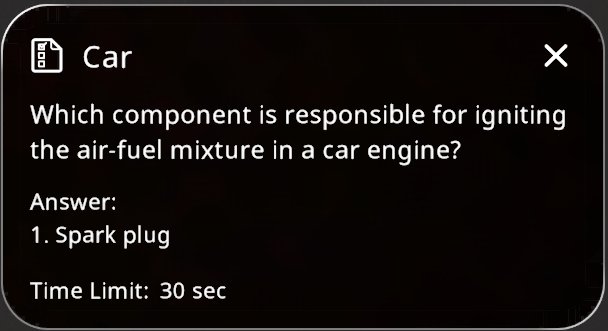
If there are multiple assessments available, are you are unsure of which you would like to select, you can press on an assessment name below the “Select the assessment” title, then press the  button. This will show the details of the assessment activity you have selected, including the questions, answers and the time limit of the assessment.
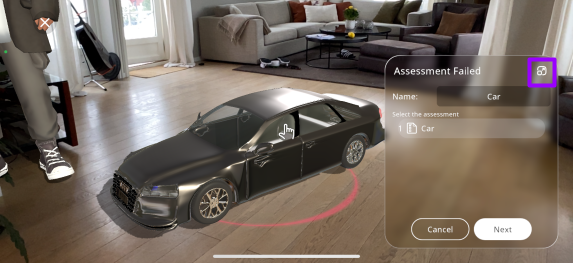
Assessment Failed: Alternatively, the interaction is triggered when the viewer fails an assessment. Simply select the assignment that should trigger the action and press “Next”.
If there are multiple assessments available, are you are unsure of which you would like to select, you can press on an assessment name below the “Select the assessment” title, then press the button. This will show the details of the assessment activity you have selected, including the questions, answers and the time limit of the assessment.
Creating a Sequence
The last option for actions to add to your Xperience is a sequence. A sequence is simply an order of successive actions that will play out when triggered. To be able to create a sequence you must have created 2 or more actions:
From the actions menu select the “Sequence” action.
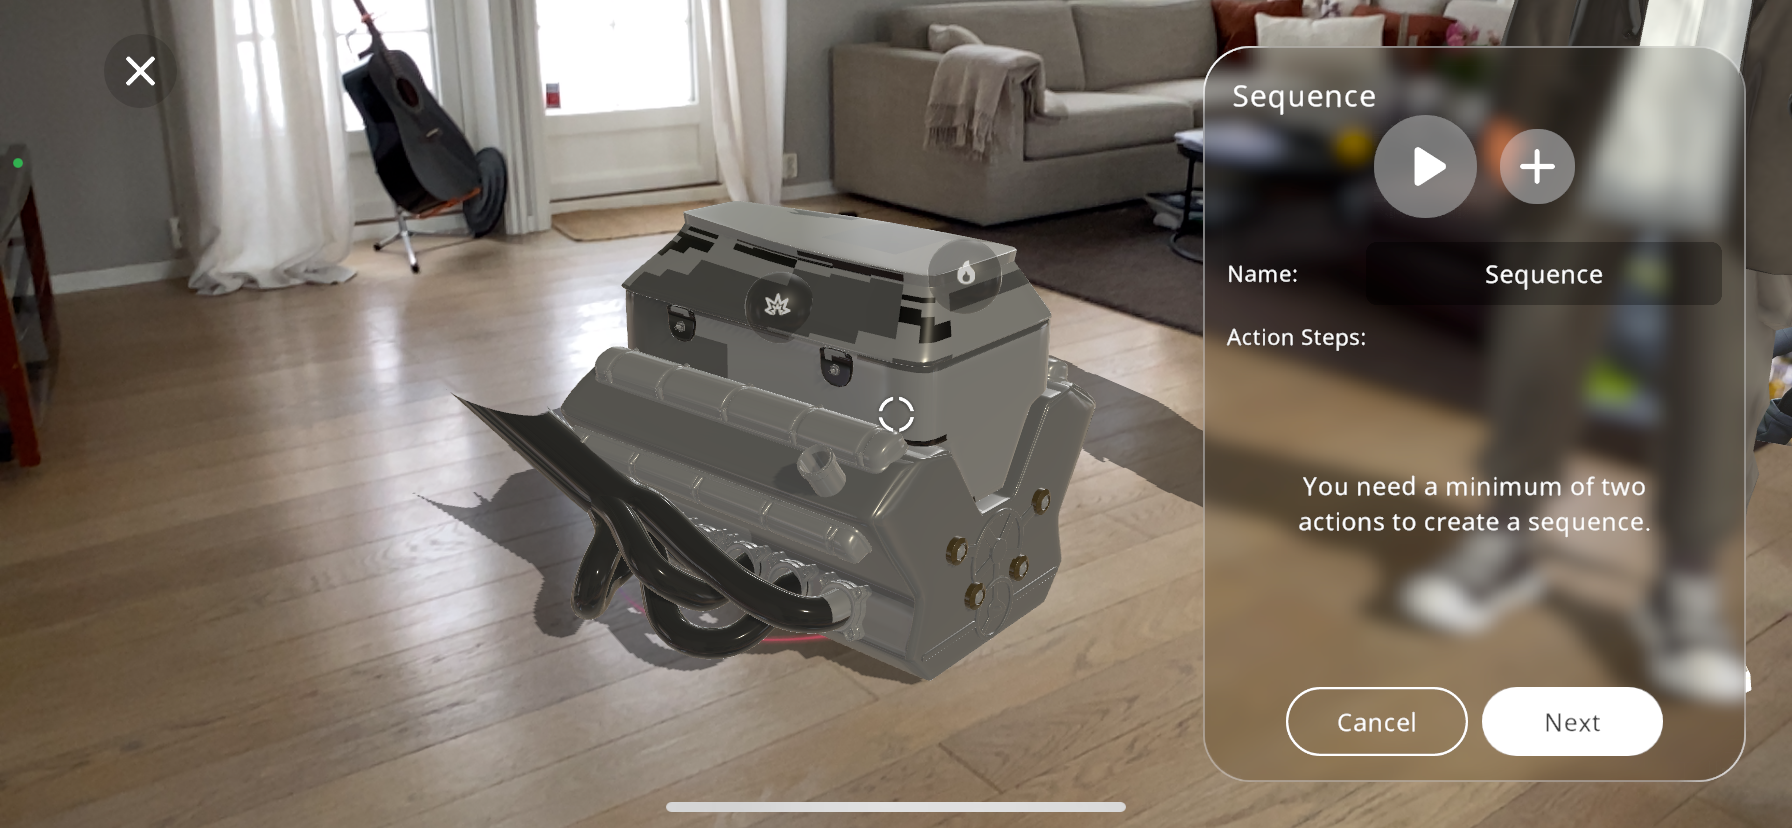
Begin by selecting the first action from your existing actions list that you wish to include in the sequence.
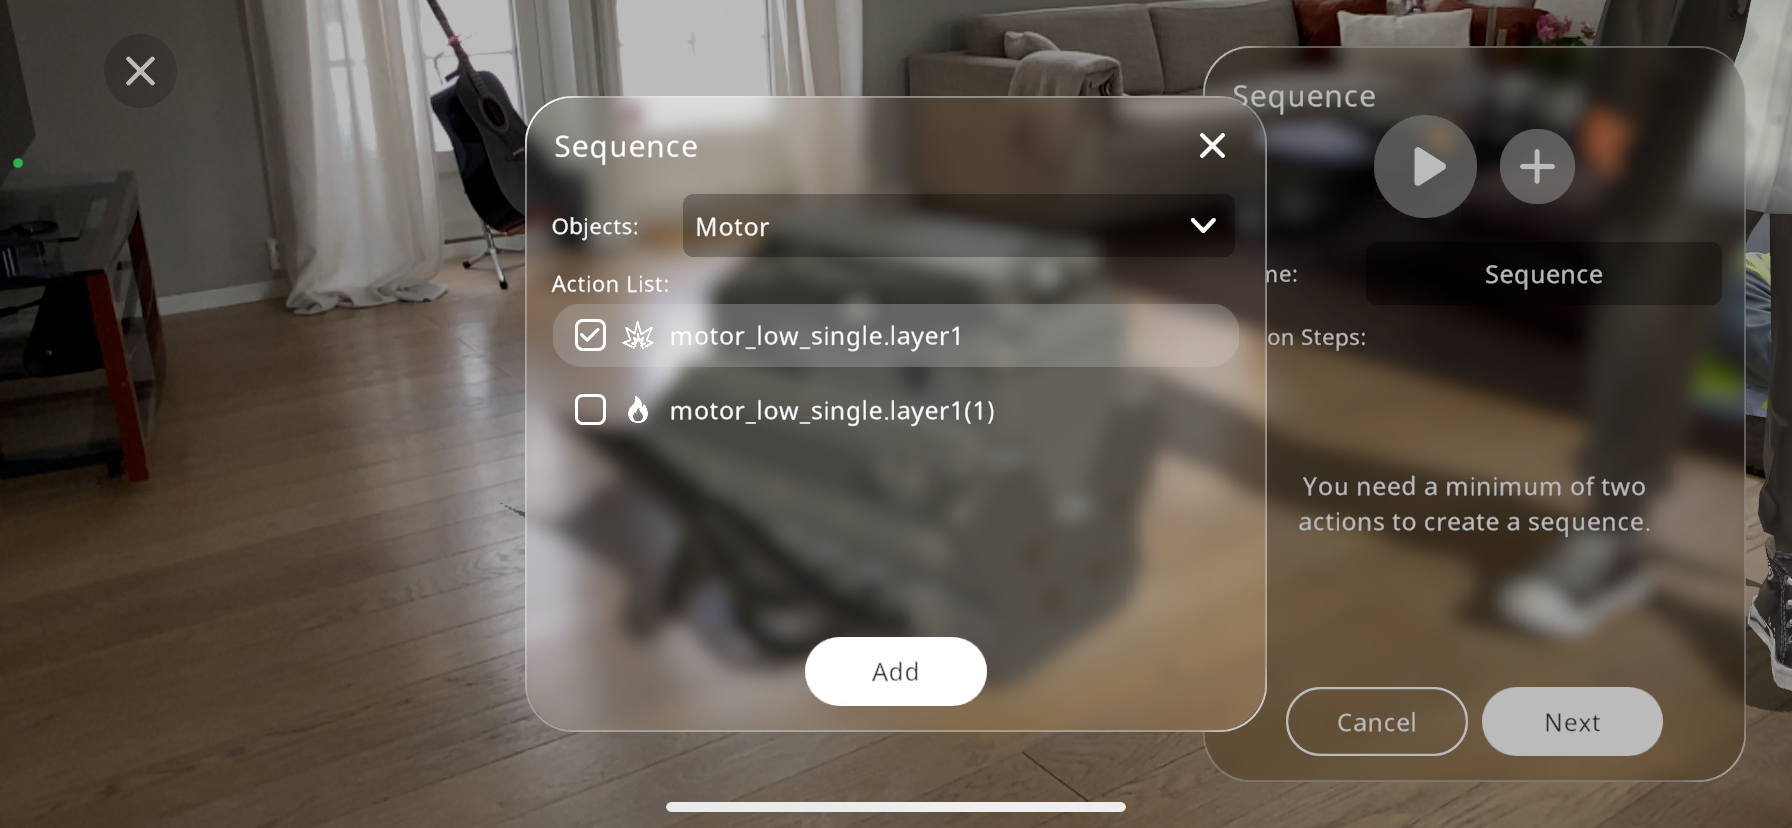
Add the action to your sequence by tapping the “Add” button. This will be the starting point of your sequence.
Continue adding subsequent actions in the order you wish them to occur. You can do this by selecting each action and then pressing the “Add” button.
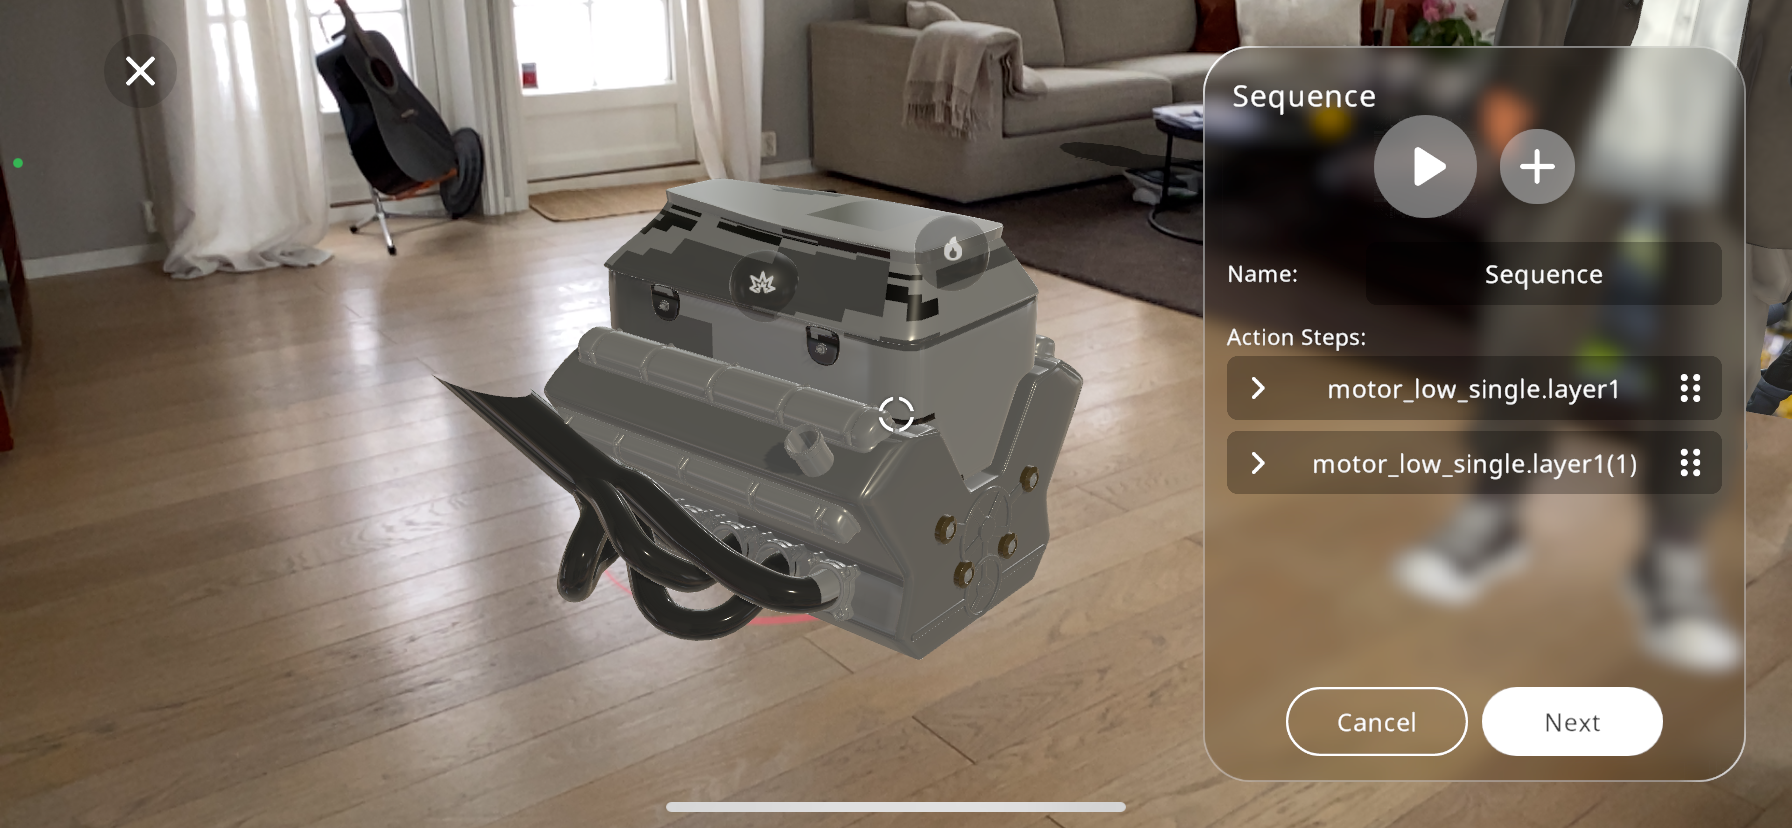
Each action can be reordered by using drag-and-drop functionality or by selecting and moving them up or down the list, ensuring they play out in the desired sequence.
In the “Name” field, give your sequence a distinctive identifier. This helps in managing multiple sequences or when you need to refer to this particular sequence for editing or triggering purposes.
After adding and ordering all the desired actions, you can preview the sequence by pressing the play button. This allows you to observe the sequence in action and make any necessary adjustments.
Once you are satisfied with the sequence and its configuration, press “Next”. This will save your sequence and allow you to define triggers to select the condition under which the sequence should activate.
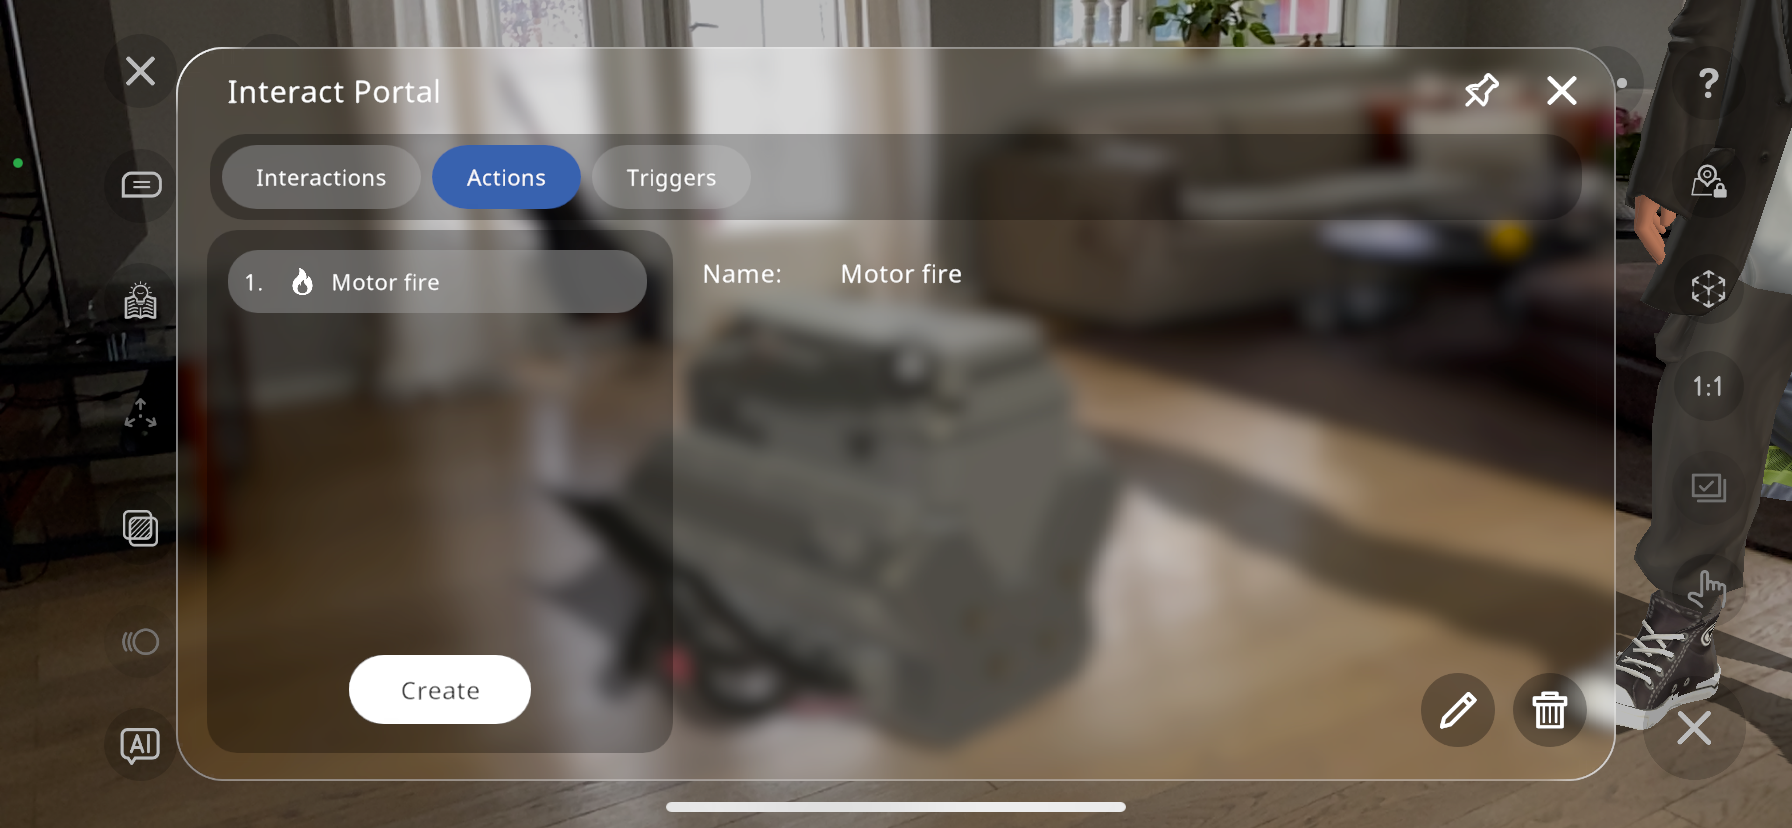
Interact Portal
In the interact portal you can see all of the interactions, actions and triggers that you have created, in order to edit them, reuse them, delete them or add new ones.
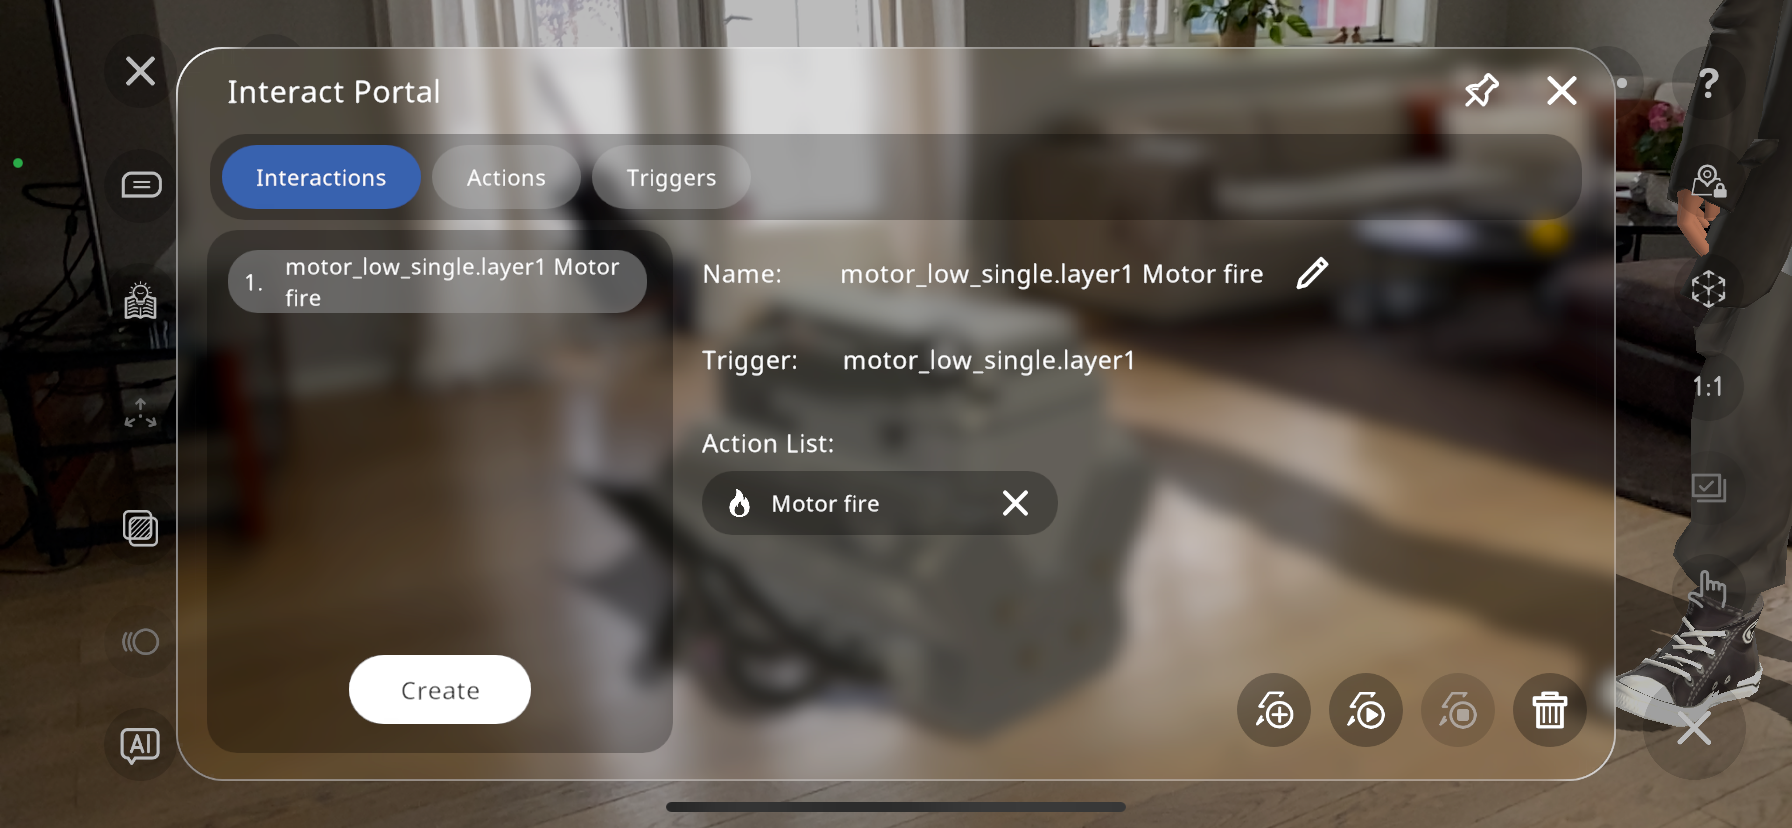
The enumerated section on the left side of the portal shows the created interactions. As can be seen, only one interaction has been created so far.
You can edit or delete these as shown in the bottom right corner of the interact portal.By pressing the  next to the interaction name, this interaction can be renamed.
The  button will play the interaction you have currently selected, in order to view it again or know if there is something you’d like to edit.
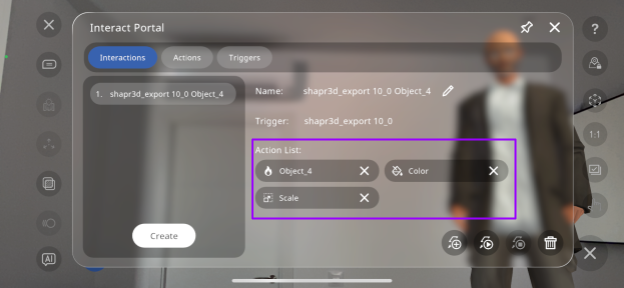
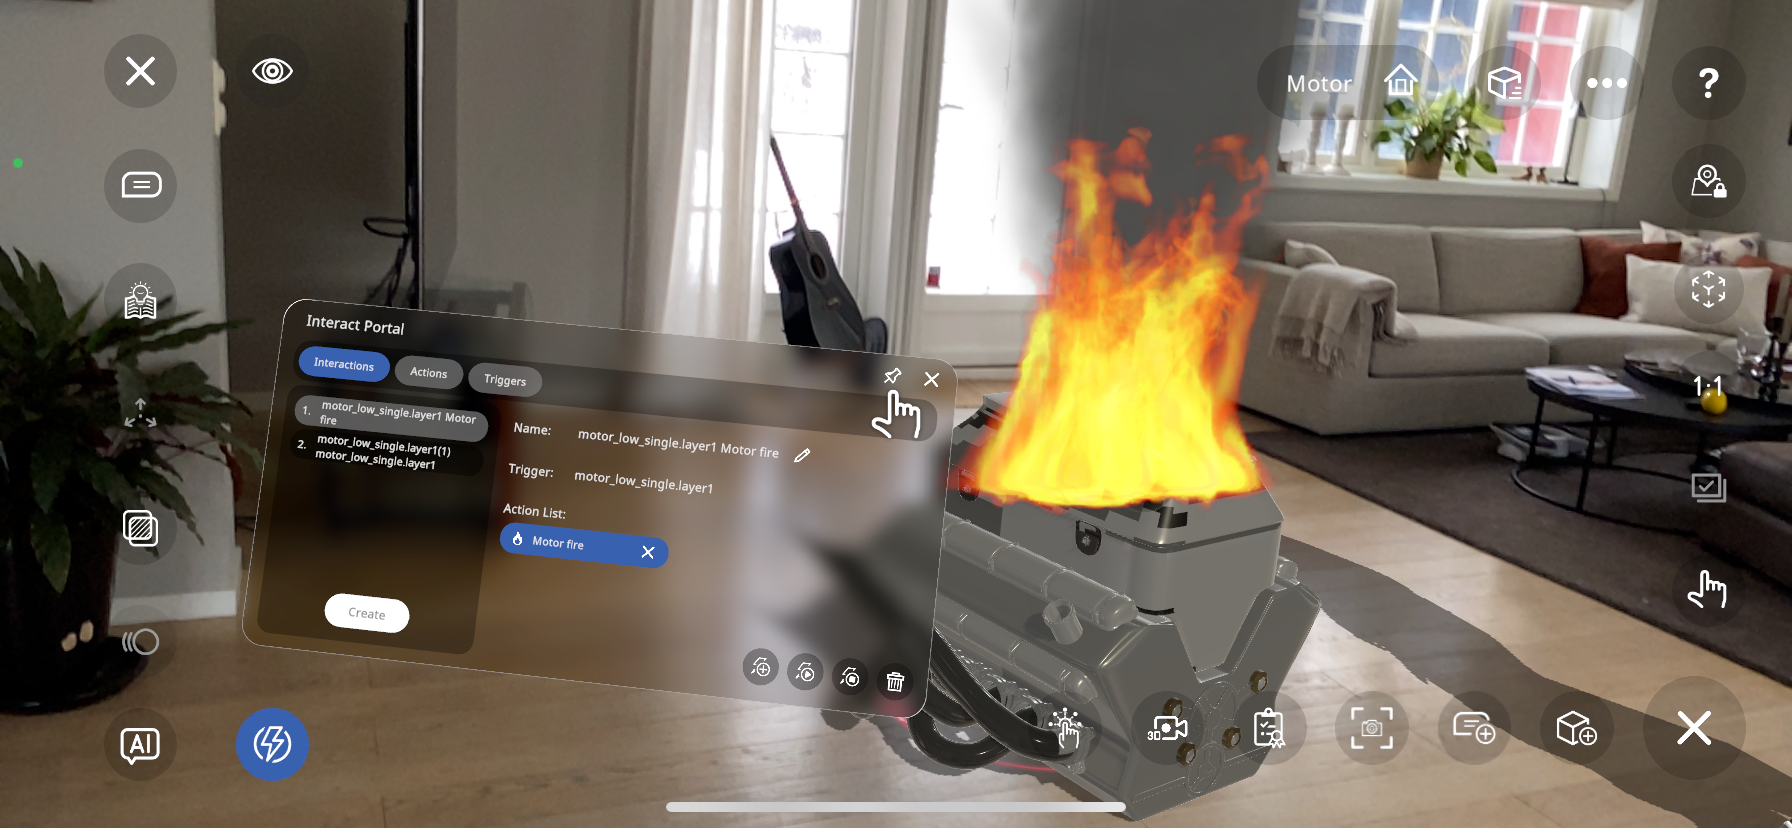
By pressing the  button near the bottom right, you can add a new ACTION to the selected interaction, without the need to create a new trigger, but instead using the same one as is already part of the interaction.
For example, if a fire action has been created with a “part” trigger, and I press the button, then add a color and scale action, the action list (in this case fire, color and scale) will play simultaneously when the “part” is triggered:
button near the bottom right, you can add a new ACTION to the selected interaction, without the need to create a new trigger, but instead using the same one as is already part of the interaction.
For example, if a fire action has been created with a “part” trigger, and I press the button, then add a color and scale action, the action list (in this case fire, color and scale) will play simultaneously when the “part” is triggered:
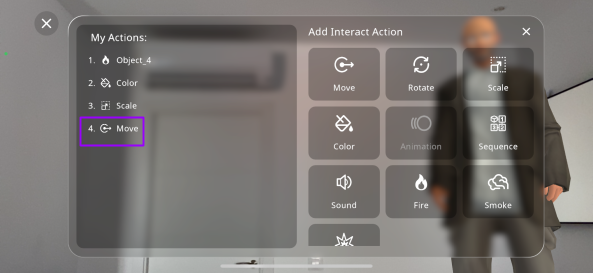
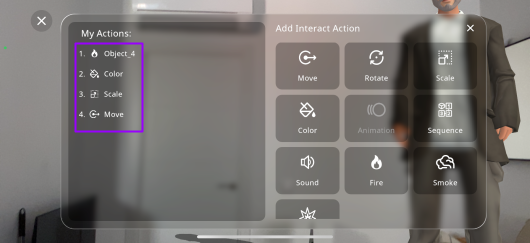
The next tab shows the actions created, these are those mentioned earlier (explosion, move, rotate, fire etc.). By pressing the “Create” button, you can create a new action. This action can then be linked with a trigger in the “Interactions” tab. This is useful if you’d like to add an action to a previously created trigger:
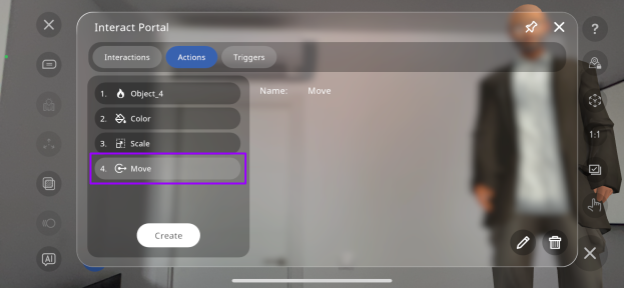
Here, the Move action has been created through the actions tab without a trigger.
By returning to the “Interactions” tab, and pressing Create:

You are able to select the recently created “Move” action:
And link it to the previously existing trigger:
You can then rename the interaction, and this will link the newly created action with the previously created trigger.
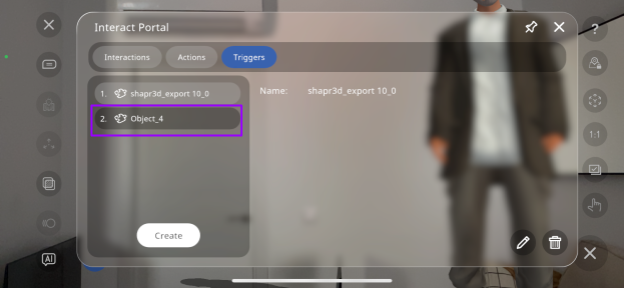
The last tab in the Interact Portal is the “Trigger” tab, with the created triggers, which you can edit or delete as well:

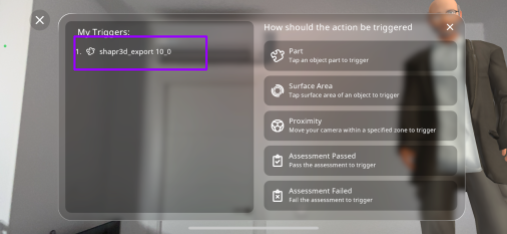
Similarly to the create Actions button, you can create a trigger by itself, then through the Interactions tab link this to an already existing action.
As can be seen below, a new trigger “Object_4” has been created through the triggers tab without creating an action:
You can now add an existing action to this trigger by returning to the “Interactions” tab, and pressing Create:
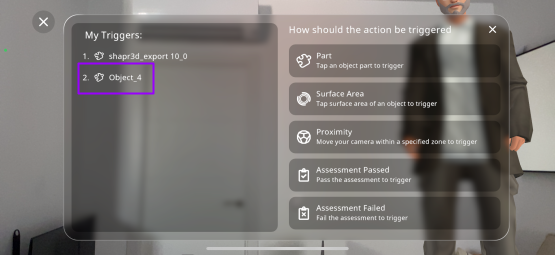
This will allow you to select a previously created action to link to the trigger:
Select the trigger you have created:
You can then rename the interaction, and this will link the newly created trigger with the previously created action.
The final button in the interact portal is the  button. This makes the interact portal resizable and movable around your Xperience, to make it more comfortable to edit and test each of the interactions while seeing them occur:
Interaction Play Mode
Once you have created all your interactions, and want to see what the result will look like for the user, you may press the  button in the top left corner to enter play mode.
When in play mode, if there are no interactions in the current Xperience, the button will appear darker, and you will not be able to click it to visualize any interactions:
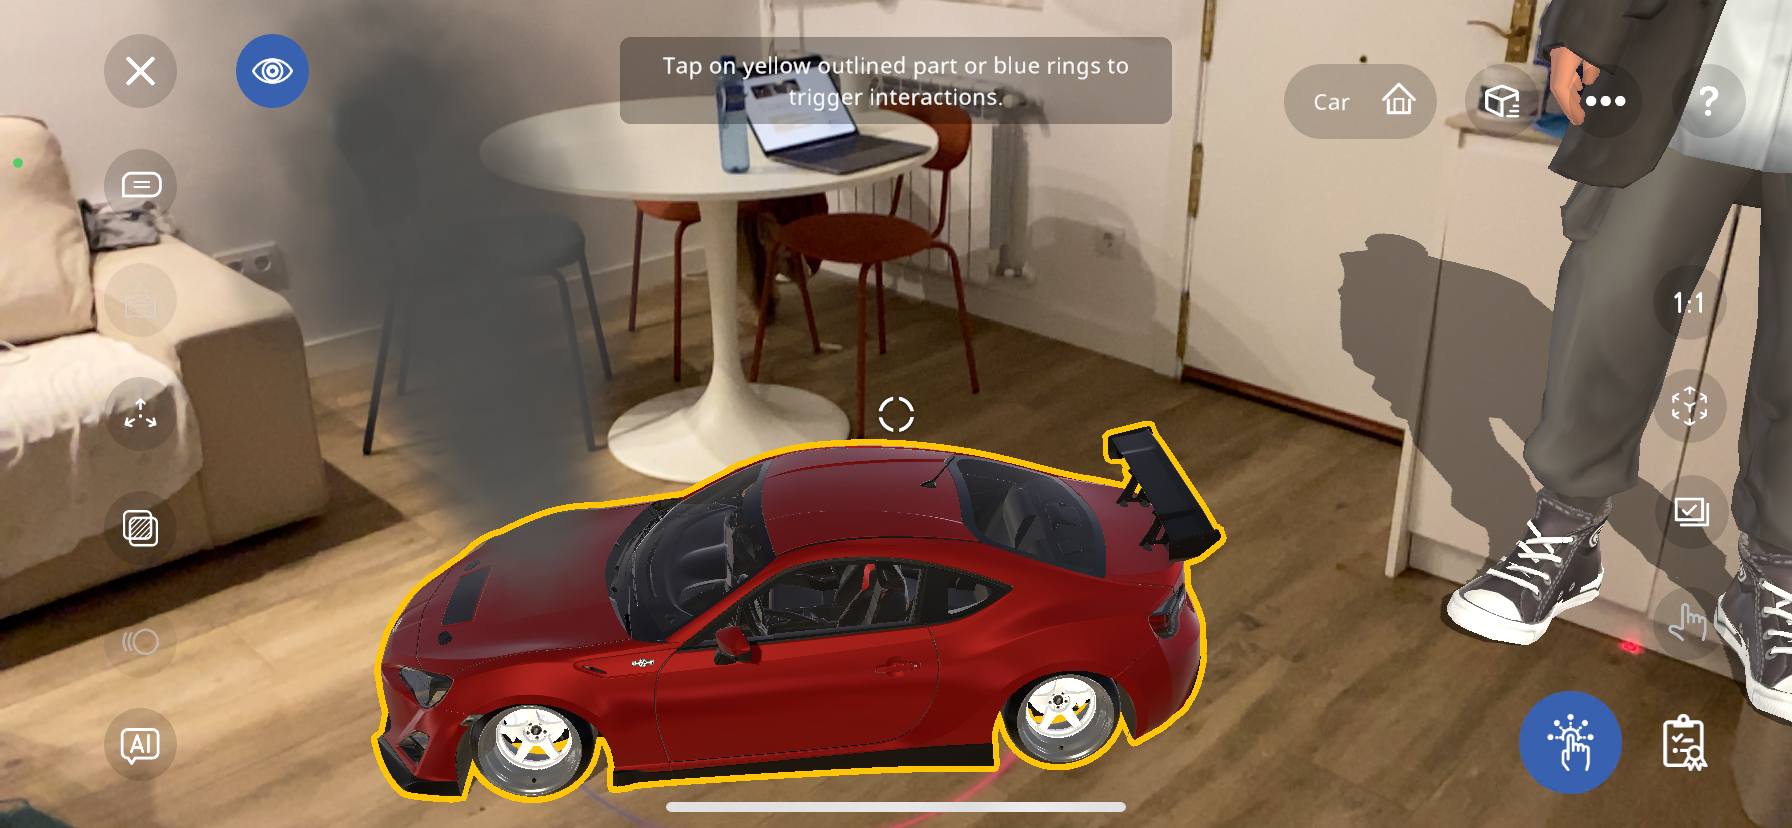
However, if the Xperience does have part/surface triggered interactions, there are two ways of visualizing them:
Pressing the interact button:
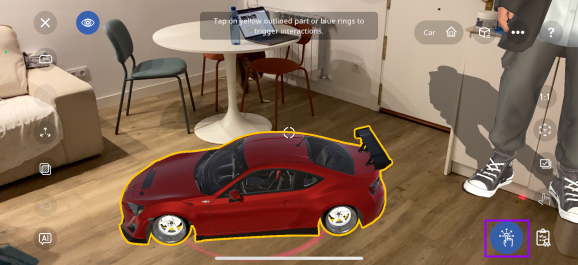
By pressing the highlighted button in the bottom right corner (shown in purple box above), the part of the object with surface or part triggers will highlight yellow as shown above, and pressing this object will activate the action linked with it, as can be seen by the smoke action:
Pressing an empty surface:
You can also press any empty surface (area where no objects are located) to see where these trigger parts/surfaces are:
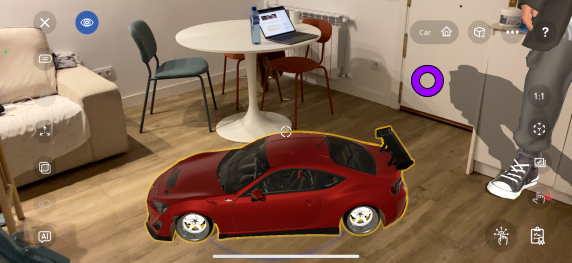
For example, by tapping where the purple circle is shown above, the car highlights yellow, since it has a part trigger attached to it, and again, it is linked to a smoke action when pressed: